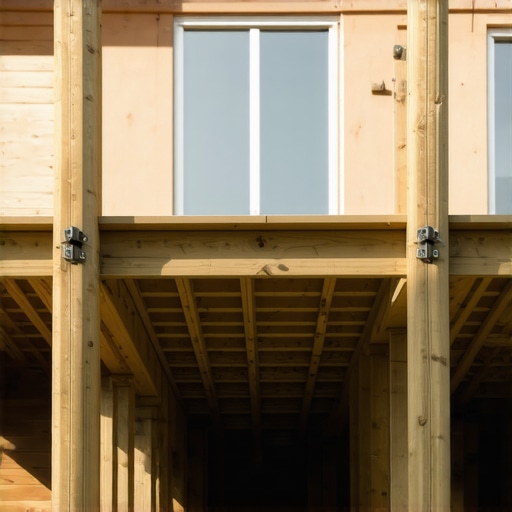
I remember the exact moment I lost faith in the humble 4×4 post. I was standing on a second-story deck I’d finished just a few months prior, holding a lukewarm cup of coffee and enjoying the Ozark breeze. Then, the homeowner’s Great Dane decided to lunge at a squirrel. The entire structure didn’t just vibrate; it did a slow, rhythmic salsa. I could feel the movement in my ankles. Even though that deck was built to the letter of the local code at the time, it felt like I was standing on a giant bowl of Jell-O. That visceral feeling of instability changed how I look at structural integrity forever. It’s one thing to build something that meets the minimum legal requirement, and it’s another to build something that feels like a fortress. If you’ve ever hosted a BBQ and felt the deck ‘walk’ when guests shifted their weight, you know exactly what I mean. Have you ever noticed your deck shimmying during a summer storm or when the kids are running around?
Why 4x4s just do not cut it for the high-rise view
The transition from using standard 4×4 lumber to beefier 6×6 posts wasn’t just about aesthetics; it was about the physics of tall structures. When you’re building high off the ground, lateral movement becomes your biggest enemy. A 4×4 post has a surprisingly small cross-section when you consider the amount of weight and leverage a tall deck exerts on it. Over time, those smaller posts are prone to twisting and checking, which only worsens the ‘spook factor’ of a bouncy deck. I spent years trying to fix a bouncy deck without adding new posts by using extra bracing, but I eventually realized I was just treating the symptoms rather than the cause. The actual stability starts from the ground up, and that means choosing a post that can handle the load without flinching. According to the American Wood Council’s DCA 6 standards, 6×6 posts are significantly more resistant to the buckling and lateral forces that plague taller outdoor living spaces. Making the switch was a lightbulb moment for me—one that saved me from countless late-night worries about structural sway.
Is your deck swaying more than it should?
Skepticism is natural, especially when 4x4s are cheaper and easier to find at the local lumber yard. You might wonder if the extra cost of 6x6s is just ‘over-building.’ But I’ve learned that the peace of mind you get from a rock-solid foundation is worth every penny. Early in my career, I made the mistake of thinking more hardware could compensate for thin wood. I’d double up on lag bolts and tension ties, but the physics remained the same. If the post itself is too thin for its height, no amount of metal will stop it from flexing. Now, I focus on the drainage move that saves your deck footings from sinking and pairing that with substantial 6×6 timber. This combination ensures the deck stays level and silent for decades. Today, we’re going to dive into why the ‘bigger is better’ rule applies to deck posts and how you can ensure your next project feels as solid as the ground it’s built on.
The structural shift that changed my building philosophy
Once I saw the difference in stability, there was no going back. Moving away from 4x4s forced me to rethink my entire approach to deck framing. It’s not just about the post; it’s about how that post integrates with the beam and the house itself. I found that the secret to a rock-solid deck to house connection often relies on the posts doing their job so the ledger doesn’t have to carry the entire lateral load. When I look at my older projects, the ones that still look brand new are the ones where I stopped cutting corners on timber dimensions. I even find myself using fewer post bases and more cantilevers these days because I trust the strength of the 6×6 supports to handle larger spans. In the following sections, I’ll walk you through the math, the visual differences, and the simple installation tweaks that make this upgrade a no-brainer for any homeowner or DIYer.
When you transition to 6×6 posts, you aren’t just buying bigger lumber; you’re changing how the entire skeleton of the deck handles stress. The most common mistake I see DIYers and even some pros make is treating a 6×6 exactly like a 4×4 by just plopping the beam on top with a metal bracket. While those brackets are code-compliant, they don’t offer nearly the same lateral resistance as a traditional notch. Think of a 4×4 like a soda straw—it’s easy to bend. A 6×6 is more like a solid rolling pin. To get the most out of that mass, you need to create a physical ‘shoulder’ for your beam to rest on.
Stop the wobble with a proper post notch
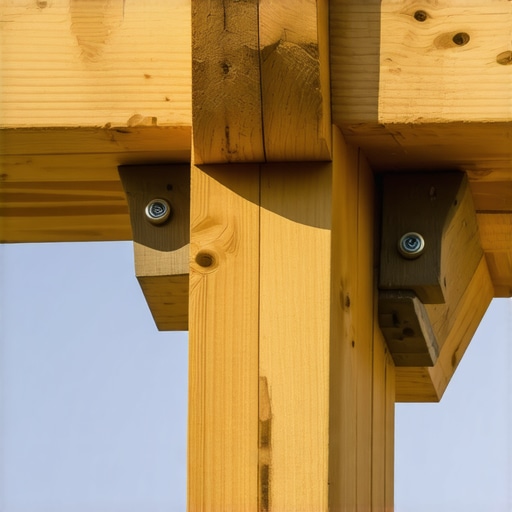
I always notch my 6×6 posts so that the beam sits directly on 2.5 inches of solid wood. This creates a mechanical connection where the weight of the deck is transferred vertically through the grain of the post, rather than relying solely on the shear strength of a few bolts. I remember a project in Branson West where the backyard dropped off so sharply that the deck felt like it was floating in the trees. The original builder used 4x4s with simple top-mount brackets, and the whole thing swayed in a stiff breeze. When we replaced them with notched 6x6s, the structure became so rigid I could barely move it with a sledgehammer. This structural rigidity is also a key component when you are considering the joist spacing secret for a solid-feeling composite surface, as a stiff frame is the only way to prevent that ‘plastic’ bounce.
Why I swapped lag bolts for structural screws
Back in the day, I used to spend half my afternoon pre-drilling holes for massive lag bolts. They were a pain, they often split the wood, and they eventually loosened up as the lumber dried out. These days, I’ve moved almost exclusively to structural screws. They have a higher shear strength and a coating that won’t corrode when it touches pressure-treated chemicals. I first realized their value during a particularly nasty staircase rebuild. I found that using structural screws instead of lag bolts for stairs and post-to-beam connections made the entire assembly feel like a single piece of steel. They pull the wood together with incredible force, eliminating the micro-gaps that lead to that annoying deck creak.
Ensure your footings can handle the extra weight
A 6×6 post is heavy, and the deck it supports is even heavier. You can have the strongest post in the world, but if your footing is too small, that post is just going to act like a giant nail being driven into the dirt. I once had to go back to a job site six months later because one corner of a deck had dropped three inches. It turned out the soil was much softer than the initial probe suggested. That experience is why I’m now obsessive about checking soil density. If you aren’t careful, you’ll find out the hard way why your deck post footings keep sinking into the soil and how much of a nightmare it is to jack up a finished deck to pour new concrete. I always use a flared base at the bottom of my holes to distribute that weight over a larger footprint, ensuring the 6×6 has a platform as stable as its own cross-section.
The visual impact of beefier timber
There is an undeniable psychological benefit to the 6×6. When a homeowner looks out at their deck, they want to feel safe. A 4×4 looks spindly on a second-story build, almost like the deck is standing on toothpicks. On the other hand, a 6×6 looks intentional and architectural. It matches the scale of modern composite decking trends for 2025, where everything is leaning toward bolder, more substantial lines. When I combine these heavy posts with high-quality materials, I also make sure the rest of the trim matches that quality; for instance, I never use standard wood for deck railings anymore because it looks flimsy next to a 6×6 post. Using the right scale for every component—from the ground to the cap—is what separates a ‘backyard project’ from a professional outdoor living space.
I’ve seen a lot of people spend twenty thousand dollars on high-end boards only to have the finished stairs feel like a rickety fire escape. The common belief is that if you buy the most expensive composite, the deck will automatically be ‘maintenance-free’ and perfect. In my experience, the material is only about thirty percent of the equation; the framing and geometry are what truly determine longevity. One of the biggest ‘traps’ I see DIYers fall into is neglecting the actual physics of the walk. If you miss the mark on your layout by even a tiny bit, you end up with the stair stringer measurement mistake that ruins your stride. It’s not just about aesthetics; it’s about the muscle memory of the human body. According to the International Residential Code (IRC), the greatest riser height within any flight of stairs shall not exceed the smallest by more than 3/8 inch. Even if you are technically ‘within code,’ a variation you can see is a variation you can feel every time you carry a tray of burgers outside.
Why do your deck stairs feel like a ladder?
Most folks assume that as long as the stairs reach the ground, they are good to go. But if the rise is too high, the stairs feel steep and dangerous. I’ve spent years helping homeowners realize why your deck stairs feel like a ladder and how to fix the rise by recalculating the total run of the staircase. When you use beefy 6×6 posts, you have the structural ‘bones’ to support a much wider, more gradual staircase. This is where you can really start creating seamless transitions with stairs as key elements in your outdoor living space. Instead of a cramped 36-inch wide path, I always advocate for a 48-inch or even a 60-inch width. It makes the transition from the house to the yard feel like a grand entrance rather than an afterthought. 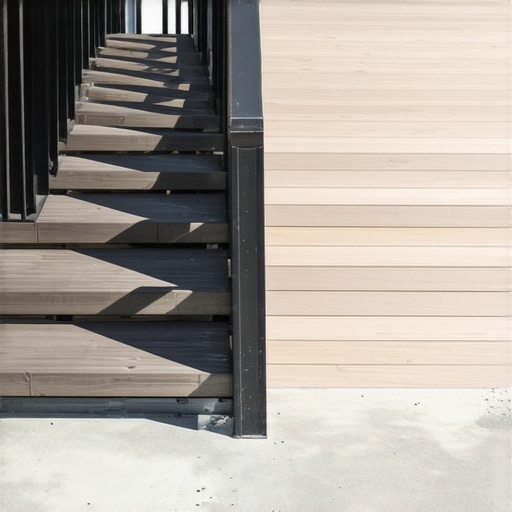
The landing pad mistake that ruins your project
Another nuance that most people miss is what happens at the very bottom of those stairs. I’ve walked onto countless decks where the stairs are just resting on a couple of loose patio pavers or, heaven forbid, directly on the dirt. Over two or three seasons, those stairs will settle at different rates, leading to that dreaded ‘pulling away’ sensation from the main frame. That is exactly why your deck stairs need a concrete landing pad at the bottom. Without a solid, level base, even the best-built 6×6 frame will eventually succumb to gravity and soil erosion. If you are going for a high-end look, don’t forget the finish work; I often find myself explaining how to hide the ugly edge of a composite stair tread to ensure the side profile of the staircase looks as clean as the top.
How do you stop composite boards from looking cheap?
Many homeowners worry that switching to composite means losing that ‘natural’ feel. The trick isn’t in the wood grain pattern—it’s in the rigidity of the floor. If your joists are spaced too far apart, even the most expensive boards will have a slight ‘mushy’ feel underfoot. I always apply the joist spacing secret for a solid-feeling composite surface by tightening my centers to 12 inches rather than the standard 16. When you pair this with those massive 6×6 posts we discussed, you create a platform that is effectively a concrete slab made of wood. This level of detail is what separates a professional build from a weekend DIY job. Have you ever fallen into the trap of thinking more screws would fix a bouncy frame? Let me know in the comments if you’ve dealt with a staircase that just didn’t feel right.
Building a deck that doesn’t move is half the battle; the other half is making sure it stays that way for the next thirty years. I’ve seen guys show up to a job site with a cheap bubble level and a box of standard house screws, and I can tell you exactly how those projects look three seasons later. I personally swear by my Stabila levels because out here in the Ozarks, the heat can warp a cheap plastic tool in a single afternoon. When you are aiming for precision, especially when checking if your deck ledger is pulling away from the house, a tool that is true to the millimeter is non-negotiable. I also keep a specialized extractor in my kit at all times because there is nothing worse than a stripped head in a $10 board. Knowing the best tool for removing a single stripped deck screw has saved me more hours of frustration than I care to admit.
How do I maintain my deck’s structural integrity over time?
Maintenance is where most people lose the ‘low-maintenance’ benefit of composite materials. They think it means ‘no maintenance,’ which is a recipe for mold. I tell my clients that while they don’t need to stain the boards, they do need to keep the gaps clear. If organic debris builds up, it traps moisture against the frame. This is also where you have to be careful with aesthetics; for example, you need to know how to keep your outdoor rug from staining your deck boards by using a breathable backing. According to the North American Deck and Railing Association (NADRA), a yearly ‘check-up’ is vital for safety, focusing on connections and hardware. I always suggest that homeowners avoid the temptation of high pressure; why you should never use a pressure washer on composite decks is the first thing I mention during my walk-throughs. It can etch the surface and void your warranty before the first summer is even over.
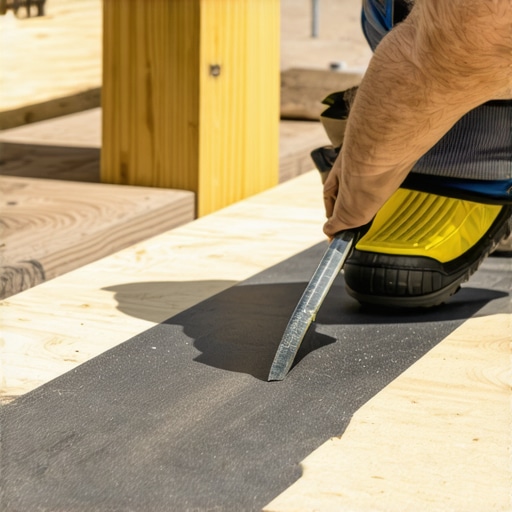
As I look toward the future of composite decking trends for 2025, I’m seeing a massive shift toward total structural protection. This means going beyond just the posts and thinking about the joists themselves. If you are building today, you’re doing yourself a disservice if you don’t account for the hidden cost of skipping joist tape on a new build. That simple butyl tape prevents the wood from rotting from the top down, where the screws enter. I predict that in five years, wood framing will be the ‘budget’ option, while the hidden benefit of using steel deck framing becomes the industry standard for any high-end build. It’s perfectly straight, fire-resistant, and won’t ever twist like a pressure-treated 6×6 might. If you want to elevate your project right now, my advice is to stop using nails entirely; the screw advantage is too significant to ignore for long-term stability. Try switching to structural screws for your next beam-to-post connection and feel the difference in the bite—you’ll never go back to lag bolts again.
I remember the exact moment I lost faith in the humble 4×4 post. I was standing on a second-story deck I’d finished just a few months prior, holding a lukewarm cup of coffee and enjoying the Ozark breeze. Then, the homeowner’s Great Dane decided to lunge at a squirrel. The entire structure didn’t just vibrate; it did a slow, rhythmic salsa. I could feel the movement in my ankles. Even though that deck was built to the letter of the local code at the time, it felt like I was standing on a giant bowl of Jell-O. That visceral feeling of instability changed how I look at structural integrity forever. It’s one thing to build something that meets the minimum legal requirement, and it’s another to build something that feels like a fortress. If you’ve ever hosted a BBQ and felt the deck ‘walk’ when guests shifted their weight, you know exactly what I mean. Have you ever noticed your deck shimmying during a summer storm or when the kids are running around?
Why 4x4s just do not cut it for the high-rise view
The transition from using standard 4×4 lumber to beefier 6×6 posts wasn’t just about aesthetics; it was about the physics of tall structures. When you’re building high off the ground, lateral movement becomes your biggest enemy. A 4×4 post has a surprisingly small cross-section when you consider the amount of weight and leverage a tall deck exerts on it. Over time, those smaller posts are prone to twisting and checking, which only worsens the ‘spook factor’ of a bouncy deck. I spent years trying to fix a bouncy deck without adding new posts by using extra bracing, but I eventually realized I was just treating the symptoms rather than the cause. The actual stability starts from the ground up, and that means choosing a post that can handle the load without flinching. According to the American Wood Council’s DCA 6 standards, 6×6 posts are significantly more resistant to the buckling and lateral forces that plague taller outdoor living spaces. Making the switch was a lightbulb moment for me—one that saved me from countless late-night worries about structural sway.
Is your deck swaying more than it should?
Skepticism is natural, especially when 4x4s are cheaper and easier to find at the local lumber yard. You might wonder if the extra cost of 6x6s is just ‘over-building.’ But I’ve learned that the peace of mind you get from a rock-solid foundation is worth every penny. Early in my career, I made the mistake of thinking more hardware could compensate for thin wood. I’d double up on lag bolts and tension ties, but the physics remained the same. If the post itself is too thin for its height, no amount of metal will stop it from flexing. Now, I focus on the drainage move that saves your deck footings from sinking and pairing that with substantial 6×6 timber. This combination ensures the deck stays level and silent for decades. Today, we’re going to dive into why the ‘bigger is better’ rule applies to deck posts and how you can ensure your next project feels as solid as the ground it’s built on.
The structural shift that changed my building philosophy
Once I saw the difference in stability, there was no going back. Moving away from 4x4s forced me to rethink my entire approach to deck framing. It’s not just about the post; it’s about how that post integrates with the beam and the house itself. I found that the secret to a rock-solid deck to house connection often relies on the posts doing their job so the ledger doesn’t have to carry the entire lateral load. When I look at my older projects, the ones that still look brand new are the ones where I stopped cutting corners on timber dimensions. I even find myself using fewer post bases and more cantilevers these days because I trust the strength of the 6×6 supports to handle larger spans. In the following sections, I’ll walk you through the math, the visual differences, and the simple installation tweaks that make this upgrade a no-brainer for any homeowner or DIYer.
When you transition to 6×6 posts, you aren’t just buying bigger lumber; you’re changing how the entire skeleton of the deck handles stress. The most common mistake I see DIYers and even some pros make is treating a 6×6 exactly like a 4×4 by just plopping the beam on top with a metal bracket. While those brackets are code-compliant, they don’t offer nearly the same lateral resistance as a traditional notch. Think of a 4×4 like a soda straw—it’s easy to bend. A 6×6 is more like a solid rolling pin. To get the most out of that mass, you need to create a physical ‘shoulder’ for your beam to rest on.
Stop the wobble with a proper post notch
I always notch my 6×6 posts so that the beam sits directly on 2.5 inches of solid wood. This creates a mechanical connection where the weight of the deck is transferred vertically through the grain of the post, rather than relying solely on the shear strength of a few bolts. I remember a project in Branson West where the backyard dropped off so sharply that the deck felt like it was floating in the trees. The original builder used 4x4s with simple top-mount brackets, and the whole thing swayed in a stiff breeze. When we replaced them with notched 6x6s, the structure became so rigid I could barely move it with a sledgehammer. This structural rigidity is also a key component when you are considering the joist spacing secret for a solid-feeling composite surface, as a stiff frame is the only way to prevent that ‘plastic’ bounce.
Why I swapped lag bolts for structural screws
Back in the day, I used to spend half my afternoon pre-drilling holes for massive lag bolts. They were a pain, they often split the wood, and they eventually loosened up as the lumber dried out. These days, I’ve moved almost exclusively to structural screws. They have a higher shear strength and a coating that won’t corrode when it touches pressure-treated chemicals. I first realized their value during a particularly nasty staircase rebuild. I found that using structural screws instead of lag bolts for stairs and post-to-beam connections made the entire assembly feel like a single piece of steel. They pull the wood together with incredible force, eliminating the micro-gaps that lead to that annoying deck creak.
Ensure your footings can handle the extra weight
A 6×6 post is heavy, and the deck it supports is even heavier. You can have the strongest post in the world, but if your footing is too small, that post is just going to act like a giant nail being driven into the dirt. I once had to go back to a job site six months later because one corner of a deck had dropped three inches. It turned out the soil was much softer than the initial probe suggested. That experience is why I’m now obsessive about checking soil density. If you aren’t careful, you’ll find out the hard way why your deck post footings keep sinking into the soil and how much of a nightmare it is to jack up a finished deck to pour new concrete. I always use a flared base at the bottom of my holes to distribute that weight over a larger footprint, ensuring the 6×6 has a platform as stable as its own cross-section.
The visual impact of beefier timber
There is an undeniable psychological benefit to the 6×6. When a homeowner looks out at their deck, they want to feel safe. A 4×4 looks spindly on a second-story build, almost like the deck is standing on toothpicks. On the other hand, a 6×6 looks intentional and architectural. It matches the scale of modern composite decking trends for 2025, where everything is leaning toward bolder, more substantial lines. When I combine these heavy posts with high-quality materials, I also make sure the rest of the trim matches that quality; for instance, I never use standard wood for deck railings anymore because it looks flimsy next to a 6×6 post. Using the right scale for every component—from the ground to the cap—is what separates a ‘backyard project’ from a professional outdoor living space.
I’ve seen a lot of people spend twenty thousand dollars on high-end boards only to have the finished stairs feel like a rickety fire escape. The common belief is that if you buy the most expensive composite, the deck will automatically be ‘maintenance-free’ and perfect. In my experience, the material is only about thirty percent of the equation; the framing and geometry are what truly determine longevity. One of the biggest ‘traps’ I see DIYers fall into is neglecting the actual physics of the walk. If you miss the mark on your layout by even a tiny bit, you end up with the stair stringer measurement mistake that ruins your stride. It’s not just about aesthetics; it’s about the muscle memory of the human body. According to the International Residential Code (IRC), the greatest riser height within any flight of stairs shall not exceed the smallest by more than 3/8 inch. Even if you are technically ‘within code,’ a variation you can see is a variation you can feel every time you carry a tray of burgers outside.
Why do your deck stairs feel like a ladder?
Most folks assume that as long as the stairs reach the ground, they are good to go. But if the rise is too high, the stairs feel steep and dangerous. I’ve spent years helping homeowners realize why your deck stairs feel like a ladder and how to fix the rise by recalculating the total run of the staircase. When you use beefy 6×6 posts, you have the structural ‘bones’ to support a much wider, more gradual staircase. This is where you can really start creating seamless transitions with stairs as key elements in your outdoor living space. Instead of a cramped 36-inch wide path, I always advocate for a 48-inch or even a 60-inch width. It makes the transition from the house to the yard feel like a grand entrance rather than an afterthought.
The landing pad mistake that ruins your project
Another nuance that most people miss is what happens at the very bottom of those stairs. I’ve walked onto countless decks where the stairs are just resting on a couple of loose patio pavers or, heaven forbid, directly on the dirt. Over two or three seasons, those stairs will settle at different rates, leading to that dreaded ‘pulling away’ sensation from the main frame. That is exactly why your deck stairs need a concrete landing pad at the bottom. Without a solid, level base, even the best-built 6×6 frame will eventually succumb to gravity and soil erosion. If you are going for a high-end look, don’t forget the finish work; I often find myself explaining how to hide the ugly edge of a composite stair tread to ensure the side profile of the staircase looks as clean as the top.
How do you stop composite boards from looking cheap?
Many homeowners worry that switching to composite means losing that ‘natural’ feel. The trick isn’t in the wood grain pattern—it’s in the rigidity of the floor. If your joists are spaced too far apart, even the most expensive boards will have a slight ‘mushy’ feel underfoot. I always apply the joist spacing secret for a solid-feeling composite surface by tightening my centers to 12 inches rather than the standard 16. When you pair this with those massive 6×6 posts we discussed, you create a platform that is effectively a concrete slab made of wood. This level of detail is what separates a professional build from a weekend DIY job. Have you ever fallen into the trap of thinking more screws would fix a bouncy frame? Let me know in the comments if you’ve dealt with a staircase that just didn’t feel right.
Building a deck that doesn’t move is half the battle; the other half is making sure it stays that way for the next thirty years. I’ve seen guys show up to a job site with a cheap bubble level and a box of standard house screws, and I can tell you exactly how those projects look three seasons later. I personally swear by my Stabila levels because out here in the Ozarks, the heat can warp a cheap plastic tool in a single afternoon. When you are aiming for precision, especially when checking if your deck ledger is pulling away from the house, a tool that is true to the millimeter is non-negotiable. I also keep a specialized extractor in my kit at all times because there is nothing worse than a stripped head in a $10 board. Knowing the best tool for removing a single stripped deck screw has saved me more hours of frustration than I care to admit.
How do I maintain my deck’s structural integrity over time?
Maintenance is where most people lose the ‘low-maintenance’ benefit of composite materials. They think it means ‘no maintenance,’ which is a recipe for mold. I tell my clients that while they don’t need to stain the boards, they do need to keep the gaps clear. If organic debris builds up, it traps moisture against the frame. This is also where you have to be careful with aesthetics; for example, you need to know how to keep your outdoor rug from staining your deck boards by using a breathable backing. According to the North American Deck and Railing Association (NADRA), a yearly ‘check-up’ is vital for safety, focusing on connections and hardware. I always suggest that homeowners avoid the temptation of high pressure; why you should never use a pressure washer on composite decks is the first thing I mention during my walk-throughs. It can etch the surface and void your warranty before the first summer is even over.
As I look toward the future of composite decking trends for 2025, I’m seeing a massive shift toward total structural protection. This means going beyond just the posts and thinking about the joists themselves. If you are building today, you’re doing yourself a disservice if you don’t account for the hidden cost of skipping joist tape on a new build. That simple butyl tape prevents the wood from rotting from the top down, where the screws enter. I predict that in five years, wood framing will be the ‘budget’ option, while the hidden benefit of using steel deck framing becomes the industry standard for any high-end build. It’s perfectly straight, fire-resistant, and won’t ever twist like a pressure-treated 6×6 might. If you want to elevate your project right now, my advice is to stop using nails entirely; the screw advantage is too significant to ignore for long-term stability. Try switching to structural screws for your next beam-to-post connection and feel the difference in the bite—you’ll never go back to lag bolts again.
Hard-Won Truths from a Decade on the Joists
Over the years, I’ve realized that the ‘Jell-O’ test is the ultimate standard for any deck builder. If you can feel a child running on the deck while you’re holding a glass of water on the other end, your framing is too light. Don’t wait for a structural failure to realize your 4x4s are overmatched; that bouncy sensation is the wood telling you it’s at its limit. I’ve also learned that hardware is a supplement, not a substitute. You can’t bolt your way out of using thin timber. I’ve seen hundreds of dollars’ worth of steel connectors fail to stop a deck from swaying because the posts themselves were flexing like reeds. Finally, to really sell the premium look, I always make sure I paint the tops of my joists black. It hides the light-colored pressure-treated wood between the gaps and makes the deck floor look like a continuous, high-end surface.
The Heavy-Duty Toolkit for Serious Builders
If you’re ready to make the switch to 6×6 construction, you need more than just bigger wood; you need the right tools. I always recommend the DCA 6 Construction Guide as your ‘bible’ for spans and loads. For the physical build, never skip joist tape; it’s the cheapest insurance policy against rot you’ll ever buy. I explain more about the hidden cost of skipping joist tape on my blog, and it’s a non-negotiable standard for any project I touch. Swap those old lag bolts for GRK or TimberLOK structural screws—they drive faster and hold tighter without the pre-drilling that weakens the post. Lastly, keep a high-quality impact driver and a set of structural washers on hand to ensure every connection is as tight as a drum.
Your Legacy Starts at the Footings
Building a deck isn’t just about adding square footage; it’s about crafting a safe haven for your family to make memories without the distraction of a squeaking, swaying floor. When you choose 6×6 posts and follow these structural principles, you’re investing in a structure that will remain silent and sturdy through every season. If you ever feel overwhelmed by the technical specs or the scale of the job, don’t hesitate to contact us for a consultation. It’s time to move beyond the minimum requirements and embrace custom composite decking ideas that prioritize both longevity and luxury. Have you ever noticed your deck ‘walking’ or swaying when guests move around? Let me know your experiences with deck stability in the comments below!