I stood there with my morning coffee, watching a single marble roll slowly across my cedar boards until it dropped into a gap near the house. My deck wasn’t just aging; it was tilting. For someone who prides himself on being the helpful neighbor with a truck full of tools, that was a punch to the gut. I had spent weekends obsessing over the joist spacing secret for a solid-feeling composite surface, yet the very ground beneath me was giving way. It was a visceral realization: all the high-end hardware and expensive boards in the world won’t save a structure if the soil underneath decides to turn into pudding every time a Missouri rainstorm rolls through. I had fallen into the trap of looking up at the aesthetic, while the real danger was lurking in the mud below.
Gravity Always Wins Unless You Divert the Flow
Most folks assume that if a post is sinking, the hole wasn’t deep enough or the concrete pier was too small. I used to think the same thing. In fact, on my very first solo build, I doubled the amount of concrete I thought I needed, thinking I was over-engineering a masterpiece that would last a century. It still sank. The problem wasn’t the weight-bearing capacity of the concrete; it was the hydrostatic pressure and saturation levels around the base. When water pools around your footings, it softens the earth until it can no longer support the load. I’ve since learned that the most important deck builder insights aren’t about the wood you see, but the water management you don’t. Today, I’m going to show you the specific grading and drainage move that keeps your footings bone-dry, even during a downpour. We aren’t just talking about a little slope; we are talking about a strategic barrier that protects your investment.
Will this drainage move actually work on my soft soil?
It is a fair question to be skeptical. You might think your yard is a lost cause or that you need a five-figure retaining wall to fix the issue. But the move I am sharing is a low-tech, high-impact grading trick that saves landscaping from the kind of runoff that destroys foundations. By creating a path of least resistance for water before it ever reaches your footings, you keep the soil compacted and stable. According to the American Society of Civil Engineers (ASCE), improper drainage is responsible for nearly 80% of preventable foundation failures in residential structures. I made the mistake of ignoring the water once, and it cost me a full week of labor to jack up the frame and reset the posts. I don’t want that for you. Have you noticed your deck feeling a little “bouncy” or looking uneven after a particularly wet month? Tell me about it in the comments, because catching it now is ten times cheaper than waiting until the stairs start pulling away from the rim joist. Let’s get into how we can fix why your deck post footings keep sinking once and for all.
Build a Gravel Moat That Actually Works
To stop a post from sinking, you have to treat the concrete pier like an island and the surrounding soil like a rising tide. Most DIYers just backfill the hole with the same clay they dug out. This is a recipe for disaster because that loose soil acts like a sponge, holding water against the concrete until it turns into a slurry. Instead, I use what I call the ‘chimney method.’ Once the concrete is set, I wrap the top twelve inches of the pier in a heavy-duty landscape fabric before backfilling with crushed clean stone. This creates a high-speed lane for water to drop straight down and away from the post base rather than soaking into the surrounding earth. I learned this the hard way on a project in Branson West where I skipped the fabric and just used gravel. The Ozark clay eventually choked the stones, the drainage stopped, and by the following spring, I was back there with a bottle jack because the post had settled nearly two inches. Now, I never skip the separation layer. It is the same principle I use when hiding irrigation pipes under a new deck installation; you want to control exactly where the moisture goes. 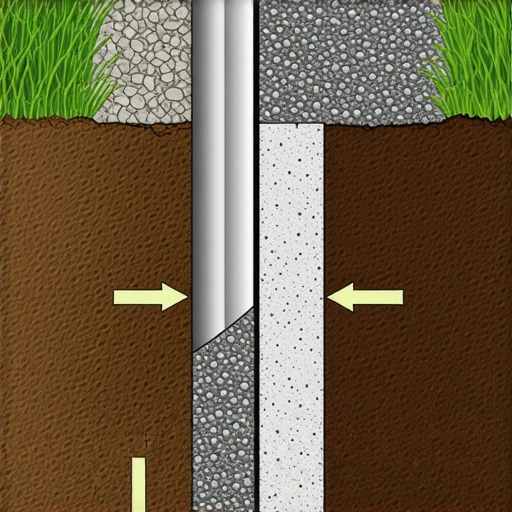
Send the Water Packing with a Gentle Slope
If the ground is flat, you are losing. You need a minimum slope of a quarter-inch per foot away from the house and the footings. Think of your yard as the roof of your house; it needs a pitch. I use a simple string line and a line level to ensure the soil isn’t just flat, but actively shedding water. This is especially critical if you are maximizing space with modern designs for composite decks where the low-profile frame sits closer to the ground. In those cases, there is less airflow to dry out the mud, making the grading move even more vital. If you find your yard is naturally concave, don’t just add dirt. You need to ‘cut’ a shallow swale—a wide, grass-lined ditch—that intercepts the water and carries it around the deck area entirely. It is a grading trick that saves landscaping and keeps the soil under your structural posts as hard as a brick.
Why Your Deck Post Footings Keep Sinking into the Muck
The physics is simple: saturated soil has a lower ‘bearing capacity’ than dry soil. When you choose 6×6 posts for tall decks, you are adding significant weight, and that weight needs a firm foundation. If you see water pooling after a storm, you have a post base mistake on your hands. I once worked on a multi-level build where the client insisted on a massive stone fireplace on the deck. I knew the standard footings wouldn’t cut it, so we integrated a drainage trick for creating a dry storage space that doubled as a massive water diversion system. We used a perforated pipe buried in a trench of river rock that skirted the entire perimeter of the deck. It felt like overkill at the time, but five years later, that deck hasn’t moved a fraction of an inch, while the neighbor’s stairs are already starting to show that dreaded gap where the stairs pull away from the frame. Consistency in your grading is the only thing that beats the Missouri weather.While getting the footings right is the literal foundation of a solid build, many homeowners—and even some ‘pros’—trip over the finish line by misunderstanding structural physics. Everyone tells you that more wood equals more strength, but in my experience, over-building with the wrong geometry is just adding weight that the ground (and your frame) has to carry. I once saw a DIY build where the owner used double the required stringers, yet the steps still felt like a trampoline. The problem wasn’t a lack of lumber; it was a total disregard for lateral stability.
Why More Wood Doesn’t Always Mean a Stronger Staircase
The most common trap I see is the ‘stair stringer squeeze.’ Builders often cut into the wood so deeply to get a wide tread that they leave almost no material at the ‘throat’ of the stringer. This is exactly [why your deck stair stringers are cracking at the throat](https://deckdesignbuild.com/why-your-deck-stair-stringers-are-cracking-at-the-throat) and why even a thick board can snap under a heavy load. According to the North American Deck and Railing Association (NADRA), a staggering number of deck-related injuries occur due to stair failure, and it is almost always linked to improper stringer attachment or weakened throats. To combat this, I have shifted away from old-school methods. I now lean on [innovative stairs solutions for safe outdoor deck access](https://deckdesignbuild.com/innovative-stairs-solutions-for-safe-outdoor-deck-access) that involve structural screws and heavy-duty hangers. Instead of just adding more boards, I focus on [why we always double block the middle of a long stair run for stability](https://deckdesignbuild.com/why-we-always-double-block-the-middle-of-a-long-stair-run-for-stability). It is the ‘hidden’ blocking between the stringers that kills the vibration and makes the stairs feel like they are carved out of stone.
The Expensive Lie About Maintenance-Free Composite
Here is a bit of a contrarian view: I love composite, but the marketing that calls it ‘maintenance-free’ is a setup for failure. While the boards won’t rot, they are significantly more ‘fluid’ than wood. They expand and contract like a living lung. If you don’t account for this thermal movement, you’ll end up with [the hidden clip mistake that leads to buckling deck boards](https://deckdesignbuild.com/the-hidden-clip-mistake-that-leads-to-buckling-deck-boards). I’ve been called out to ‘repair’ decks that were only two years old because the boards had pushed so hard against the house they actually damaged the exterior. Learning [how to stop composite boards from expanding into your vinyl siding](https://deckdesignbuild.com/how-to-stop-composite-boards-from-expanding-into-your-vinyl-siding) isn’t just a pro tip; it’s a requirement for a long-lasting [innovative outdoor living ideas with composite decking in 2025](https://deckdesignbuild.com/innovative-outdoor-living-ideas-with-composite-decking-in-2025).
Is there a way to prevent that annoying ‘wavy’ look on long spans?
This is the advanced question I get most often from meticulous homeowners. If you look down a 40-foot deck and see ripples, it usually isn’t the boards—it’s the joists underneath. Wood joists are never perfectly straight, and composite is flexible enough to telegraph every single imperfection. That is why I have become obsessed with the prep work. This is [why i paint the tops of my joists black before installing composite](https://deckdesignbuild.com/why-i-paint-the-tops-of-my-joists-black-before-installing-composite) and why I spend hours with a plane and a string line [the best way to level an uneven deck frame before decking](https://deckdesignbuild.com/the-best-way-to-level-an-uneven-deck-frame-before-decking). If the ‘skeleton’ isn’t perfect, the ‘skin’ never will be. Have you ever noticed your composite boards looking a bit uneven in the midday sun? Let me know in the comments, and we can troubleshoot if it’s a joist issue or a fastener problem. If you’re ready to avoid these traps entirely, [the benefits of working with a professional deck builder](https://deckdesignbuild.com/the-benefits-of-working-with-a-professional-deck-builder-in-your-outdoor-projects) become very clear when you see the precision required for a high-end finish.If you want that high-end finish, you have to stop thinking like a carpenter and start thinking like a surgeon. I’ve seen guys try to drive massive structural screws with a standard cordless drill, only to have the head strip out or the wood split. I personally swear by my high-torque 18V impact driver for every single stair attachment because the pulse-action torque seats the fastener without over-stressing the wood grain. This is exactly why I use structural screws instead of lag bolts for stairs—they offer superior shear strength and a much cleaner profile. To keep things straight over a long run, a 100-foot chalk line is great for layout, but for the actual build, I rely on a braided nylon mason’s line. It doesn’t stretch or sag under tension, ensuring that when I am checking for joist crowns, I am getting a true reading. If you skip this step, you are basically inviting that ‘wavy’ floor we talked about. Getting this right is the best way to level an uneven deck frame before decking.
How do I keep my composite looking brand new for a decade?
Maintenance is the part where most homeowners fail. They assume ‘low maintenance’ means ‘no maintenance.’ If you let pollen, leaf tannins, and dirt sit on those boards, they will eventually grow a film of mildew. But here is the golden rule: why you should never use a pressure washer on composite decks. The high pressure can actually etch the surface of the plastic capping, creating microscopic pores that trap even more grime over time. Instead, I use a soft-bristle deck brush and a pH-neutral soap. It takes twenty minutes longer, but it preserves the factory finish. Looking toward the future, I suspect we are going to see a massive shift toward heat-reflective technology becoming the industry standard. Right now, choosing the right composite decking for durable low-maintenance outdoor areas involves a trade-off with surface temperature, but the chemistry is evolving fast. According to the American Wood Council (AWC) DCA6 guidelines, the structural integrity of your entire frame is only as solid as its mechanical connections. That is why I am also obsessed with the bracket that keeps your railing from wobbling forever. A wobbly rail isn’t just an annoyance; it is a sign that the leverage of the post is slowly tearing at your rim joist. If you already have that wiggle, you need to learn how to fix a loose railing post without tearing up the deck boards before the damage spreads. I also make it a point to check my hardware every spring. I am looking for any signs of bolt oxidation or loose nuts. If you have a gate, check it before the first winter frost, because the ground shift will tell you immediately if you failed to build a deck gate that won’t sag after one winter. Try this advanced tip tomorrow: take a simple speed square and check the ‘plumb’ of your stair posts at midday. If they are leaning even an eighth of an inch, tighten your through-bolts now. It is the difference between a deck that lasts 10 years and one that stays rock-solid for 30. Once the structure is locked down, you can focus on the aesthetics, like the lighting setup that turns a standard deck into a private outdoor cinema.
The Hard-Earned Wisdom I Wish I Had on Day One
I have spent years fixing ‘over-built’ decks that were failing because the builder mistook bulk for brains. One lightbulb moment was realizing that composite boards aren’t wood; they behave like a living lung that expands and contracts in the Missouri sun. If you do not respect that movement, your fasteners will eventually fail. Another realization? A deck is only as safe as its weakest connection. I have seen massive structures fail because the builder did not understand why your deck stairs feel like a ladder and how to fix the rise. You have to design for the human stride, not just for the lumber dimensions. Finally, remember that choosing the right composite decking for durable low-maintenance outdoor areas is not about picking the most expensive color—it is about the chemistry of the cap layer that protects the core.
The Short List of Tools That Actually Matter
If you are ready to take your project from a basic DIY to a professional-grade finish, you need to stop guessing. I personally recommend keeping these three things in your workshop: First, the DCA6 Residential Wood Deck Construction Guide; it is the industry standard that explains the ‘why’ behind every safety code. Second, a high-quality braided nylon mason’s line for checking joist crowns. Third, a high-torque 18V impact driver for seating structural screws without splitting the grain. I trust these because they remove the margin for error that leads to wobbly railings. If you find the technical side overwhelming, remember the benefits of working with a professional deck builder who can navigate these structural nuances while you focus on the design.
Take the First Step Toward Your Dream Backyard
You now have the grading tricks, the drainage secrets, and the structural hacks needed to beat the muck. The only thing left is to grab your tape measure and start. Building a solid structure is the most rewarding way to transform your space with expert deck builder tips. Whether you are installing innovative stairs solutions for safe outdoor deck access or a sprawling wrap-around, your commitment to the hidden details will pay off for decades. Don’t let the mud win—control the water, secure the frame, and enjoy the Missouri evenings. Have you ever had a project where the soil seemed to have a mind of its own? Tell me about your drainage struggles in the comments below!