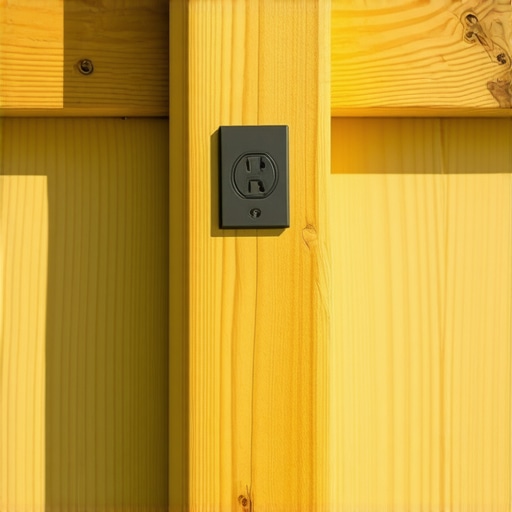
I’ll never forget the evening I finally sat back to admire my brand-new multi-level deck. The sunset was hitting the grain of the wood just right, the stairs were sturdy, and the air smelled like fresh cedar. Then my eyes locked onto it. A chunky, industrial-looking gray plastic outlet box bolted right to the face of a gorgeous 6×6 post. It looked like a wart on a supermodel. I’d spent thousands on high-end materials and deck builder insights, but that $15 piece of plastic was all I could see. It was a classic rookie oversight that happens to the best of us when we’re focused on the big picture of custom composite decking ideas. It bugged me for weeks until I finally tore it out and started over.
Stop Letting Plastic Boxes Ruin Your Custom Woodwork
The problem with standard exterior outlets is that they are built for utility, not for aesthetics. Most contractors just slap a surface-mount bubble cover on the side of a post and call it a day. It’s functional, sure, but it breaks the visual flow of your outdoor living space. Early in my DIY journey, I made the mistake of trying to camouflage one by painting the plastic cover with leftover house paint. Within one Missouri summer, the heat made the paint bubble and flake off, leaving a mess that looked even worse than the original gray plastic. That’s when I realized that if I wanted a truly professional finish, I had to think like a designer, not just a technician. Today, I’m going to show you how to integrate your power needs so seamlessly that your guests won’t even know they’re there until they need to plug in their phone. We are going to stop treating electricity as an afterthought.
Does This Extra Detail Really Make a Difference for My Deck?
You might be wondering if it’s actually worth the fiddly work of recessed boxes or custom post wraps. In my experience, yes. Think about it: you spend hours choosing the right composite decking to ensure everything looks high-end. Why stop at the 95% mark? According to the National Electrical Code (NEC), outdoor receptacles must remain accessible and weather-protected, but that doesn’t mean they have to be an eyesore. We’re going to look at ways to tuck these essential components away while staying fully compliant with safety standards. Have you ever looked at your deck and felt like one small, ugly detail was overshadowing all your hard work? When we prefer 4×4 posts for short decks but 6×6 for tall ones, we have to consider the structural integrity of the post before we start carving into it. I’ve seen folks drill massive holes into load-bearing timber just to hide a wire, which is a recipe for disaster. We are going to do this the right way—safely, stylishly, and permanently.
Bury Your Boxes Inside the Posts for a Flush Look
The first secret to a disappearing electrical system is choosing your hardware before you ever cut a single board. If you’re using 6×6 posts, you have enough meat in the timber to install a recessed electrical box. This allows the outlet to sit inside the post rather than on it. I remember a project in Reeds Spring where I tried to hog out a hole with a dull spade bit and ended up with a splintered mess that no cover plate could hide. Now, I use a precise plywood template and a plunge router. It’s like surgery; you create a clean, rectangular pocket that allows the box to sit perfectly flush. When you are choosing the right composite decking and trim, you have to account for that extra 1/2 inch of material thickness so the cover plate doesn’t look sunken or protruding.
Get the Depth Right for a Seamless Finish
Precision is everything here. If the box is too deep, the outlet won’t reach the cover; if it’s too shallow, the plate will gap. I always suggest using ‘Arlington’ style recessed boxes specifically designed for siding or posts. They come with a built-in flange that overlaps the hole, hiding any minor imperfections in your cuts. When you combine this with deck builder insights on material expansion, you’ll leave just enough wiggle room for the wood to breathe without exposing the internal wiring.
Use Composite Sleeves to Hide the Wiring Skeleton
If you aren’t keen on carving into your structural posts, the next best thing is utilizing post sleeves or wraps. This is a game-changer for custom composite decking ideas. You essentially run your gray PVC conduit or UF-rated wire up the side of the structural pressure-treated post and then slide a hollow composite sleeve over the top. The wire is now sandwiched in that 1/4-inch gap between the wood and the sleeve. It’s a clean, invisible run that requires zero drilling into the load-bearing heart of the post. I once watched a homeowner try to fish wire through a solid 4×4 using a 12-inch auger bit—he ended up coming out the side of the post halfway up. It was an expensive mistake that could have been avoided with a simple sleeve.
Why Railings Are Your Best Friend for Cable Management
Don’t just think about the posts; your railing system is essentially a horizontal highway for electricity. By using innovative stairs solutions for safe outdoor deck access, you can tuck low-voltage wires or even small-gauge power lines under the handrail. If you install deck lighting under the handrail for a subtle glow, you’re already halfway to adding a conveniently hidden outlet for a laptop or phone charger. Use the underside of the ‘cocktail rail’ to mount small, low-profile outdoor boxes that are painted to match the railing color. This keeps the power accessible at waist height without ever breaking the visual line of your beautiful stairs and railings.
Don’t Forget the Weatherproofing Behind the Scenes
Every time you penetrate the deck’s surface or a post to run power, you’re creating a potential entry point for water. This is where most DIYers fail. I’ve seen brand-new frames rot out in five years because water wicked into the wire holes. You should treat every electrical cut-out with the same respect you give your ledger board. This means using high-quality silicone sealant around the box and considering the hidden cost of skipping joist tape on a new build. Flashing tape isn’t just for joists; you can use small strips of it to seal the top of your recessed boxes, ensuring that any water running down the post is diverted away from the electrical components.
Why Hidden Connections Prevent Future Structural Squeaks
When you route wires through the substructure, make sure you aren’t compromising your blocking. For example, we always double block the middle of a long stair run for stability, and I’ve seen sparkies drill 1-inch holes through the center of those blocks, effectively splitting them. Instead, notch the very corner of the block or run the wire along the side of the joist. This keeps the wood strong and prevents that annoying ‘rubbing’ sound that happens when a wire is pinched between a moving board and a frame. If you’re working on the steps, take the time to hide the ugly edge of a composite stair tread by wrapping your fascia over the electrical access points. It’s these tiny, invisible details that separate a ‘backyard deck’ from a professional outdoor living retreat.
Why Overbuilding Your Deck Might Actually Shorten Its Lifespan
Most DIYers and even some ‘pros’ believe that more lumber equals a better deck. It’s a common misconception. In reality, shoving extra joists into a tight space without considering airflow is a death sentence for your frame. I’ve seen builders ignore the joist spacing secret for a solid feeling composite surface and instead cram joists 8 inches apart thinking it’s ‘extra strong.’ All they’ve done is created a giant moisture trap where the wood can never dry out. According to the North American Deck and Railing Association (NADRA), hidden moisture trapped between the board and the joist is the leading cause of structural failure in modern decks. This is why the hidden cost of skipping joist tape on a new build is so much higher than the price of a few rolls of flashing. If you don’t seal those tops, you’re just building a very expensive sponge.
Why do my expensive composite boards start to ‘wave’ in the summer?
This is the ‘Oops’ factor that ruins high-end projects. Composite decking expands and contracts significantly more than wood. If you ignore the hidden clip mistake that leads to buckling deck boards, your beautiful floor will look like a roller coaster by July. I once consulted on a project in Branson where the homeowner had used ‘extra’ fasteners because they wanted it ‘tight.’ By mid-August, the boards had expanded so much with no place to go that they actually sheared the screw heads off. It wasn’t a product defect; it was a failure to account for thermal dynamics.
The Critical Nuance of Stair Ergonomics and Safety
Stairs are where I see the most ‘pro’ mistakes. People often focus on the aesthetics of designing safe and stylish stairs for outdoor decks in 2025 but fail at the basic geometry. If your rise varies by even 3/8 of an inch between steps, your brain won’t register it, but your foot will, leading to trips. This is usually why your deck stairs feel like a ladder and how to fix the rise. A skilled builder knows that you have to account for the thickness of the final tread material *before* you cut your stringers. If you don’t, that first step off the ground will always be ‘the weird one.’ When you are choosing the right composite decking for durable low-maintenance outdoor areas, remember that the material’s thickness is a variable, not a constant. Have you ever fallen into this trap of overcomplicating the frame only to have the details bite you later? Let me know in the comments.Once you have the geometry of your stairs dialed in, the focus shifts to the long game. You aren’t just building for the reveal; you’re building for the 10-year anniversary. I’ve seen too many guys treat their power tools like hammers. If you want a finish that looks like furniture, you need to use the screw depth trick for a perfectly smooth deck surface. I personally use a dedicated impact driver with a torque-limiting clutch rather than a standard drill. If you over-drive a screw into a composite board, you create a ‘mushroom’ of plastic that looks terrible and catches dirt. It’s the difference between a project that looks DIY and one that looks like a high-end investment. For my pool decks, I take it a step further and choose mineral core decking for every poolside build because of its superior grip and dimensional stability in wet environments.
How do I keep my composite deck looking brand new for twenty years?
Maintenance is the most misunderstood part of custom composite decking ideas. People think ‘low maintenance’ means ‘no maintenance.’ That’s a myth. Every spring, I tell my clients to put away the heavy machinery. You should never use a pressure washer on composite decks. I’ve seen 3000 PSI wands literally peel the wood-grain texture off a board in seconds, leaving an unfixable bald spot. Instead, use a soft-bristled brush and a pH-neutral cleaner. If you live in an area with heavy tree cover, keeping organic debris out of the gaps is vital to prevent mold and moisture trapping. It’s about small, consistent efforts rather than one aggressive cleaning session every five years.
Seal those end cuts or watch your frame crumble from the inside
Even the best composite boards won’t save a rotten frame. Whenever you cut a piece of pressure-treated lumber for your stairs or joists, you expose the untreated heartwood. According to the American Wood Council’s DCA 6, these field-cut ends are highly susceptible to moisture intake. I make it a non-negotiable rule to use the best way to seal the end cuts of pressure-treated lumber to prevent rot by applying a copper naphthenate solution to every single cut. It takes an extra ten seconds, but it adds a decade to the life of your stairs. If you’re building a large-scale project with high-end features, ensure you’re using the best low voltage transformers for large outdoor lighting projects to handle the load without blowing fuses.
The next decade of outdoor living will be smarter and cooler
Looking ahead to 2025 and beyond, I predict we’re going to see a massive shift toward ‘cool-deck’ technology. Manufacturers are already developing capping materials that reflect UV rays rather than absorbing them, which is a lifesaver for south-facing decks in the summer heat. We’re also moving toward fully integrated ‘smart’ decks where your lighting, heating, and even hidden sound systems are controlled via a single app. The era of the simple wooden platform is over; we are now building high-performance outdoor rooms. I challenge you to try one thing on your next project: don’t just screw the boards down through the face. Invest in a high-quality hidden fastening system and spend the extra time to seal every cut end. Your future self—and your property value—will thank you for it.
The Small Details That Separated My Pro Projects from My Early Flops
Over the years, I’ve realized that the difference between a good deck and a legendary one isn’t the price of the boards; it’s the invisible labor. When I started out, I thought speed was everything. I now know that taking thirty minutes to properly route a recessed outlet saves hours of annoyance later. One of my biggest lightbulb moments was realizing that composite boards are alive—they move and breathe with the sun, and fighting that movement is a losing battle. Another hard lesson? If you can see the wiring, you didn’t finish the job. High-end custom composite decking ideas only work when the technical guts are hidden behind the beauty.
- Don’t rush the frame. If your joists aren’t perfectly level, your expensive composite will highlight every dip and hump like a neon sign.
- Think about the ‘barefoot test.’ If a screw head is slightly proud or a transition is sharp, that’s what you’ll remember, not the wood grain.
- Water is the enemy. Every cut you make is an invitation for rot, so seal those ends religiously.
The Toolbelt Essentials I Never Step Onto a Job Site Without
If you’re serious about taking your outdoor projects to the next level, you need more than just a circular saw and a dream. I always keep a bottle of copper naphthenate handy because I’ve learned the best way to seal the end cuts of pressure-treated lumber to prevent rot is to treat it immediately. For the electrical side, I swear by Arlington’s INBOX series for recessed outlets; they provide a much cleaner finish than standard surface-mount boxes. I also highly recommend checking out the NADRA (North American Deck and Railing Association) safety manuals. They changed how I look at structural integrity. Finally, for those big evening vibes, I only trust the best low voltage transformers for large outdoor lighting projects to keep everything running smoothly without flickering.
Build a Space That Earns a Second Look Every Single Time
At the end of the day, your deck is more than a collection of lumber and plastic; it’s the backdrop for your family barbecues, morning coffees, and quiet sunsets. When you take the extra time to hide a wire or perfect innovative stairs solutions for safe outdoor deck access, you’re building a legacy of quality. Don’t be intimidated by the technical side of outdoor living. Start small, focus on the precision of your cuts, and remember that the best features are often the ones no one notices at first glance. You have the tools and the knowledge—now it’s time to get out there and build something incredible.
Have you ever had a ‘wart’ on your deck—like a poorly placed outlet or a squeaky board—that drove you crazy? Let me know in the comments below!