I’ll never forget the morning after our first big Ozark ice storm three years ago. I went to let my golden retriever, Cooper, out into the yard, and as I grabbed the handle of my brand-new deck gate, I heard that soul-crushing scrape. The gate hadn’t just settled; it had practically surrendered to gravity, wedging itself firmly into the wood of the top step. I’d spent all summer building what I thought was a masterpiece of durable outdoor living, only to have a single winter turn my entrance into a barricade. It’s a classic homeowner’s headache, but after years of trial and error (mostly error), I’ve figured out that a sagging gate isn’t a ‘wood’ problem—it’s a physics problem that most people ignore until it’s too late. Today, I’m going to share the exact framing secrets I use now to ensure your gate stays square and swings freely, even when the ground is frozen solid and the humidity is pushing 90%.
Stop Dragging Your Gate Through the Mud
The truth is, most DIY gates are destined to fail the moment the first screw goes in. We tend to build them like small sections of a wall, but a gate is actually a cantilevered door that’s constantly fighting to pull itself apart. When I first started out, I thought more screws were the answer. I was wrong. I ended up with a heavy, bloated mess that pulled my railing posts out of alignment. If you’ve ever had to lift your gate with both hands just to get the latch to click, you know exactly what I’m talking about. Have you found yourself shimming your latches every single spring just to keep the gate functional?
Is a sagging gate just an inevitable part of owning a deck?
Absolutely not. While wood naturally expands and contracts—the USDA Forest Products Laboratory notes that moisture content changes can cause significant dimensional shifts in lumber—the structural failure of a gate is almost always due to poor bracing. You don’t need to be a professional deck builder to get this right, but you do need to stop treating the gate like a static object. It’s a machine. And like any machine, if the frame isn’t rigid, the parts won’t move.
Why Your First Gate Probably Failed
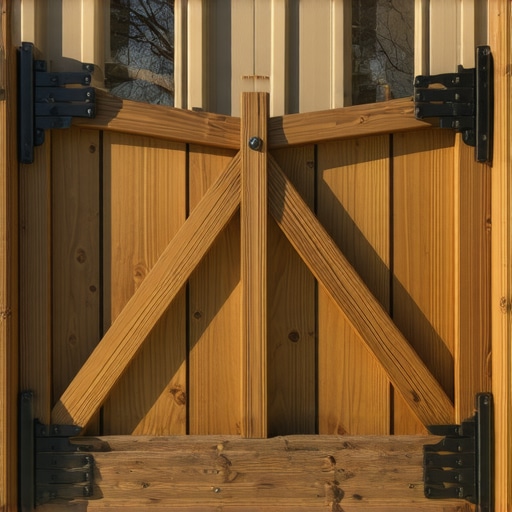
My biggest early mistake was ignoring the compression side of the brace. I’d slap a piece of wood diagonally and call it a day, often pointing it the wrong direction. A gate wants to sag at the latch side because there’s nothing supporting that corner from underneath. To fix this, you need a diagonal brace that runs from the bottom hinge corner up to the top latch corner. This puts the brace in ‘tension’ if you’re using cables, or ‘compression’ if you’re using wood. Without this, the weight of the outer edge will eventually turn your rectangle into a parallelogram. Trust me, I’ve seen enough ‘parallelogram gates’ in my neighborhood to last a lifetime. Before we get into the nitty-gritty of the build, tell me: what’s the biggest frustration you’ve had with your current outdoor setup?
Build a Frame That Fights Gravity Every Second
To build a gate that doesn’t sag, you have to treat the frame like it’s a structural bridge. I always start by building the gate box on a perfectly flat surface—usually the deck floor itself. If you try to assemble it while standing up, you’ve already lost. I use the 3-4-5 method to ensure every corner is a true 90-degree angle. One time, I was rushing a job for a neighbor’s safe and stylish stairs and eyeballed the squareness. By the time I hung the gate, the latch was off by nearly an inch. I had to rip the whole thing apart. Now, I use a framing square and temporary ‘gussets’ to hold that rectangle in place while I drive the first round of fasteners.
The Secret Sauce is in the Compression Brace
This is where most DIYers get confused. Think of a wooden brace like a kickstand on a bike. It needs to prop up the heavy side of the gate. For a wood gate, your diagonal piece must run from the bottom hinge corner up to the top latch corner. This puts the wood ‘in compression,’ meaning the weight of the gate is literally pushing down through the diagonal and into the solid hinge post. If you go the other way, you’re relying on the screws to hold all that weight in tension, and screws will eventually bend or pull out. I remember a specific project in 2021 where I tried to use a fancy tension cable kit on a heavy composite decking gate. Within six months of Ozark humidity, the wood frame had warped around the cable. A solid 2×4 compression brace would have saved me a Saturday of repairs.#IMAGE_PLACE_HOLDER_B#
Don’t Let Cheap Fasteners Ruin Your Hard Work
Once your frame is braced, the hardware is your last line of defense. Standard exterior screws are too brittle for the torque a swinging gate produces. This is why I use structural screws instead of lag bolts for almost every moving part of the build. They have a higher shear strength, meaning they can handle the constant ‘tugging’ of the gate’s weight without snapping. I also recommend using a bracket that makes your deck components feel rock-solid at the hinge points. If your hinge post wiggles even a fraction of an inch, your gate will never line up. I often ‘over-build’ this area by doubling up the framing inside the deck fascia boards to ensure there’s zero flex when the gate is fully extended.
Leave Room for the Wood to Breathe
Finally, remember that wood is a living thing. If you build your gate to fit the opening with only a hair’s width of clearance, you’re going to be reaching for the plane or the saw come July. I always leave at least a half-inch gap on the hinge side and 3/4-inch on the latch side. This accounts for the natural expansion of the lumber and any minor settling of the deck itself. It’s better to have a slightly wider gap than a gate that you have to shoulder-charge every time you want to get to the backyard.Let’s dig deeper into why that $200 ‘heavy-duty’ hardware kit you bought at the big-box store might actually be your gate’s worst enemy. Most people think bigger hinges solve sagging, but they’re often just adding more weight to a post that isn’t ready for the leverage. In my experience, the beefiest hinge in the world won’t help if your post has even a millimeter of play. This is why the post base mistake that causes modern decks to sink into the mud is so critical; if the foundation of the post shifts, your gate geometry is toast. I’ve seen homeowners spend a fortune on choosing the right composite decking for durable low-maintenance outdoor areas, only to let a wobbly gate ruin the entire aesthetic.
Why Heavy Hinges Often Backfire on Weak Posts
The ‘oops’ factor I see most often is forgetting that a gate is a lever. A 40-inch wide gate exerts massive horizontal force on the hinge post. If you didn’t follow the rule where we prefer 4×4 posts for short decks but 6×6 for tall ones, or at least double-block the framing inside the deck fascia boards, you’re asking the wood to do something it wasn’t designed for. Most people believe more hardware equals more strength, but the reality is that excess weight without structural reinforcement simply accelerates the sag.
Is your gate actually ‘growing’ more than the deck itself?
One nuance that catches even seasoned DIYers off guard is the coefficient of thermal expansion, especially with modern materials. While wood expands mostly with moisture, composite decking expands with heat. According to technical data from composite manufacturing leaders like Trex, a 12-foot board can expand or contract by as much as 3/16 of an inch depending on the temperature. If you’ve built a tight-fitting gate in the cool Ozark spring, that same gate will likely bind against the latch post by July. I’ve learned to build my gates during the hottest part of the day if possible, or at least account for that ‘growth’ by leaving wider gaps than you think you need. #IMAGE_PLACE_HOLDER_C#
Stop Over-Engineering the Wrong Parts of Your Frame
Another common trap is the stair-to-gate transition. If your gate is at the top of a flight of designing safe and stylish stairs for outdoor decks in 2025, you have to ensure the stringers aren’t pulling the hinge post out of plumb. I often see the stair stringer measurement mistake that ruins your stride compounded by a gate that’s fighting the stair’s structural lean. Instead of adding more metal brackets to the gate itself, look at how the landing is braced. A rock-solid gate starts at the ground, not the hinge. Have you ever fallen into the trap of over-engineering the gate but under-building the post? Let me know in the comments.I’ve learned the hard way that a great gate isn’t a ‘set it and forget it’ project. If you really want to avoid that soul-crushing scrape I mentioned earlier, you need to invest in a few specific pieces of gear that most big-box stores won’t tell you about. For instance, I never build a gate or a set of stairs without my BoWrench. It’s a simple lever tool that lets you pull warped boards into alignment with one hand while you drive a screw with the other. Without it, you’re basically wrestling a bear that won’t stop moving. This is especially true when you’re following composite decking trends 2025, where the materials are heavier and less forgiving than traditional cedar. Another secret is using high-quality self-closing hinges. Don’t grab the $15 black-painted ones from the bargain bin. Those are just stamped steel and will rust through the first time a Missouri thunderstorm rolls in. I opt for adjustable tension hinges made of glass-filled polymer. They don’t rust, they don’t squeak, and you can dial in the closing speed so it doesn’t slam and shake the whole railing. If you’re unsure about the hardware load, the benefits of working with a professional deck builder often include access to industrial-grade fasteners that aren’t even on the shelves at your local hardware store.
How do I maintain my gate and stairs over time?
The real work starts about six months after the build. I make it a habit every spring and fall to walk my deck and check every single connection point. Specifically, I look at the hinge-to-post connection. The National Design Specification (NDS) for Wood Construction by the American Wood Council points out that fasteners driven into end-grain have significantly reduced withdrawal capacity compared to side-grain. Since most gate frames involve some end-grain fastening, I’m always checking for the slightest sign of the screw head backing out. If it’s loose, I don’t just tighten it—I back it out, fill the hole with a sliver of wood and waterproof glue, and drive a longer structural screw.#IMAGE_PLACE_HOLDER_D#I also pay close attention to the stair tread depth that feels safest for kids and the elderly. If the treads start to cup or the risers show a gap, that’s your warning sign that the framing underneath is holding moisture. I’ve found that why we use double joists under every composite seam for a flat floor applies to gate landings too; that extra meat in the frame gives you more surface area to catch screws and prevents the wood from splitting as it seasons. Looking ahead, I suspect we’re going to see a lot more integration of smart-home tech into outdoor living. Imagine a gate that sends an alert to your phone if it didn’t latch properly, or lighting that changes color if the gate is left open at night. It’s not as far off as you think. For now, my best advice is this: go out to your gate today and give it a firm shake. If you feel any wiggle at the post, don’t wait for it to sag. Add a structural screw to the frame-to-post connection right now. It’ll take you five minutes and save you five hours of repairs next summer.
The Hard Lessons I Learned While Chasing a Sag-Free Gate
Building gates has taught me more about patience than any other part of deck building. One of the biggest ‘lightbulb moments’ for me was realizing that wood doesn’t just sag; it rotates. If you don’t secure your posts into the ground properly, even the most perfect brace will eventually tilt the whole assembly. I’ve also learned that pre-drilling every single hole isn’t a suggestion—it’s a requirement. If you drive a thick structural screw into the end-grain of a cedar 2×4 without a pilot hole, you’re creating micro-fractures that will turn into full splits after the first freeze-thaw cycle.
- Stop over-tightening your hinges: Give the metal room to move, or the screw heads will eventually pop off under the pressure of wood expansion.
- Gravity is your only constant: If you aren’t using a level at every single stage, you’re just guessing.
- Maintenance is a lifestyle: A quick spray of silicone lubricant on your latches every fall prevents the metal-on-metal grinding that causes early failure.
My Tested Recommendations for a Professional Finish
If you want to move beyond the basic DIY level, you need tools and resources that prioritize longevity. I personally swear by the BoWrench for straightening stubborn boards, but I also rely heavily on structural screws instead of traditional lag bolts. You can read more about why I use structural screws instead of lag bolts for stairs and gates to see the shear strength benefits. For hardware, look for brands like D&D Technologies—their polymer latches are the only ones I’ve found that survive the Ozark humidity without rusting shut. Finally, if you’re feeling stuck on the design, check out the composite decking trends 2025 to see how pros are integrating hidden gates into modern glass and steel railings.
Take the First Step Toward a Better Deck Today
A gate that swings perfectly is more than just a convenience; it’s the final touch that makes your outdoor living space feel truly professional. Don’t let a “parallelogram gate” be the one thing that bugs you every time you look out the kitchen window. With a solid compression brace and the right hardware, you can build something that stays square for a generation. Remember to always consider the best way to light stairs for safety without creating a glare if your gate leads to a lower level, ensuring your path is as safe as it is sturdy. Have you ever had a gate that worked perfectly in the winter but stuck every single summer? Let me know in the comments below!
#IMAGE_PLACE_HOLDER_E#