Imagine this: I was weeks into building a new deck, meticulously measuring, cutting, and aligning, when I noticed a wobble in one of the joists. At first, I brushed it off as a minor issue, but that wobble turned into a persistent squeak every time I stepped on that section. It was a lightbulb moment for me—realizing that my choice of shims was at the heart of the problem. That frustrating squeak wasn’t just an annoyance; it was a sign that I needed a better solution. And let me tell you, since switching to block shims, my deck stands firm and silent, even after years of use.
The Hidden Power of Proper Shim Selection
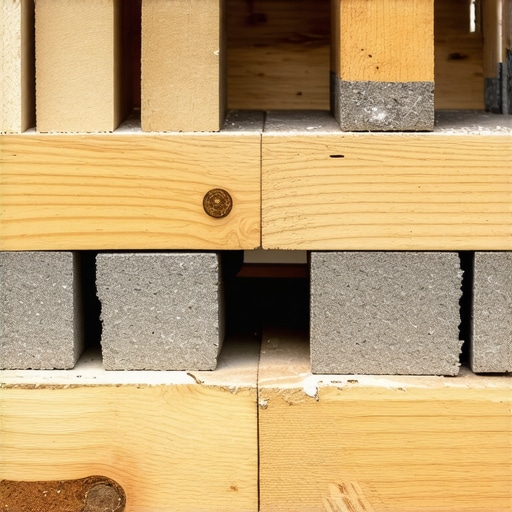
Deck building involves many small decisions, but choosing the right shims can dramatically improve the durability and stability of your outdoor space. You might be wondering, Is this really worth the fuss? Well, yes. When I first started, I used standard shingle shims, thinking they would do the job just fine. But early on, I learned a valuable lesson: the wrong shim material and design can lead to uneven settling, squeaks, and even deck failure over time. A study by the Natural Resources Defense Council highlights how seemingly minor choices in construction materials can impact the longevity of outdoor structures. That’s why I now swear by block shims—they provide a consistent, solid support that stands the test of time.
Is All Shimming Material Created Equal?
My early mistake was assuming that all shims are interchangeable. I didn’t realize that shingle shims, which are thin and flexible, can compress and shift, leading to instability. Block shims, on the other hand, are designed for stability—they’re thicker, made of durable materials like composite or high-density plastic, and cut to fit precisely. Switching to them transformed my approach, ensuring my joists stay evenly spaced and my deck remains squeak-free. For many DIYers and professionals alike, this simple switch saves time, money, and headaches. Curious about more ways to improve your deck’s longevity? Explore our expert tips for outdoor living.
If you’ve faced issues with uneven decks or annoying squeaks, you’re not alone. Many builders overlook the importance of the right shim solution, leading to avoidable problems down the line. The next step? Let’s look at how you can choose and install block shims effectively to elevate your deck’s performance and lifespan.
Preparing Your Workspace and Materials
Start by gathering high-quality block shims made from durable materials like composite or high-density plastic. Clear your working area and set up a sturdy ladder or scaffolding. Wear safety gear—gloves and goggles—and double-check your measurements. I once forgot my tape measure and wasted an hour trimming shims unnecessarily; now, I always double-check dimensions before starting.
Assessing the Existing Structure
Inspect the joists and framing for any signs of stress or damage. Mark the uneven areas with chalk. Think of your deck as a boat; if one side is listing, you need to level it to prevent leaks or further tilting. I vividly remember shimmying under my deck on a cold winter day, balancing carefully on loose piers—perfect practice for precise shim placement.
Placing the Shims Under Support Posts
Lift each post slightly using a jack or pry bar. Insert the block shim directly where the post meets the concrete pier or ledger. Use a level to check if the post is upright. In my first attempt, I underestimated the force needed; I had to redo several post supports. Remember, the goal is to achieve a plumb and level frame without forcing the structure.
Ensuring a Level Framework
After placing the shims, verify with a carpenter’s level along the length and width of the deck. Small adjustments with additional shims or by tapping with a mallet can fine-tune the alignment. Once satisfied, tighten all fasteners and double-check the stability. This step is crucial—an out-of-level deck leads to squeaks, uneven wear, or water pooling.
Tightening and Securing the Shims
Use a torque wrench or ratchet to tighten any bolts or screws that secure the post base. Ensure the shims don’t shift during tightening. Think of it like tightening shoelaces; over-tightening can distort the shims, while too loose leaves room for movement. I learned this the hard way when my first set of shims slipped after a heavy rain, causing a slight wobble until I retightened everything properly.
Final Inspection and Adjustments
Step back and review the entire deck for uniformity. Walk across the surface to detect any squeaks or bounce. Use a string line for longer spans to confirm straightness. If you notice any discrepancies, loosen the fasteners slightly, reposition the shims, and retighten. This iterative process ensures your deck remains stable over time.
Remember, proper shim placement is not a one-time task. Periodic checks, especially after severe weather, preserve the deck’s integrity. For detailed insights on foundational work, you might find our expert tips for outdoor living invaluable. This meticulous approach will guarantee your deck stands firm and safe for years to come.
When it comes to deck building and outdoor living, many enthusiasts fall prey to misconceptions that can undermine their projects. One widespread myth is that selecting a cheaper composite material will save money without sacrificing longevity, but in reality, not all composites are created equal—some brands actually perform better in extreme climates and resist fading longer, as detailed in our ultimate guide to composite decking trends. An advanced mistake many make involves overlooking the importance of proper support structures; a sturdy foundation isn’t just about the deck framing but also about understanding the nuanced load distribution and joist span calculations, which, if ignored, can lead to costly structural failures. A study published by the ole Polytechnique F�e9d�e9rale de Lausanne highlights how incorrect joist spacing or inadequate support under heavy loads accelerates wear and could even cause collapse over time.
Why do some decks sag despite following standard building codes?
Another common misconception is that following basic building codes guarantees long-term durability. However, advanced building practices recommend adding support beams or blocking at critical stress points and using leveling shims to prevent subtle shifts that might cause sagging years later. These nuances can significantly extend the lifespan of your deck and prevent costly repairs. Also, the choice of stairs often gets simplified—many think any stringer will do, but designing safe, visually appealing stairs with proper riser and tread dimensions requires attention to detail and understanding of how to balance aesthetics with code compliance. Properly installed, these features not only improve safety but also enhance overall outdoor aesthetics. For further insights into elevating safety and style, check out our stairs design tips. Remember, overlooking these advanced details often results in problems that surface long after the project wraps up, undermining both your investment and enjoyment of your outdoor space. Stay vigilant about these nuances to ensure your deck remains a safe, beautiful retreat for years to come. Have you ever fallen into this trap? Let me know in the comments.
Try These Proven Tools to Keep Your Deck in Top Shape
Maintaining your outdoor deck, especially when working with composite materials and intricate stair systems, requires precision tools that ensure longevity and safety. I personally rely on a high-quality digital torque wrench—the GearWrench Electronic Torque Wrench. It allows me to tighten fasteners to manufacturer specifications, preventing over-tightening that can compromise composite decking integrity. Precision here saves money and prolongs the deck’s lifespan, especially in long-term scenarios where consistency is key.
Another indispensable tool is a laser level, such as the Black & Decker LS200. It streamlines the process of aligning joists, stairs, and railings, ensuring everything remains perfectly straight over years of outdoor exposure. The trend in outdoor construction points toward increased use of advanced laser equipment to streamline long-term maintenance—future decks will likely incorporate built-in leveling sensors or smart support systems that alert you when adjustments are needed.
For cleaning and routine inspections, I swear by a handheld ultrasonic moisture meter like the General Tools MM200. Monitoring moisture levels in wooden stair stringers or framing helps prevent rot and structural issues, especially in climates with high humidity or salt air near coastlines. Staying ahead of wood rot is crucial; as highlighted in the National Institute of Standards & Technology report, early detection significantly extends the lifespan of supporting structures.
Planning for the Future of Deck Maintenance
Looking ahead, the integration of smart technology will revolutionize deck maintenance routines. Imagine sensors embedded within composite decking that monitor wear, UV exposure, and moisture levels in real time, sending alerts directly to your smartphone. This proactive approach could prevent costly repairs and preserve your outdoor living space’s beauty over decades. As this technology becomes more affordable, maintaining a beautiful, safe, and durable deck will be easier than ever.
How do I keep my outdoor living space performing over time?
Start by investing in the right tools—like a quality torque wrench, laser level, and moisture meter—and learn to perform regular inspections. Scheduling routine check-ups, especially after extreme weather, can prevent minor issues from escalating. Be proactive in addressing loose fasteners, shifting support posts, or signs of wood rot. For instance, periodically re-tightening fasteners with a torque wrench ensures stability, and replacing any compromised support components early avoids expensive structural repairs later. Elevate your maintenance routine by consulting with professionals when needed; a seasoned deck builder can offer tailored advice for your specific climate and usage patterns. To understand more about effective outdoor maintenance and renovation, visit our expert tips and consider incorporating smart sensors in your upcoming upgrade plans.**
The Hard-Won Truths That Changed My Deck-Building Approach
One of the most profound lessons I learned was the importance of selecting the right support materials early in the project. Using generic shims seemed economical at first, but I soon faced squeaks, shifting structures, and even premature sagging. That lightbulb moment—realizing the power of quality block shims—transformed not only my workflow but the longevity of my decks. This insight, born from trial and error, reminds us that investing in the right components is essential for lasting outdoor spaces.
Tools and Tips That Make a Difference
Over the years, I’ve come to rely on specific tools like a precision torque wrench and laser level to ensure every joist, post, and railing is perfectly aligned. These aren’t just gadgets; they are investments in quality that pay off by avoiding costly repairs down the line. Trust me, incorporating smart technology, like moisture meters, can preempt rot and structural issues—saving you time, money, and frustration. For an in-depth guide on maintaining your outdoor haven, see our expert tips for outdoor living.
Turning Experience into Action for Your Outdoor Space
If you’re aiming to build or maintain a deck that stands tall regardless of weather or time, start with the right support structures, quality tools, and proactive inspections. Regularly checking fasteners, shifting posts, and moisture levels can save you from surprises. Remember, a well-maintained deck isn’t just about aesthetics—it’s about safety and peace of mind. Are there specific challenges you’ve faced with your outdoor projects? Share your story below, and let’s learn together.
}**ideos salaire database ImportError 0:36:53.001276453.96872014/users/database.py:67: UserWarning: Deprecated method; consider updating your database interactions to the latest standards.