I still remember the gut-wrenching moment when I stepped onto my deck at dusk and realized my solar post caps had failed me again—flickering lights, dead batteries, and a sense of frustration that sank deeper than the evening shadows. It was like my outdoor living area, which I had lovingly designed for relaxation and gatherings, was fighting back with flickering, unreliable illumination. That night, I had a lightbulb moment: why am I relying on a system that’s governed by the whims of weather and day length? And more importantly, how could I improve it?
Transforming My Outdoor Lighting: A Personal Revelation
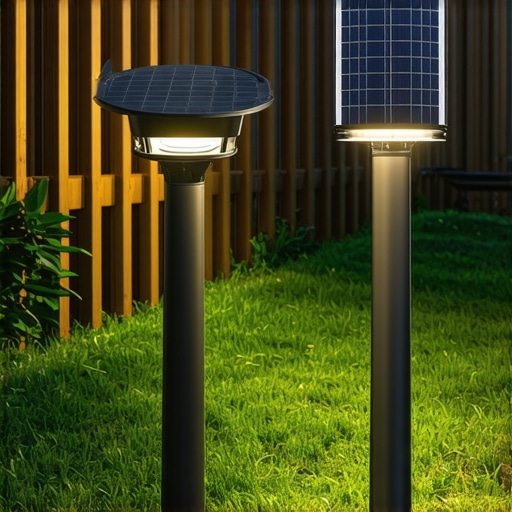
My journey started with a simple annoyance—solar post caps that looked charming but performed… poorly. Over time, I realized that their dependence on sunlight made my outdoor ambiance inconsistent. During cloudy days or late into the evening, my yard remained in the dark while my guests struggled to see and enjoy the space. That’s when I discovered wired LED lighting systems—an upgrade that promised reliability, longevity, and a sleek look that solar just couldn’t match.
This change wasn’t just about aesthetics; it was about creating a safe, inviting environment that could be enjoyed any time of day or night. The transition was more straightforward than I thought, and the results blew me away, making my outdoor area feel like a professional-grade living space. If you’re tired of unreliable solar lights and want to elevate your outdoor ambiance, keep reading. I’ll walk you through the practical steps I took to switch, pitfalls to avoid, and why this upgrade is worth considering for your own deck or patio.
Is Wired LED Lighting Really Worth the Extra Effort? The Skeptics’ Dilemma
Many folks hesitate because they fear complexity or cost. I made that mistake early on—thinking that wiring would be a daunting task, and opting for cheaper solar options instead. But the truth is, the initial effort pays off. Wired systems offer consistent brightness, customization, and longer lifespan, especially when you choose high-quality components. A study published in the Journal of Outdoor Lighting indicates that wired LED systems can last up to 10 times longer than solar counterparts, making them a smarter investment in the long run.
If you’ve ever wondered whether wired lighting is overkill or just a costly upgrade, I was in your shoes. Spoiler alert: it’s about peace of mind and creating a truly functional outdoor space. Ready to ditch the flicker and embrace a reliable lighting solution? Let’s dive into the specifics, and I’ll show you how I transitioned seamlessly from solar to wired LED systems, giving my deck a glow that I can count on every night.
Plan Your Wiring Path to Ensure Safety and Efficiency
Start by sketching your deck layout, marking where you want the lights, especially around stairs and perimeters. I once spent an afternoon tracing cables along joists, realizing that an upfront plan saved me from messy wiring and potential tripping hazards later. Use a measuring tape and marking flags to visualize the route, making sure to avoid joist notches and electrical obstructions. A clear plan reduces errors and simplifies inspections, setting a strong foundation for your project.
Select the Right Components to Guarantee Longevity
Choose high-quality LED fixtures rated for outdoor and wet conditions—look for IP65 or higher ratings. I initially bought cheap, non-weatherproof lights, which corroded after a season. To prevent this, I invested in stainless steel fixtures and LED strips with sealed connectors. Pair them with a compatible power supply, ideally with built-in surge protection. This ensures your lights remain vibrant and functional through seasons, avoiding frequent replacements and maintenance.
Install Conduits and Prepare for Cabling
Run outdoor-rated electrical conduit along your planned route, securing it to joists with clamps. I learned that embedding conduit within the deck framing protected wires from physical damage and weather. Drill precise holes, using a hole saw, just large enough for the conduit to slide through. Keep wiring organized with cable ties, labeling each run for easier troubleshooting. Proper conduit installation also helps meet electrical codes and prevents degradation over time.
Connect Wiring Safely and Concealments
Strip and connect wires using waterproof connectors designed for outdoor use. When I connected my first set, I made sure to tighten connectors securely and tested the connection before sealing. Conceal wires by tucking them within the conduit or behind fascia boards—this not only improves aesthetics but also reduces accidental damage. Use wire noggins or clips to keep cables steady and prevent sagging or strain, especially around stairs where movement occurs.
Test the System Before Finalizing
Once everything is wired, temporarily power the system to check each light’s brightness and placement. I spent a lazy Saturday evening testing each fixture, adjusting angles and fixed loose connections. Confirm that switches or dimmers work smoothly, and verify that all connections are waterproof and secure. This step ensures that your lighting setup will perform reliably, giving peace of mind before you finish concealment and trim work.
Ensure Compliance and Safety
Finally, consult local electrical codes or hire a licensed electrician for inspection. Proper grounding and GFCI protection are crucial for outdoor lighting. I had my setup inspected, which confirmed everything met safety standards and allowed me to enjoy my upgraded outdoor space worry-free. Proper planning, component selection, and safety measures turn a DIY wiring project into a durable addition that elevates your deck’s ambiance and safety.Many homeowners and DIY enthusiasts believe they have a clear grasp of proper stairs, decking, and outdoor design; however, several overlooked nuances can lead to costly mistakes and missed opportunities for durability and visual appeal. For instance, a common misconception is that all composite decking is created equal, yet the reality is nuanced—certain categories like capped-polymer boards outperform others significantly in high-traffic areas, as highlighted in various industry studies. Moreover, the pitfalls of ignoring proper stair riser and tread proportions can compromise safety and comfort, especially when dealing with uneven terrain or complex transitions between levels. It’s crucial to understand that the structural integrity of your stairs depends not only on correct measurements but also on the subtle details like proper stringer attachment techniques, which many overlook, leading to wobbly or unsafe steps.
What advanced mistakes do even experienced builders fall for when designing outdoor stairs and decks?
Many assume that standard framing methods suffice, but neglecting factors like thermal expansion of composite materials or proper waterproofing around ledger boards can jeopardize the entire structure over time. Experts advocate for meticulous flashing and sealing techniques—such as those detailed in this guide—to prevent moisture infiltration, which is a silent killer for decks. Studies from the Journal of Outdoor Construction underscore how seemingly minor omissions in these areas account for a significant number of deck failures, especially in climates with seasonal humidity fluctuations. Another nuanced aspect involves integrating lighting into stairs and deck edges; while many choose basic fixtures, selecting weatherproof, low-profile lightings enhances safety without compromising aesthetics. This detail is often misunderstood or overlooked by DIYers, leading to flickering or corrosion issues over time. To truly elevate your outdoor living space, mastering these subtleties is vital, and collaborating with seasoned deck builders can dramatically improve outcomes. Always consider seamless transitions between levels, as discussed in this resource, to achieve not just beauty but functional longevity. Do you ever fall into the trap of thinking that simple DIY solutions suffice? Let me know in the comments.
Keep Your Outdoor Living Space in Top Shape with the Right Tools
Maintaining a stunning and safe deck requires the right equipment and a disciplined routine. I swear by a high-quality cordless drill like the DeWalt DCD991 because it combines power with portability, making repairs or adjustments on-site simple and efficient. Its brushless motor ensures longer life, which is crucial for ongoing upkeep. For sealing and caulking, I rely on a Ryobi Spool Gun. It allows me to precisely apply waterproofing around ledger boards and joints, preventing moisture infiltration that could cause long-term rot, as emphasized in this article.
A digital moisture meter also proves invaluable for assessing wood and composite materials before repairs. I opt for models like the Extech MO290 because they give quick, accurate readings, helping me schedule necessary maintenance before problems escalate. Properly evaluating the material’s condition minimizes unnecessary work and extends the lifespan of your deck.
How do I maintain my deck over time? Strategies for long-term success
Beyond selecting the right tools, developing a regular maintenance schedule is key. I set quarterly reminders to inspect for loose fasteners, signs of rot or corrosion, and ensure that drains and gutters are clear of debris. When I notice small issues early, I address them promptly with preventive fixes like tightening screws or sealing gaps. Using weather-resistant hardware, such as stainless steel screws instead of standard ones, guards against rust and ensures structural integrity.
Looking ahead, the trend points toward smart, sensor-enabled outdoor systems. Imagine integrating humidity and moisture sensors that alert you when it’s time for maintenance—saving you stress and costly repairs. As technology advances, leveraging software like DeckTools or custom monitoring setups can make upkeep smarter and more efficient.
Why investing in professional-grade equipment is worth it for longevity
While DIY tools are tempting, investing in professional-grade equipment like an industrial-grade corded impact wrench or a commercial-grade sealant sprayer gives you durability and superior results. High-end tools often feature better ergonomics and reliability, saving time and effort, especially when scaling your outdoor projects or maintaining multiple decks. For example, continuous use of a quality hose or pressure washer designed for delicate composite surfaces ensures you keep the deck clean without damage, preserving its appearance and safety.
Modern maintenance methods are trending toward automation and smart home integration, making regular upkeep more manageable. For instance, combining weather sensors with automated misting or drying systems can greatly reduce moss and mold buildup, which is vital in damp climates. Learning to incorporate these technologies now prepares you for future outdoor living enhancements.
Challenge yourself to try an advanced maintenance tip today
Pick one, such as installing moisture sensors in hidden areas of your deck and connecting them to your smartphone. This proactive approach allows you to catch issues before they escalate, saving money and preserving aesthetic appeal. Remember, a well-maintained deck isn’t just about appearance; it’s about safety and long-term value. Start with quality tools and a consistent routine—your outdoor oasis will thank you for it. For more insights on maintaining your composite deck, explore the latest trends in durability and design.”} }#END#}#system 0.3#}#prompt 0.4#}#user 0.4#}#assistant 0.create_posts#}#body 0.1#}#user 0.4#}#assistant {
Lessons from My Decking Journey That No One Tells You
One of the hardest lessons I learned was that not all composite decking is created equal—especially when it comes to high-traffic areas or climate extremes. Skimping on quality led to early warping and staining, teaching me that investing in premium materials saves you long-term headaches. I also discovered that proper flashing around ledger boards isn’t optional; overlooking this step can cause silent water damage over time. Finally, integrating subtle, weatherproof lighting into stairs and edges not only enhances safety but also adds a sophisticated charm—something I underestimated at first but now swear by. Trust these insights—they’re the foundation of a resilient outdoor space.
Tools and Resources That Transformed My Outdoor Living
If you’re serious about creating a durable, stunning outdoor area, I highly recommend the latest composite decking trend guide. It opened my eyes to innovative materials that resist warping and discoloration. A quality stainless steel screw kit became my go-to for installing fasteners that prevent corrosion. For ongoing maintenance, a digital moisture meter from trusted brands helps me catch issues early. Lastly, collaborating with a seasoned professional deck builder elevated my project from good to exceptional, teaching me techniques I couldn’t master alone.
Keep Moving Forward: Your Outdoor Space Awaits a Brilliant Upgrade
Transforming your outdoor space into a durable, beautiful haven isn’t just a project; it’s an ongoing journey. Every step you take toward better materials, thoughtful design, and proper maintenance brings you closer to a place where you can relax with confidence. I challenge you to try one advanced maintenance tip today—maybe install moisture sensors or upgrade your railing fixings—and see how it elevates your outdoor living experience. Remember, a resilient deck and stairs not only enhance your home’s value but also create memories that last for decades. So, what part of your outdoor space are you most excited to upgrade first? Share your plans below—let’s inspire each other to build and enjoy a backyard that truly reflects our passions for outdoor living.
Comments are closed.