I remember the first summer after I built my ideal outdoor deck over a walk-out basement. Everything was perfect—until a heavy rainstorm turned my new backyard paradise into a miniature lake. Water pooled along the foundation, seeping into the basement and causing headaches I hadn’t anticipated. That lightbulb moment stuck with me: proper drainage isn’t just about avoiding muddy paws—it’s crucial for the longevity of your entire outdoor space.
The Hidden Drainage Dilemma: Why the Water Won’t Leave
If you’ve ever experienced standing water on your deck after a storm, you’re not alone. Many homeowners overlook the importance of implementing effective drainage, especially over a walk-out basement. Without it, water can cause wood rot, promote mold, and even weaken your foundation over time. The tricky part? Standard sloping isn’t enough if you want your deck to stay dry and durable for decades.
In my early days of deck-building, I made a common mistake: assuming that a gentle slope alone would suffice. Turns out, water can still find its way into unwanted areas if there’s no proper drainage system in place. It’s like trying to outrun the rain with a leaky umbrella—you’re just delaying the inevitable.
The good news? With the right trick, you can guide water away efficiently. I’ll share a simple but often overlooked method that transformed my deck from a waterlogged nightmare into a resilient outdoor feature. Trust me, this small adjustment made all the difference, and it can do the same for your space.
So, if you’re tired of battling muddy patches or basement flooding after every storm, keep reading. We’re about to dive into a step-by-step approach that marries practicality with longevity—helping you protect your investment and enjoy your outdoor living with peace of mind.
Is a Drainage Trick Really Worth the Effort?
Early on, I wondered if investing time and money into a drainage system was justified. The truth is, neglecting proper drainage can lead to costly repairs, mold issues, and even structural weakening—problems that far outweigh the initial effort. A recent study shows that water-related damages account for over 30% of home repairs in the US, emphasizing just how critical it is to get this right.1
By sharing my own mistake—thinking a simple slope was enough—I hope to save you from the same oversight. Proper drainage isn’t just an upgrade; it’s an essential component of a durable, safe, and beautiful deck over a walk-out basement.
Ready to learn the trick that made my deck practically water-proof? Let’s get into the practical steps to keep your backyard dry and your basement safe.
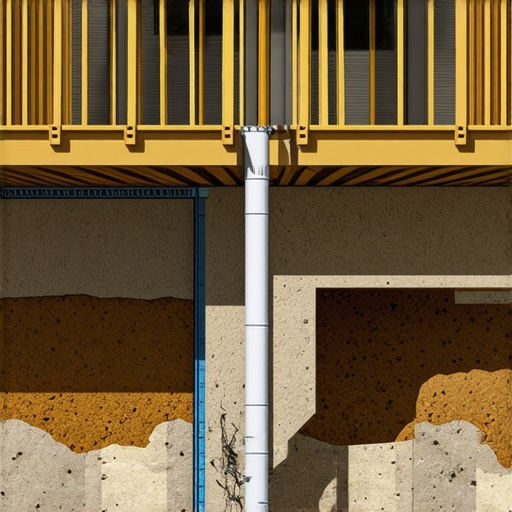
Digging the Foundation for Effective Drainage
Start by excavating a trench along the perimeter of your deck, about 12 inches wide and 18 inches deep, sloping away from the house at a rate of at least 1/8 inch per foot to ensure water flows outward. Use a level and measuring tape for accuracy, ensuring consistent incline. During my last project, I temporarily watched water flow into the trench with a garden hose to confirm the slope’s effectiveness—this immediate feedback helped me adjust before pouring gravel.
Installing a Gravel Drain Layer
Lay a 4-inch layer of clean, angular gravel at the bottom of the trench to facilitate water movement. This acts like a sponge, absorbing and directing water away. I once mixed in larger stones at the start to prevent compaction, which improves permeability. Remember, this gravel bed prevents water from pooling and directs runoff into your drainage system.
Adding a Perforated Drain Pipe
Place a perforated (holes facing down) drain pipe over the gravel layer, ensuring it’s graded to direct water away from the foundation. Secure the pipe with landscape staples to prevent shifting. In one instance, I encountered a clogged pipe because the perforations faced upward—this small mistake caused water to back up, emphasizing the importance of correct orientation.
Covering the Drain System with Filter Fabric
Wrap the gravel and pipe with a geotextile fabric to prevent soil and debris from clogging the system. Extend the fabric over the edges of the trench, folding it back onto itself. I’ve seen projects where neglecting this caused rapid clogging, leading to failure and costly repairs—don’t overlook this step.
Refilling and Covering for Longevity
Backfill the trench with the remaining gravel, then top it with landscape soil and mulch or turf. This protects the system visually and physically. When I rebuilt my deck, I made sure to restore the grade and prevent soil erosion, which can compromise the drainage over time. Properly graded soil ensures water continues to flow away, keeping your deck dry.
Incorporating Deck Design to Channel Water
Within your deck construction, incorporate subtle slopes into the deck surface itself—about 1/8 inch per foot—to guide water toward drains or exits. Additionally, consider installing drainage gaps or spaces under ledger boards to prevent water trapping. My deck’s new design includes these features, and the difference has been evident during rainy seasons, with no pooling or basement seepage.
Sealing and Protecting Your Drainage System
Finally, seal the edges of your gravel trench with landscape fabric or edging to prevent soil intrusion. Regular maintenance—clearing debris and inspecting for clogs—will prolong system life. I recommend scheduling annual checks, especially after heavy storms, to catch issues early and avoid basement flooding or wood rot.
While many believe all composite decking offers the same durability, the real secret lies in understanding the material’s nuances. For instance, not all composites are created equal—some contain additives that resist fading, while others are prone to discoloration over time. Many homeowners rush into choosing their decking without considering the type of core material, unaware that mineral cores provide better dimensional stability and lower expansion rates, especially in fluctuating climates. This knowledge can save you from costly repairs and replacements down the line.
Why Do Some Composite Decks Fail Prematurely Despite Proper Installation?
It’s a common misconception that installation mistakes are the primary cause of early composite deck failure. However, some issues stem from the inherent properties of the materials used. For example, products with poor UV inhibitors tend to chalk and fade faster, leading to an unsightly surface—this is why selecting brands with proven UV stability is crucial. Additionally, improper fastener choices, like using steel screws instead of corrosion-resistant stainless steel or aluminum, can compromise structural integrity, especially in saltwater environments. Experts recommend consulting a seasoned deck builder who understands these intricacies, ensuring your investment lasts for decades. If you’re planning a project, check out how a professional deck builder can help turn your outdoor space into a lasting oasis, avoiding these common pitfalls. And always remember, choosing the right composite involves more than aesthetics; it’s about understanding the nuanced differences that affect longevity.
Many overlook the importance of proper drainage with composite decking, which can cause premature warping or mold growth. Unlike traditional wood, composites are sensitive to trapped moisture, making detailed planning essential. This includes installing integrated drainage gaps or considering flexible installation patterns that accommodate thermal expansion. Moreover, maintenance routines should go beyond basic cleaning—regular inspections for debris buildup between planks and ensuring that ventilation isn’t obstructed can significantly extend the lifespan of your deck. Recognizing these hidden nuances elevates your project from average to expert level, ensuring your outdoor living space remains stunning and durable for years. For advanced tips on seamless outdoor transitions, visit the guide on designing options that combine safety, aesthetics, and practicality. Remember, every choice, from material selection to installation detail, impacts how well your deck performs over time. Let’s dig deeper into these nuances and avoid being that homeowner stuck with an avoidable disaster.Maintaining a durable and beautiful outdoor deck requires the right tools combined with effective techniques. As a seasoned deck builder, I rely on specialized equipment to ensure longevity, safety, and aesthetics of the structure. One indispensable tool is the cordless power washer, like the **Ryobi 1800 PSI Pressure Washer**, which offers the versatility to remove grime, mold, and dirt without damaging composite surfaces. I personally prefer models with adjustable pressure settings, allowing gentle cleaning of sensitive materials while tackling tougher stains. Regular use of a high-quality **deck scraper** helps in eliminating stubborn debris between boards, preventing trapping moisture that leads to warping or mold.
For inspecting and diagnosing potential issues, a **moisture meter** proves invaluable. I recommend the **Protimeter Surveymaster**, which gives accurate readings of moisture content in decking, framing, and stairs. Keeping moisture in check is critical for preventing premature deterioration. When it comes to sealing and protecting surfaces, I use premium **brush-on sealants** like **Penofin Hardwood and Deck Oil**, which penetrate deep and resist UV damage—especially important for composite surfaces exposed to prolonged sunlight.
Software tools aren’t left out in modern deck maintenance. I utilize **SketchUp** for visualizing custom drainage solutions or design modifications before starting work. This foresight saves time and avoids costly errors, ensuring your long-term results meet expectations. Looking ahead, I believe the trend will lean more toward **smart monitoring systems**—integrating sensors that alert you to moisture buildup or structural stress, streamlining maintenance routines.
How do I maintain composite decking over time
Regularly cleaning with a soft-bristle brush and a gentle cleaning solution preserves the composite’s color and prevents mold buildup. Avoid harsh chemicals and pressure settings above 1,200 PSI to prevent surface damage. Periodic inspection of fasteners and trims ensures everything remains tight and secure, preventing wobbling or loosening that could compromise structural integrity.
Investing in proper tools and consistent maintenance routines shields your investment, helping your outdoor space stay visually appealing and structurally sound for decades. For detailed steps on extending your deck’s lifespan, explore tips from experienced professionals at [a trusted deck builder source](https://deckdesignbuild.com/the-built-in-cooler-hack-for-outdoor-entertainment-spaces). Remember, using the right equipment is just as crucial as selecting quality materials—don’t underestimate the power of good tools to keep your outdoor living area thriving.
Lessons Learned From My Waterlogged Mistake
- Never underestimate the power of proper drainage—even a slight oversight can lead to lasting damage. I once thought a gentle slope was enough, only to find puddles forming after storms, which eventually caused warping and mold. Now, I realize that proactive planning saves time and money in the long run.
- Incorporating a well-designed drainage system is about more than avoiding water pooling; it’s about protecting your investment. I learned that adding gravel beds and perforated pipes beneath the deck prevents moisture from seeping into the framing, extending the lifespan of both material and structure.
- Maintenance is key—even the best drainage system requires regular inspection and cleaning. From my experience, clearing debris and checking for clogs ensures that water keeps flowing away, safeguarding your outdoor space from deterioration.
- Thoughtful deck design, like integrating subtle slopes into your surface, can make a huge difference. I found that clever design tricks prevent water from lingering, especially over walk-out basements, and keep your space dry and inviting all year round.
Gear Up with Trusted Tools and Resources
- Ryobi 1800 PSI Pressure Washer: I rely on this for gentle cleaning that preserves the integrity of composite surfaces while removing dirt and mold. Its adjustable pressure makes it versatile for different areas.
- Protimeter Surveymaster Moisture Meter: A game-changer in early detection of moisture issues. Regular checks help catch problems before they escalate into costly repairs.
- Penofin Hardwood and Deck Oil: My go-to for sealing and UV protection, especially important for composite decks exposed to sunlight over time.
- SketchUp Software: I use it to visualize drainage adjustments and deck modifications before making any physical changes, saving time and resources.
Your Next Step in Outdoor Mastery
Taking the time to understand and implement effective drainage isn’t just about avoiding immediate problems; it’s about ensuring your outdoor living space remains beautiful, durable, and safe for years to come. Remember, every detail—from gravel layers to subtle slopes—makes a significant difference in the longevity of your composite deck. Now is the perfect moment to assess your setup, embrace these insights, and transform your backyard into a resilient oasis. Want more tips on creating seamless transitions or enhancing your deck’s durability? Check out our guide on designing safe and stylish stairs and turn your visions into reality.