I remember the moment vividly—a chilly morning on my deck, sun just starting to peek out, when I stepped onto my stairs and heard that dreaded creak. I looked down to see a slight wobble in the stringer, and suddenly, the reality hit me: my outdoor stairs were on borrowed time. That lightbulb moment pushed me to reevaluate my approach to preventing rot, especially in those hidden areas like stair stringers, which often go unnoticed until it’s too late.
Protect Your Outdoor Stairs Before It’s Too Late
Many of us overlook the importance of sealing and flashing around stair stringers. These crucial components are constantly exposed to moisture, making them prime candidates for rot and decay. A few years ago, I made the mistake of neglecting proper sealing, which led to water seeping in and causing early deterioration. Early on, I trusted traditional methods—painting, basic caulking—but those just didn’t cut it, especially with the unpredictable weather swings we’re experiencing in 2026.
Thankfully, I discovered liquid flashing, a product I now swear by for stopping rot before it starts. Unlike conventional sealants, liquid flashing forms a seamless barrier, hugging every crevice and preventing moisture intrusion. My experience showed me that with the right sealing, I could extend the life of my stairs significantly. Plus, it’s surprisingly easy to apply—no need for specialized skills, just a good brush and a little patience.
So, what’s the big deal about using liquid flashing today? Well, recent reports indicate that moisture-related issues are among the top causes of deck failure in 2026, largely because many builders and homeowners still rely on outdated sealing methods. Liquid flashing not only offers superior protection but also adapts better to the complex shapes and hard-to-reach spots like stair stringers. It’s a game-changer, particularly when paired with proper ventilation and maintenance.
Are you tired of watching your outdoor stairs suffer from rot and decay, wasting time and money on repairs? If so, you’re not alone. Many homeowners face this issue, often ignoring the early signs until structural damage manifests. Remember, early intervention can save a lot of hassle down the line—and that’s exactly why I switched to liquid flashing.
Before I go into the step-by-step process, I want to share a quick tip I learned early on: skipping the proper sealant was a common mistake I made—don’t repeat it. Instead, start with the right product, and you’ll be amazed at how much more durable your outdoor features become. To see more about how to select durable materials for your deck, check out this detailed guide on choosing the right composite decking.
Now, let’s dive into how exactly you can use liquid flashing to keep your stair stringers rot-free for years to come.
Prepare for Application
Begin by cleaning the surface of the stair stringers thoroughly, removing dirt, loose paint, and existing debris with a wire brush and a power washer if needed. Ensure the area is completely dry before proceeding—moisture can hinder adhesion and reduce effectiveness.
Mask Off Surrounding Areas
Use painter’s tape to shield adjacent surfaces, such as handrails or surrounding siding. This helps achieve a clean, professional finish and prevents overspray or excess product from coating areas where it isn’t needed.
Apply Liquid Flashing
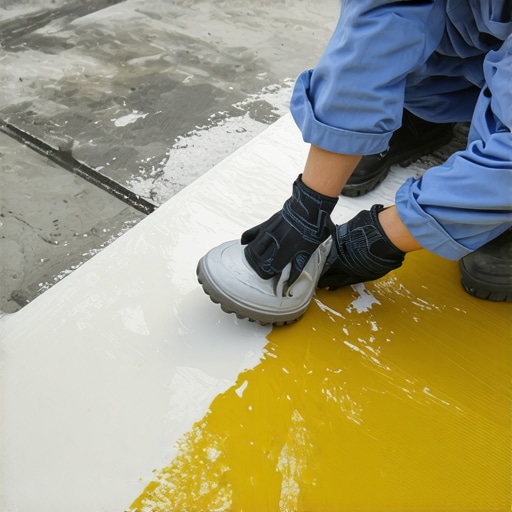
Pour a small amount of the liquid flashing into a disposable container or directly onto a quality brush. Dip the brush into the product and start at the top of the stringer, working your way downward.
Think of this step as sealing an envelope—you’re creating a protective barrier that hugs every nook and cranny. Use even, continuous strokes to cover all exposed wood surfaces, paying close attention to joints, screw holes, and seams. Remember that thin, multiple coats often produce better results than a single thick layer.
Work in Sections
If the surface is large, divide the task into manageable sections. This ensures each part gets adequate coverage before the product begins to set. For my deck, I worked in 2-foot sections, which allowed me to maintain control and precision.
Address Hard-to-Reach Areas
Use a small brush or even a disposable sponge for tight corners and intricate areas around fasteners. This meticulous attention prevents water infiltration in spots that might seem insignificant but can cause rot over time.
Allow Proper Curing Time
Once you’ve applied the liquid flashing, let it cure according to the manufacturer’s instructions—usually 24 to 48 hours. During this period, avoid foot traffic or moisture exposure, as it can compromise the seal. This curing process is vital; think of it as setting a sturdy cast around your stair stringers, ensuring durability for years.
Inspect and Maintain
After curing, visually inspect the coated surfaces for uniform coverage. Touch up any thin spots immediately. Regular maintenance includes reapplying the sealant every few years or after significant weather events, much like reapplying sunscreen before prolonged sun exposure. This upkeep is essential for prolonged rot resistance and structural integrity.
In my own experience, applying liquid flashing was straightforward but critical—my stairs stayed rot-free during a particularly rainy season, saving me from costly repairs. Remember, proper surface prep and diligent application are key to leveraging this method’s full protective potential.
Extra Tips for Success
For an even longer-lasting shield, consider combining liquid flashing with advanced drainage solutions around your stairs, such as installing drainage mats or improving slope. Also, integrating good ventilation in covered stair areas can help moisture escape, further extending the life of your stringers.
If you’re exploring ways to enhance your outdoor living space, check out seamless stair integration for more ideas on creating durable and attractive transitions between your deck and yard.
Many homeowners believe that choosing the most popular decking material or following generic building tips guarantees long-term durability, but in reality, the nuances of stair design and maintenance are often overlooked. For example, a common myth is that pressure-treated wood is always the best choice for outdoor stairs. While affordable, it can be prone to rot when not sealed properly, especially in water-resistant zones like stair stringers. Advanced deck builders understand that material selection must consider environmental factors such as UV exposure, moisture, and temperature fluctuations, which many DIYers underestimate, resulting in premature deterioration.
Are All Composite Decking Brands Equally Durable in Extreme Weather?
Not at all. The market boasts a variety of brands claiming to be weatherproof, but studies reveal that only a handful maintain integrity during heatwaves or cold snaps. For instance, capped-polymer boards with thick, high-quality caps perform better in resisting UV damage and staining, especially in 2026’s unpredictable climate. Choosing the right brand isn’t solely about price but about understanding specific product formulations and their testing standards, as outlined in expert guides on composite decking trends.
Another commonly missed nuance is the importance of proper stair stringer installation. Many assume that just placing stringers on a level surface suffices, but even minor misalignments can cause uneven tread heights, increasing safety risks. The advanced approach involves precision measurements and installing triple-stringer systems for added stability, especially on larger decks or sloped terrains. This technique isn’t well-known among average DIYers but is crucial for ensuring safety and longevity, as detailed in stair safety standards.
Furthermore, neglecting proper flashing and sealing around stair risers and stringers can lead to hidden rot that, over time, compromises structural integrity. While many surface-level projects focus on cosmetic finishes, seasoned professionals emphasize sealing every joint, joint space, and fastener to prevent water intrusion. Applying liquid flashing, for example, forms a seamless barrier against moisture infiltration that traditional caulk or paint often fails to provide. Remember, quick fixes are tempting but often short-lived—investing in detailed sealing now saves costly repairs later. For insights, see my detailed guide on rot prevention techniques.
One more pitfall to avoid is ignoring the impact of thermal expansion in composite decking. Many assume it won’t shift significantly, but during peak summer or winter, expansion and contraction can cause gaps, warping, and loose fasteners. This issue is especially pertinent with hollow-core boards, which are more susceptible to expansion. Advanced deck builders recommend planning for spacing with self-leveling pedestals or ensuring sufficient clearance. This nuanced understanding of material behavior under temperature extremes can be the difference between a stunning, durable outdoor space and one plagued with maintenance issues. For more on this, visit pedestal systems for rooftop decks.
In conclusion, mastering these hidden nuances and avoiding common myths can elevate your outdoor project from average to outstanding. Do you think you’ve fallen into these traps? Share your experiences in the comments or visit us at our contact page to get expert guidance. Your next outdoor upgrade deserves more than just surface-level solutions—let’s dig deeper and build something that lasts.
Maintaining Your Deck with Precision Tools
Proper maintenance starts with using the right equipment. I personally rely on a high-quality orbital sander, specifically the Makita BO5041, because its variable speed control allows me to gently sand delicate areas like stair stringers without causing damage. Coupled with a set of carbide scraper blades, I can efficiently remove old sealant or debris from hard-to-reach spots, ensuring a fresh surface for sealing or re-coating.
For cleaning, I use a pressure washer with a adjustable orifice setting—typically around 25 degrees—to prevent surface etching, especially on composite decking. The Sun Joe SPX3000 is my go-to because of its dual-wash wands and variable pressure modes, giving me control over cleaning intensity without risking damage. These tools help me keep the deck in top condition, reducing rot risks and extending its lifespan.
Software and Inspection Techniques
To monitor the condition of my outdoor stairs, I employ a digital moisture meter, like the Delmhorst J-Lite, which provides instant readings of interior moisture levels. Regular inspections using this device reveal early signs of water infiltration that visual checks might miss, allowing for timely intervention. For detailed visual documentation over time, I photograph problem areas with a mirrorless camera, making record-keeping efficient and comprehensive.
Predictions for Future Maintenance Trends
Looking ahead, I predict that smart sensors embedded in decking materials will become increasingly mainstream. These tiny devices could monitor moisture, temperature, and structural stress in real-time, alerting homeowners via smartphone apps to potential issues before rot or warping occurs. Integrating this technology with maintenance routines will revolutionize how we care for outdoor spaces, making them more durable and trouble-free.
How do I stay on top of [Deck and Stair Maintenance] over time?
I adopt a proactive approach: setting quarterly schedules for cleaning, inspecting, and resealing—using my moisture meter to confirm thresholds—and keeping my tools sharp and calibrated. Regular attention to small issues prevents major repairs later, saving time and money. To deepen your understanding of durable, low-maintenance outdoor spaces, explore tips on selecting the best composite decking and consider trying advanced sealing techniques discussed earlier. When you incorporate precise tools and routine checks, maintaining your outdoor setup becomes manageable and even enjoyable. Don’t forget—investing in quality tools like a dependable orbital sander and moisture meter is key to long-term success and peace of mind.
What I’d Uncover About Hidden Risks in Outdoor Stairs
One of the most eye-opening moments in my journey as a deck builder was realizing how easily rot could lurk behind seemingly sound materials, especially when neglected. I learned that without proper sealing—like liquid flashing—moisture can sneak into tiny cracks, accelerating decay faster than I ever imagined. This taught me that proactive measures in these hidden spots protect your entire outdoor space from costly repairs later on.
My Journey Beyond Conventional Wisdom
Initially, I believed that standard paint or basic sealants were enough to guard my stairs, but experience proved otherwise. The lightbulb moment was understanding the versatility and superior defense of liquid flashing—it adapts to complex shapes and reaches those difficult areas. This shift in mindset transformed my approach, emphasizing that investing in the right materials makes all the difference in durability and safety.
Why DIYers Often Miss Critical Details
Many homeowners overlook the importance of surface preparation or underestimate the complexity of sealing around fasteners, joints, and seams. My own early attempts at sealing were half-hearted, leading to rot creeping in before I noticed it. Now I know that meticulous application—working section by section and using the right tools—ensures flawless coverage, safeguarding the stairs and extending their lifespan.
The Power of Routine Maintenance and Smart Tools
Regular inspections with tools like moisture meters and visual checks can detect issues before they escalate. I adopted a quarterly care routine, reapplying sealant and checking for gaps or damage. The difference it made was incredible—protecting my stairs from weather, foot traffic, and time. This proactive approach, combined with high-quality equipment, is something I deeply recommend for anyone serious about outdoor living.
The Secret That Saved My Deck During Rainy Seasons
Applying liquid flashing was surprisingly straightforward, but its impact was profound—my stairs stayed rot-free through rainy months, avoiding costly repairs. This success reinforced that understanding structural nuances, investing in quality sealants, and maintaining vigilance are key to outdoor longevity. Remember, knowledge combined with action transforms outdoor spaces from temporary setups into lasting retreats.
My Crucial Lessons from the Field
- Don’t skip surface prep—it’s the foundation of a durable seal.
- Choose the right sealing product—liquid flashing outperforms traditional caulk in complex spots.
- Work methodically—divide into sections to ensure even coverage and control.
- Inspect and maintain regularly—small touches now prevent big problems later.
These lessons reshaped my understanding of outdoor stair protection and can do the same for you. Dive deeper into choosing durable materials for your deck with insights from this comprehensive guide, or explore fresh ideas to elevate your outdoor space with stunning transition designs.