I remember the first time I built a deck with stairs, full of excitement but also filled with mounting anxiety. I had read all the tutorials, watched videos, and even sketched out my plans. Yet, when it came to notching the stair stringers, I hit a wall—literally. The cuts didn’t line up, or worse, I accidentally weakened the structure. That lightbulb moment hit me hard: I needed a better way, a smarter method. And that’s when I discovered the 2026 Housed Method, a game-changer for stop notching stair stringers.
Why Get it Right? The High Stakes of Stair Safety and Style
In outdoor living, stairs aren’t just functional—they’re the gateway to your comfort and safety. Improperly notched stringers can cause wobbling, sagging, or even structural failure over time. As I learned early on, a mistake or shortcut can lead to costly repairs or, worse, safety hazards. That’s why mastering the correct technique, like the 2026 Housed Method, isn’t just about aesthetics; it’s about peace of mind. Properly executed, this method ensures a clean, strong connection that stands up to the elements, heavy foot traffic, and the test of time.
Mixing in the latest trends in composite decking can elevate your entire project—check out this guide to stay ahead in outdoor design. But before you dive into the aesthetics, the foundational work like stair framing must be rock solid. That’s why I want to share my journey and the practical steps that turned my shaky DIY streak into confident craftsmanship.
Addressing the Skepticism: Is the 2026 Housed Method Truly Worth It?
Early in my career, I made the mistake of rushing the notch cuts because I thought quick fixes would save time. Turns out, that shortcut led to uneven stairs and safety concerns. I’ve learned the hard way that meticulous work pays off—especially when it comes to stairs that people trust their safety on. Thankfully, after adopting the 2026 Housed Method, my projects not only looked better but also felt more secure and durable. And let’s be honest, when your stairs are solid, your confidence soars. If you’ve faced the chaos of imperfect notching, I promise this method is worth exploring. Ready to turn your stair-building frustrations into reliable results? Stick around; I’ll guide you step-by-step, sharing tips and insights from my personal experience.
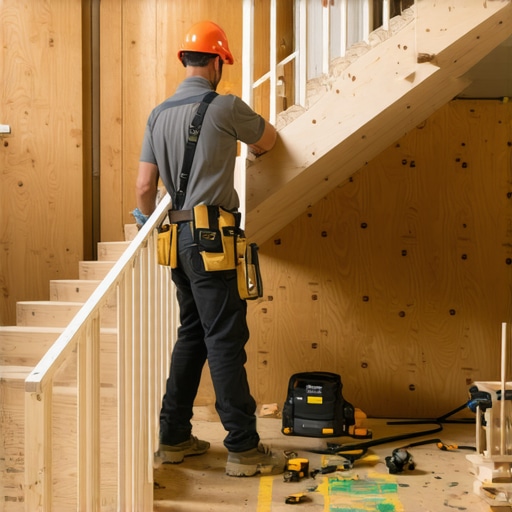
Prepare Your Materials and Layout
Start by selecting high-quality composite decking that withstands weather and foot traffic. Lay out your stair stringers on a flat surface, and mark the notching points according to your desired riser and tread dimensions. Use a chalk line for clear guides. I once messed up the initial measurements, which led to uneven stairs, but double-checking your measurements saves time and hassle.
Mark the Notching Areas Precisely
Identify where each notch should go, aligning with the load-bearing points of your deck frame. Use a square to draw the cut lines, ensuring they are perpendicular to the stringer. Precision here is critical; a misaligned notch can cause instability. During my first attempt, I used a carpentry pencil and a speed square to achieve accuracy, which resulted in a perfect fit.
Cut Notches Using the 2026 Housed Technique
Set your circular saw to the appropriate depth, matching the width of your cut. Make parallel cuts along the marked lines, then remove the waste between them with a chisel or a reciprocating saw. Think of this as carving a puzzle piece — each cut must fit snugly. I remember a time when rushing created jagged edges; taking your time ensures clean, precise cuts that lock securely.
Refine the Notches for Safety and Stability
Smooth out rough edges with a file or sandpaper to prevent splinters and ensure tight contact. Double-check that the notches fully seat onto the framing, providing solid bearing points. During a recent project, meticulous finishing eliminated wobble, making for a safer staircase.
Attach and Secure the Stringers
Use stainless steel brackets or notching cleats to connect the stringers to the deck framing. Ensure they are level and spaced according to your local building code. For added strength, consider internal tension ties or steel supports, especially if your stairs will endure heavy loads. My experience shows that properly secured stringers prevent future sagging or shifting.
Test and Adjust for the Perfect Fit
Place the assembled stairs temporarily and verify alignment with your deck surface. Make adjustments as needed by trimming or sanding. A well-fitted stair stringer not only looks professional but also enhances safety. During one project, minor adjustments saved me from future squeaks and instability.
Seal and Protect the Notch Areas
Apply an appropriate waterproof sealant to the cut edges to prevent moisture infiltration and rot. This is crucial for long-term durability, especially in climates with high humidity or rainfall. I make it a habit to seal all cut surfaces immediately after cutting, which prolongs the life of the wood or composite material.
Integrate Your Stairs into Outdoor Living
Finish by installing handrails, railings, or lighting to enhance both safety and aesthetics. Refer to the latest trends in outdoor design for inspiration, such as this guide. Properly executed, your stairs will seamlessly connect your deck with the landscape, turning functional elements into focal points of your outdoor space.
Many outdoor living enthusiasts believe that choosing the right composite decking material and following basic building principles guarantees a durable, low-maintenance deck. However, this oversimplification overlooks some critical nuances that can make or break your project’s longevity and safety. One common misconception is that all composite decking is created equal; in reality, different brands and formulations react differently under environmental stress, with some more prone to warping, fading, or mold. For example, caps and core materials significantly influence resistance to UV rays and moisture infiltration, which are often overlooked in initial selections. **A key mistake** is neglecting proper ventilation and expansion gaps. Contrary to popular belief, an overly tight installation can lead to unseen issues like buckling and creaking over time, especially during temperature fluctuations. In fact, a study by the North American Decking Association emphasizes the importance of allowing material movement to prevent stress cracks and structural failure.
Investing in the right tools can make all the difference in ensuring your outdoor decking and stairs stand the test of time. One essential item I rely on is the DeWalt Cordless Circular Saw. Its lightweight design and powerful motor allow me to make precise, clean cuts through composite materials with minimal fatigue, especially during long working sessions. I prefer models with variable speed settings, as they provide better control when handling different thicknesses and profiles, reducing the risk of accidental damage. Clamps are often overlooked but are indispensable for securing materials during cutting or assembly. My go-to is the TrustFire Bar Clamps because of their sturdy grip and ease of use, preventing shifting that can cause misaligned notches or gaps in stairs and decks. For larger projects, I utilize a Miter Saw with a sliding function—this allows me to execute precise angles, crucial when fitting stairs and decorative trim seamlessly into your outdoor setup.
Measuring accuracy is vital to durable, safe outdoor living spaces. I recommend the Bosch Laser Distance Measurer. Its digital display and high accuracy—up to 1/16 inch—help prevent costly errors that could lead to uneven steps or warped decking. This device is particularly helpful when working with composite decking, where hidden flaws are less forgiving, and meticulous measurement ensures perfect alignment. Leveling tools are also critical; I always use a quality Stabila Spirit Level to verify that your deck surfaces and stair stringers are perfectly horizontal or vertical, avoiding unevenness that might cause safety hazards down the line.
How do I maintain my tools over time?
Proper maintenance extends the life and performance of your equipment. Regularly clean your saw blades and sharpen them as needed—dull blades cause rough cuts and put undue strain on motors. For power tools, I apply manufacturer-recommended lubricants to moving parts and store them in a dry, cool place to prevent rust and damage. One trend that’s gaining popularity is using protective tool casings that shield equipment from moisture and debris, especially for those who work in dusty or humid environments. This not only preserves your tools but also ensures consistent performance every time you pick them up.
Advancements in technology continue to evolve, signaling a future where smart tools could monitor wear and tear or even automatically order replacement parts. Embracing these innovations now can enhance your project workflow. For instance, leveraging digital level apps synced with your smartphone provides extra precision and record-keeping for your projects, making long-term results more predictable.
If you’re looking to elevate your craftsmanship, I recommend trying out the Laser Distance Measurer for your next project. It’s a game-changer for effective planning and flawless execution. Incorporate advanced measuring techniques and quality tools now, and watch your outdoor living space transform into a durable masterpiece that endures years of use and weather.
What I Wish I Knew When Starting Out
One of the most overlooked lessons in building outdoor stairs is the importance of precision in notching. Even small errors can lead to wobbling or structural issues down the line. I learned this painfully early, realizing that rushing through cuts almost always results in problematic fits—costly and dangerous. A key insight was understanding the value of careful measurements and the necessity of double-checking every mark, especially with the 2026 Housed Method, which demands accuracy for optimal strength.
Another underestimated aspect is the importance of material quality. Choosing high-quality, weather-resistant composite materials paired with proper sealing techniques dramatically extends the life of your stairs. I once used cheaper wood, and it rotted within a few years, whereas switching to durable composites made a noticeable difference in durability and maintenance requirements. This experience cemented my belief that investing in top-tier materials pays dividends over time.
Patience and meticulous finishing are underrated virtues in outdoor stair construction. Lightly smoothing edges and sealing cut surfaces prevented future water infiltration and rot, preserving structural integrity. Rushing leads to rough edges and missed sealing spots, which I discovered can compromise safety long-term. Taking my time and paying attention to detail transformed my projects from okay to exceptional.
Where to Dive Deeper and Keep Growing
If you’re eager to elevate your outdoor living projects, I highly recommend exploring the latest composite decking trends. Staying updated on innovative materials and techniques keeps your work fresh and resilient. Additionally, consulting resources like this guide on designing safe and stylish stairs offers practical insights that can boost safety and aesthetic appeal.
Partnering with experienced professionals can also accelerate your mastery. A good deck builder understands nuances that can make a significant difference. Their expertise ensures not only a sturdy structure but also time-efficient work that meets local codes.
Take Action and Build Confidently
Now is the perfect time to take your outdoor stair building to the next level by applying the 2026 Housed Method. With patience, proper tools, and quality materials, you can create stairs that are safe, durable, and beautiful—turning your outdoor space into a true sanctuary. Remember, each project is an opportunity to learn, improve, and showcase your craftsmanship. Don’t hesitate—grab your tools, follow proven techniques, and start building your perfect outdoor stairs today. What’s been your biggest challenge in stair construction? Share your experiences below and let’s grow together.