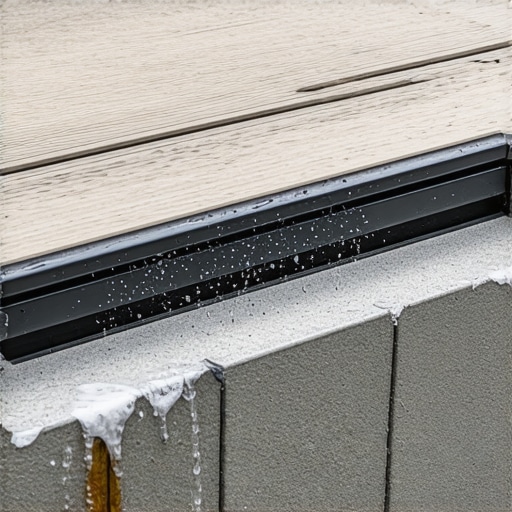
It was a bright spring morning when I finally realized my deck stairs weren’t just an aesthetic feature—they were a magnet for water damage. I had spent weeks designing a beautiful outdoor space, imagining summer barbecues and lazy Sunday mornings. But standing there, drenched in rain, I watched water pool and seep where it shouldn’t be, threatening the integrity of my hard-built project. That lightbulb moment made me rethink everything I knew about deck construction.
Preventing Water Damage: An Honest Approach to Deck Stairs
One of the simplest yet most overlooked details in outdoor building is the drip edge. Early in my deck-building journey, I made the mistake of ignoring this small but mighty component. I thought sealing the wood was enough, but I soon learned that water doesn’t play fair. Without a proper drip edge, water can easily find its way underneath, leading to rot, mold, and costly repairs down the line. If you’ve ever faced warped stairs or spongy treads, you understand the frustration—trust me, I’ve been there.
What I’ve come to realize is that a well-installed drip edge acts like a raincoat for your deck stairs. It directs water away from vulnerable joints and prevents it from pooling. This isn’t just a DIY tip; it’s a practical safeguard that prolongs the life of your outdoor structure. As a seasoned deck builder pointed out, “Proper drainage details are the foundation of a durable deck” ([source](https://deckdesignbuild.com/creating-seamless-transitions-stairs-as-key-elements-in-outdoor-living)).
Have you ever struggled with water damage on your deck stairs? If so, you’re not alone. But don’t worry—adding a drip edge is easier than you think and can save you from big headaches in the future.
Is Installing a Drip Edge Actually Worth the Hype?
Early on, I made the mistake of assuming that just sealing the wood’s surface was enough. But sealing alone only slows down the inevitable. Some skeptics wonder if a drip edge really makes a difference, or if it’s just another unnecessary step in the building process. My experience? It’s worth every minute and dollar. Proper detailing can prevent long-term decay, saving you money and stress.
In the upcoming sections, I’ll share the practical steps I took to incorporate drip edges into my project, along with tips from professional deck builders who swear by this extra measure. So, if you’ve faced issues like warped stairs or rotting posts, stay tuned. We’ll uncover how a simple addition can transform your outdoor space from a potential disaster zone into a resilient retreat.
Ready to give your deck stairs the protection they deserve? Let’s get started.
Installing a Drip Edge: Step-by-Step Guide
To protect your deck stairs from water damage, start by measuring the width of your stairs and cut a metal flashing or a specially designed drip edge to size. I once made this mistake on my own project—cutting the flash slightly too short—and water pooled at the edges, causing early rot. Replacing that section was messy, but it reinforced the importance of precise measurements.
Next, position the drip edge under the top edge of the stair tread, ensuring it extends slightly beyond the outer edge to direct water away from the riser and support framing. Secure it with corrosion-resistant screws, spaced about every 6 to 8 inches. Remember to countersink screws so they don’t catch debris or cause splinters. Applying a generous bead of exterior-grade sealant beneath the edge before fastening provides an extra layer of protection—think of it as sealant’s role similar to choosing weatherproof paint on siding.
When I installed my last drip edge, I used a level to confirm it was perfectly aligned, preventing any water runoff issues. Mistakes happen; I once jetted rain right over a poorly aligned edge, which resulted in pooling and staining on my stairs. An accurate installation ensures water flows away smoothly—preventing rot below and keeping your stairs safe and sound.
Sealing and Finishing
After fixing the drip edge, seal the overlap area with a waterproof sealant to prevent water ingress at joints. This process is similar to sealing gaps in a roof flashing—every detail counts. Be vigilant about sealing under the edge and at corners; neglecting these spots leads to water seeping into vulnerable areas, potentially causing structural damage over time.
If your stairs are made from composite decking, it’s still crucial to add a drip edge. Water infiltration can accelerate wear and discoloration. For a professional finish, consider consulting a deck builder ([learn more about their services](https://deckdesignbuild.com/the-benefits-of-working-with-a-professional-deck-builder-in-your-outdoor-projects)). Their expertise can ensure water is effectively diverted, extending your deck’s lifespan.
Final Checks and Maintenance
Once installed, always test your work by pouring water at the top—observe if it drains correctly without pooling. Regularly inspect the drip edge, especially after heavy rains, to catch any dislodged screws or sealant failures early. Over time, debris can clog the drainage path, so clearing the edges and ensuring smooth water runoff will keep your outdoor stairs in top shape for years to come.
Remember, a simple component like a drip edge acts as the first line of defense against water-induced decay. Incorporating it into your deck stair design is a proactive step that saves money and hassle later. Interested in customizing your entire outdoor space? Check out [these inspiring deck and stair ideas](https://deckdesignbuild.com/maximizing-outdoor-space-inspiring-deck-and-stair-ideas-for-every-budget) for creative solutions that blend style with durability.
Many homeowners assume that choosing composite decking automatically means low maintenance and durability, but this is a misconception. In reality, a common myth is that all composite materials are created equal—yet, the differences in core composition and manufacturing processes can significantly impact longevity and performance. For example, capped polymer boards are more resistant to fading and staining, but even they require careful installation and regular inspections to avoid issues like moisture intrusion or mold buildup ([source](https://deckdesignbuild.com/composite-decking-trends-2025-the-ultimate-guide-for-outdoor-enthusiasts)).Maintaining a durable outdoor deck requires not only quality materials but also the right tools and techniques to ensure long-term performance. Over the years, I have refined my toolkit to include specific equipment that makes inspection, cleaning, and minor repairs faster and more effective. One indispensable item is a high-quality digital moisture meter. I personally use the Protimeter Surveymaster because it provides precise readings of moisture content in wood and composite materials, helping me identify potential rot spots or areas prone to mold before they become major issues. Regular moisture checks, especially after heavy rains or seasonal changes, can extend your deck’s lifespan significantly, aligning with the upcoming composite decking trends expected to shape 2025.
The Hidden Costs of Skipping Important Details
One of my biggest realizations was that overlooking small components like drip edges can lead to significant expenses down the line. Neglecting this detail initially seemed minor, but it resulted in early rot and costly repairs. This taught me to prioritize every element in deck construction, understanding that quality details prevent future headaches.
Another lesson was the importance of precise measurements and careful installation. Rushing or guessing can cause water to pool, accelerating deterioration. I learned that taking the extra time for accurate cuts and proper alignment saves a lot of trouble later, making my outdoor space more durable.
Finally, I understood that regular maintenance and inspections are vital, even after a professional build. Water can find its way into the tiniest gaps, so staying vigilant with inspections saves money and preserves the aesthetic. Incorporating simple checks into annual upkeep makes a noticeable difference in longevity.