Last summer, I stepped onto my deck and immediately felt that familiar squish underfoot. Turns out, a few of those screw holes, which I had drilled just last year, had started to rot. It was a gut punch—seeing all that effort and money waste away because of a tiny overlooked detail. That moment was a real eye-opener, and I knew I had to find a better way to protect my investment.
From that day, I dove into deck-building forums, researched materials, and experimented with different solutions. What I discovered was surprisingly simple but incredibly effective—the trick of using joist tape to seal screw holes. Today, I want to share this insight with you, especially if you’ve been frustrated by premature rot or the ongoing maintenance that’s draining your time and wallet.
The Secret to Long-Lasting, Rot-Free Decks Starts Here
Many DIYers and even some pros overlook the importance of sealing screw holes during installation. It’s easy to assume that pressure-treated wood or composite decking is enough to prevent rot, but the truth is, exposed gaps at screw points are prime entryways for moisture and decay. A small, unnoticed breach can lead to big problems over the years. And once rot sets in, replacing boards can feel like an endless battle.
I made a mistake early on—skipping the sealing step to save time. That was a costly lesson. I learned that even the tiniest gaps can become water traps, especially in climates with high humidity or frequent rain. sealing screw holes with joist tape is a straightforward, budget-friendly fix that dramatically extends the life of your deck.
In the sections ahead, I’ll walk you through how to properly apply this simple trick, explain why it’s so effective, and share some tips to make sure your outdoor space stays inviting for years to come. Ready to give your deck the protection it deserves? Let’s get started.
Gather Your Materials and Prepare for Action
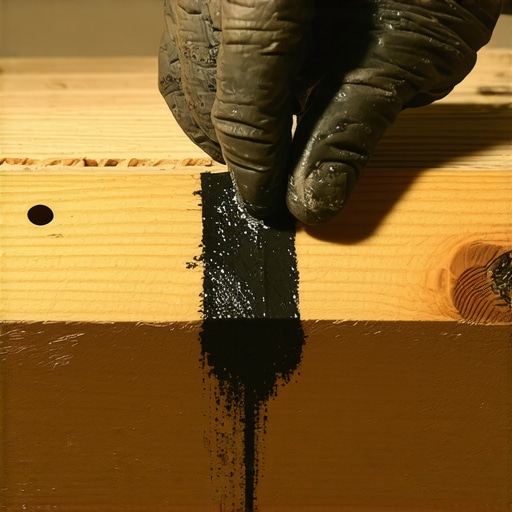
Start by collecting high-quality joist tape, a utility knife or scissors, a wire brush or scraper, and a clean cloth. Clear the deck surface around the screw holes to ensure a dust-free environment. I remember the first time I did this—cutting the tape precisely was messy at first, but the difference in sealing quality was worth the effort. The key is to have everything within reach so you can work efficiently without interruptions.
Clean and Inspect Screw Holes Thoroughly
Use a wire brush or scraper to remove any debris, dust, or splinters around the screw holes. Moisture can hide in these imperfections, promoting rot. Inspect each hole to confirm no water or dirt remains. On a humid day, I installed sealing tape on an older deck I was refurbishing; after cleaning, I noticed some holes had developed slight cracks. Addressing these cracks early ensures better sealing and durability.
Apply the Joist Tape Correctly for a Seamless Seal
Unroll the joist tape and cut strips slightly longer than the width of each screw hole. Peel back the backing and carefully apply the tape directly over the hole, ensuring it adheres firmly. Press firmly around the edges to eliminate air bubbles and gaps. Think of this step like wrapping a tiny package—smooth, tight, and neat. During my first attempt, I didn’t press hard enough, leaving an air pocket. It was a rookie mistake that I corrected by reapplying and pressing out the air for a perfect seal.
Secure the Tape and Final Checks
Once applied, double-check each seal for gaps or wrinkles. Use your finger or a small roller to press the tape down firmly. In my own experience, a quick run over with a clean cloth helps to smooth the surface and ensure maximum adhesion. After sealing, re-tighten the screws if needed; sometimes, the tape can slightly shift or compress. This extra step guarantees that moisture has no chance to seep in.
For the best results, repeat this process during deck installation or whenever you notice new screw holes. Regular maintenance like this can significantly extend your deck’s lifespan, saving you money and time in the long run. If you’re considering upgrading your outdoor space, exploring options like composite decking can also prevent future rot issues—check out the latest composite decking trends for 2025.Many enthusiasts assume that choosing pressure-treated lumber or premium composite decking automatically guarantees a long-lasting outdoor space. However, this overlooks subtle factors that can make or break your project’s durability. For instance, a common myth is that sealants and finishes are optional if you select “weather-resistant” materials, but in reality, proper sealing—especially around joints, stairs, and fasteners—is crucial for preventing moisture infiltration and decay.
A trap many fall into involves neglecting the importance of detailed design versus superficial aesthetics. An attractive deck with elaborate railings might seem ideal, yet if the underlying structure isn’t meticulously planned—considering load distribution, proper joist spacing, and drainage—these visual features can turn problematic over time. I’ve seen numerous projects where a beautiful staircase failed early due to improper stringer support, simply because the builder assumed standard calculations sufficed. For advanced insights on designing safe and stylish stairs, check out [this guide](https://deckdesignbuild.com/designing-safe-and-stylish-stairs-for-outdoor-decks-in-2025).
Another overlooked nuance is the misconception that all composites are equal in quality. Many buyers focus on color and price, ignoring the composition core or brand reputation. Recent studies indicate that capped polymer composites offer significantly better resistance to scratching, staining, and algae growth—essential for maintaining pristine appearance and safety. For detailed comparisons, explore [the latest trends in composite decking](https://deckdesignbuild.com/composite-decking-trends-2025-the-ultimate-guide-for-outdoor-enthusiasts).
Be cautious about underestimating the importance of proper fastening techniques. Using nails instead of screws, or employing insufficient fasteners, may save time initially but leads to faster loosening and deck surface irregularities. An advanced mistake is not accounting for thermal expansion, which can cause composite boards to warp or gaps to develop. Experts recommend, as per [industry standards](https://deckdesignbuild.com/the-error-in-stair-stringer-layout-that-makes-steps-uneven), including expansion gaps in the design phase.
Lastly, the assumption that DIY can replicate professional craftsmanship often results in overlooked details like proper flashing, support placement, and load calculations. While building a deck may seem straightforward, complex considerations—such as proper joist span calculations and drainage—require experience. Collaborating with a professional deck builder can save you from costly mistakes and ensure compliance with safety standards, as highlighted in [this article](https://deckdesignbuild.com/the-benefits-of-working-with-a-professional-deck-builder-in-your-outdoor-projects).
Have you ever fallen into this trap? Let me know in the comments about your experience with hidden pitfalls in outdoor projects. Remember, understanding these nuances elevates your outdoor living space from good to exceptional.
Maintaining your deck and outdoor structures over time requires more than just initial craftsmanship; it hinges on the right tools, consistent techniques, and a forward-looking approach to scaling. Personally, I rely on a dedicated set of equipment that ensures quality and efficiency, especially when working with composite decking and stairs. The first must-have is a high-quality cordless impact driver, which offers the power needed for fasteners and reduces fatigue during long projects. I prefer models with adjustable clutch settings—like the Milwaukee M18 Fuel Impact Driver—because they provide control over torque, protecting delicate components and preventing overdriving screws.
Alongside this, a laser level is indispensable for achieving precise alignment, whether installing stair risers or ensuring that your deck boards are perfectly parallel. I use a cross-line laser for its versatility and ease of use, especially when working on uneven terrain or multi-level designs. Combining this with a moisture meter allows me to check wood moisture content before sealing or staining, extending the lifespan of the materials. Properly dried and sealed wood prevents rot and ensures long-term performance, which is critical given the moisture-prone environments many outdoor spaces face.
For cutting composite decking and framing, a fine-tooth circular saw with a carbide blade minimizes splintering and yields cleaner cuts. I rely on a saw equipped with a dust collection system to keep the workspace tidy and maintain visibility of the cut line. When it’s time to seal screw holes or apply joist tape, I use specialized brushes and rollers for even coverage. A detail-oriented approach to sealing—especially at transitions like stairs or where deck boards meet landscaping—is key to a durable, low-maintenance finish. I also make use of a pneumatic nailer for fastening under stair treads, avoiding hammer-induced mistakes and ensuring consistent pressure.
In the future, I see an increasing role for smart tools and software that can automate measurements, calculate load capacities, and flag potential structural issues before assembly. Integrating these advancements into your workflow can significantly boost accuracy and safety, saving time and money in the long run. For instance, leveraging 3D modeling software can help visualize complex staircases or multi-level decks before construction, reducing costly rework later. To maximize your outdoor space, adopting these innovative tools and techniques will keep your project running smoothly and extend the life of your investments.
Wondering How to Keep Your Deck in Top Shape Over Time?
The secret lies in routine inspections, periodic sealing, and replacing worn fasteners before they fail. Regularly checking for loose screws or gaps and sealing any new holes with high-quality joist tape can prevent moisture intrusion and rot. Investing in the right tools—like a precision impact driver and laser level—not only makes these tasks easier but also ensures they’re done correctly the first time. For a comprehensive upgrade, consider exploring composite decking options, which are designed for minimal upkeep and maximum longevity. Starting with the right tools and a proactive maintenance mindset sets the stage for outdoor spaces that last for decades.
The Hidden Lessons That Changed My Outdoor Projects Forever
One of the most eye-opening moments in my outdoor building journey came unexpectedly—discovering how seemingly small details, like sealing screw holes, can make a huge difference in the longevity of a deck. I learned that skipping these steps initially saved time but cost me in the long run, revealing that attention to detail is vital. A simple shift to proactively sealing screw holes with joist tape became my game-changer, teaching me that proactive maintenance is the true foundation of durability.
Another lightbulb moment was realizing that even premium materials need proper sealing and support. No matter how advanced the composite or pressure-treated lumber, neglecting sealing or structural considerations accelerates decay. This taught me that knowledge about design nuances—like proper joist spacing and drainage—can save you endless repairs and keep your outdoor space beautiful for years to come.
Where to Elevate Your Decking Knowledge
For those eager to deepen their understanding, I rely on tools and resources like the guide to composite decking, which offers insights into choosing durable, low-maintenance materials. My impact driver and laser level are indispensable, making precise sealing and alignment straightforward. Consulting industry-standard publications and experienced deck builders has also been invaluable; their tips competitively reduce trial-and-error, saving both time and money.
Your Next Step Matters
Embarking on or upgrading your outdoor living space with confidence starts with small, intentional actions—like sealing screw holes diligently or selecting the right tools. Remember, every detail counts toward creating a deck that endures through seasons and years, transforming your backyard into a lasting retreat. Don’t wait for rot or shifting boards to remind you of neglected maintenance—act now and build smarter from the start.
Have you ever overlooked a small detail that impacted your outdoor project long-term? Share your story below—I’d love to hear how making adjustments early saved your deck in the future!