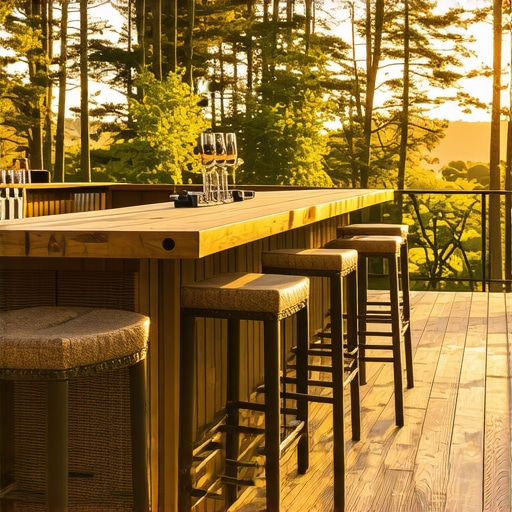
I’ll never forget the look on my brother’s face when he sat down at my first DIY deck bar. He looked like a kid trying to peer over a tall fence. I’d spent a fortune on composite decking and weeks perfecting the layout, but I’d ignored the simple ergonomics of seating. Within twenty minutes, everyone had abandoned the ‘fancy’ bar I built to sit on the stairs. It was embarrassing. I realized then that a built-in bar is only as good as the comfort it provides. If the height is off by even two inches, it transforms from a social hub into an architectural annoyance. Today, I’m going to walk you through the hard-won lessons I learned so you don’t make the same mistakes I did. We’re going to get your seating perfectly dialed in.
Don’t Let a Tape Measure Ruin Your Backyard Vibe
When you’re deep in the weeds of designing your dream outdoor space, it’s easy to focus on the aesthetics. You want the colors to pop and the railing to be sleek. But the most critical dimension for your built-in bar is the vertical one. My biggest early mistake was simple: I measured the bar height before I even looked at the stools I wanted to buy. I just assumed ‘bar height’ was a universal law. It isn’t. When you hire a skilled deck builder, they usually push for a standard 42-inch height. There’s a reason for that. It allows for standing guests to lean comfortably while seated guests remain at eye level. This creates a ‘social equity’ that makes a party flow better. I once made the mistake of using indoor furniture measurements for an outdoor space, forgetting that deck boards and outdoor stool cushions behave differently under the sun. Have you ever been the only one sitting down while everyone else is standing, feeling like you’re talking to people’s belt buckles? That’s exactly what happens when your bar is too low. [image placeholder]
Is a custom bar really worth the extra framing hassle?
I get it. Adding a built-in bar means more joists, more structural screws, and more precision. You might be wondering if you should just buy a standalone patio set instead. But here’s the truth: a built-in bar saves an incredible amount of floor space. On a small deck, every square foot counts. By integrating the seating into the perimeter, you keep the center open for foot traffic and lounging. Moreover, a built-in bar acts as a natural windbreak. When you use composite decking trends for 2025 as your guide, you’ll see that ‘multifunctional zones’ are the biggest thing in outdoor living right now. The key is getting that 40-to-42-inch sweet spot right. According to architectural standards, this range is the gold standard for bar-height seating because it accommodates the widest variety of body types. If you go lower—say, 36 inches—you’re in ‘counter height’ territory. That’s great for prepping food, but it often feels too low for a casual beer. Before we dive into the specific framing moves, I have to ask: have you already faced the frustration of guests abandoning your deck because the seating was just plain uncomfortable?
Build a Foundation That Won’t Flex
When you’re building a bar, you’re essentially creating a high-leverage lever. Every time someone leans their weight on that outer edge, they’re trying to pry your railing off the deck. This is why I stopped using standard nails. To make this thing rock-solid, you need to treat the framing like it’s holding up the house itself. I start by doubling up the joists directly beneath where the bar posts will sit. If you skip this, your bar will eventually develop a ‘drunk’ lean that no amount of shimming can fix. I learned this the hard way on a project where I thought three-inch nails would suffice; two seasons later, the wood had expanded, the nails had backed out, and the bar felt like a loose tooth. Now, I exclusively use structural screws because they bite into the timber and stay there.
Lock Your Posts with Internal Blocking
Think of blocking like the skeleton of your deck. To get that 42-inch height perfectly stable, you need to install ‘mid-span’ blocking between your joists. This prevents the joists from twisting under the lateral pressure of people leaning against the bar. It’s a simple move: cut short chunks of pressure-treated lumber and wedge them tightly between the joists, securing them with structural screws. If you’re working with composite decking, remember that the material itself isn’t structural. It’s beautiful and low-maintenance, but it relies entirely on the skeleton you build beneath it. 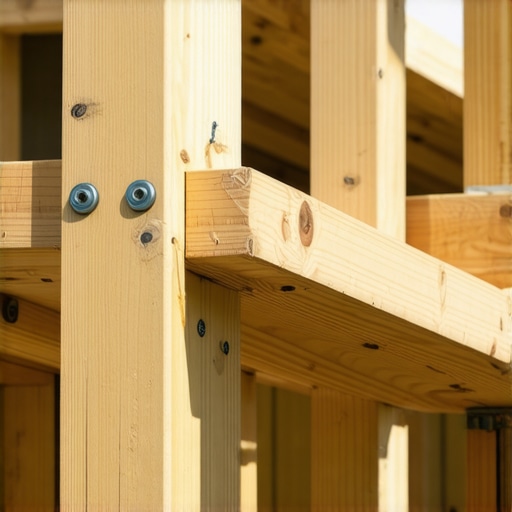
How to Handle the Overhang Without Sagging
The ‘knee-knock’ is the enemy of a good bar. You need at least 10 to 12 inches of overhang so your guests aren’t constantly hitting their shins against the siding. But a 12-inch overhang in thin air is a recipe for disaster. I like to use heavy-duty steel brackets hidden under the bar top or extend the sub-structure out using a ‘corbel’ style frame. When you’re designing your dream outdoor space, plan this overhang to face the view, not the house. This ensures that even when the bar is full, the flow toward your stairs remains clear.
Integrate Your Bar with Your Deck Stairs
One of the slickest moves a skilled deck builder can pull off is wrapping the bar top around the top landing of the stairs. This creates a natural ‘welcome station.’ However, you have to be careful about height transitions. If the bar is too close to the first step, it becomes a trip hazard. I always leave a minimum of 36 inches of clearance between the bar seating and the start of any outdoor deck stairs. This keeps the transition safe and ensures that your outdoor living area feels expansive rather than cramped. I once saw a DIY job where the bar stool was literally six inches from a downward flight of stairs; one accidental chair-scoot and someone was headed for the ER. Don’t be that guy. Use picture framing your deck techniques to visually mark the edge of the bar area versus the start of the stairs. This isn’t just about style; it’s a subconscious cue for safety.Most people assume that because composite is ‘engineered,’ it is inherently stronger than traditional wood. In reality, while it is far more durable against rot, it lacks the structural stiffness of kiln-dried pressure-treated lumber. I often see homeowners try to save a few bucks by spacing their stair stringers 16 inches apart. This is a massive mistake. When you’re designing safe and stylish stairs for outdoor decks in 2025, you have to account for the ‘creep’ factor—the tendency of composite materials to slightly sag under weight over time. To prevent that spongy feeling that makes guests nervous, you actually need stringers spaced at 12 inches on-center. According to technical bulletins from the North American Deck and Railing Association, improper stair support is the most frequent point of failure in DIY inspections. If your bar area is a high-traffic zone, understanding why your deck stairs need a middle stringer for stability becomes a matter of safety, not just comfort. The ‘Oops’ factor I see most often involves thermal expansion. Wood expands across its grain, but composite decking expands primarily along its length. If you butt your bar-top boards tight against a post in the morning, by mid-afternoon, those boards will buckle and pull your screws right out of the frame. This is why your composite boards are expanding more than expected. I’ve seen beautiful bar tops literally hump up in the middle because the builder didn’t leave a 1/8-inch gap.  I’ve also noticed a trend where people think darker colors look ‘richer’ for a bar top, but why I avoid dark grey decking in sunny backyards is a lesson in basic thermodynamics. A dark composite bar top can reach 160 degrees in direct sun. Your guests aren’t going to lean on a surface that fries their forearms. If you are set on a darker look, you’ll need to plan for the best way to mount a sun shade to your deck. It’s these logistical nuances that separate a ‘good looking’ deck from a functional masterpiece.
Do you really need to double-joist under every bar seam?
If you want your bar to look like a pro built it, the answer is absolutely. A common trap is thinking a single joist can support two boards meeting end-to-end. It can’t. One board will always end up with less ‘meat’ for the fastener to grab, leading to a loose, dangerous edge. I always tell folks that the benefits of working with a professional deck builder often come down to these hidden framing decisions that you won’t see once the boards are down, but you’ll definitely feel under your feet. Integrating a bar requires more than just adding a shelf; it requires a skilled deck builder to reinforce the entire section of the deck to handle the specific lateral loads of guests leaning their full weight against it. Have you ever fallen into this trap of under-building the sub-frame because it seemed like overkill? Let me know in the comments.If you want to avoid that heart-sinking feeling of a sagging bar top, you need to stop reaching for the box of standard deck screws. For these high-leverage areas, I swear by the impact driver paired with heavy-duty structural screws. I’ve found that the reason we use structural screws instead of old-fashioned lag bolts comes down to the shear strength; they won’t snap when four grown men decide to lean on your bar at once. While we’re talking about the ‘guts’ of the build, why I always use joist tape on every single deck frame is my number one tip for longevity. It creates a waterproof barrier that stops the wood from rotting where the composite traps moisture. If you’re designing your dream outdoor space, don’t skimp on this five-dollar roll of tape. It’s the difference between a ten-year deck and a thirty-year deck. According to the Simpson Strong-Tie Deck Connection and Fastening Guide, most deck failures occur at the ledger or the stair-to-deck transition, so over-engineering these points isn’t just paranoia—it’s smart building.
Keep the burger grease away from your expensive boards
Maintenance for choosing the right composite decking for durable low-maintenance outdoor areas isn’t about scrubbing; it’s about prevention. When the first barbecue sauce spill happens—and it will—you need to know how to clean grease stains off composite without ruining the finish. Most people panic and reach for a pressure washer, but why you should never power wash your composite deck is a lesson in surface integrity; you’ll literally peel the ‘wood grain’ right off the plastic. Instead, keep a spray bottle of dish soap and warm water nearby. It’s boring, but it works better than any ‘industrial’ cleaner that might discolor your boards.  Looking ahead to composite decking trends 2025, we’re seeing a massive shift toward ‘smart bars.’ I’m talking about integrated wireless charging pads hidden under the composite and the best way to light a deck perimeter for parties using low-voltage LED strips that you can control from your phone. This is why a digital designer is the best move for planning a complex backyard deck; you can map out the wiring before you ever cut a single joist. If you really want to level up your outdoor living experience, I challenge you to try the ‘hidden fastener’ method on your next bar top. It’s a bit more tedious, but the seamless look is absolutely worth the extra hour of work.
What My Guests Taught Me After Three Bar Rebuilds
Building a bar is about more than just a flat surface; it is about the experience. I have realized that the best bars are the ones where you forget you are on a deck at all. One major lightbulb moment was realizing why I always use double joists under composite seams—it is not just for stability, but to prevent that tiny, annoying bounce that happens when someone sets a heavy drink down. Another lesson? Don’t forget the footrest. A 42-inch bar feels like a cliff if your legs are dangling. I often recommend the best way to install a cocktail rail on a staircase that leads right into the bar area, creating a continuous flow for your guests’ hands and drinks. Lastly, remember that the truth about maintenance-free decking claims is that while the boards won’t rot, they still need a thoughtful design to stay beautiful. If you don’t account for drainage around the bar posts, you’re just inviting trouble later on.
[image placeholder]
The Tools and Resources I Never Start Without
Over the years, I have narrowed down my toolkit to the essentials that actually save time and frustration. First, I never pick up a hammer when the reason we use structural screws instead of old-fashioned lag bolts is so clear; the speed and strength of modern fasteners are unmatched. I also swear by a high-quality joist tape; learning why I always use joist tape on every single deck frame was a game-changer for the longevity of my projects. For planning, I highly suggest using 3D software; seeing the layout before cutting is why a digital designer is the best move for planning a complex backyard deck. Finally, keep a scrap piece of your chosen board to test out how to clean grease stains off composite without ruining the finish before the first party starts.
Turn Your Backyard Into the Neighborhood Hub
There is a specific kind of magic that happens when the sun goes down and the first round of drinks is served at a bar you built with your own hands. By focusing on ergonomics and structural integrity, you aren’t just adding a feature; you are transforming your outdoor living with custom composite decking ideas that will last for decades. It can feel intimidating to start, but once those first few structural screws are in, the vision starts to take shape. You have the measurements, you have the framing plan, and now you have the insider tips to avoid the ‘amateur’ pitfalls. It is time to stop dreaming and start building. Have you ever struggled with matching your bar height to the perfect set of stools, or did you find a height that works better for your family? Let me know in the comments below!