Ever spent hours cursing over a stubborn, uneven corner joint while decking or framing? I sure have. There was this one project, a deck extension I wanted to look flawless, but those jagged, misaligned corners kept nagging at me, stealing the satisfaction from what should’ve been a straightforward build. That lightbulb moment struck when I finally learned the secret to cleaner, more precise corner joints—the 45-degree miter trick. Today, I want to share this trick with you, especially if you’ve faced similar frustration with composite decking or outdoor stairs. We’ll get into how this simple cut can elevate your craftsmanship and cut down on costly mistakes.
Nailing That Perfect Corner Joint with a Simple Trick
Measure and Mark Precisely
Start by selecting your decking boards or framing materials and measure the length needed for the corners. Use a square and pencil to mark the exact 45-degree angle at the ends of your boards. Remember, clarity in marking avoids costly mistakes later. I once mismeasured a corner, leading to a jagged joint that took hours to fix, but accurate marking from the start saved me the headache.
Set Your Miter Saw Correctly
Adjust your miter saw to cut at a 45-degree angle. Ensure the blade is sharp and clean to make smooth cuts. Double-check the angle setting with a protractor or a carpenter’s square for precision. In my first attempt, I underestimated the importance of blade sharpness, which resulted in uneven edges requiring re-cuts. Precise setup makes all the difference.
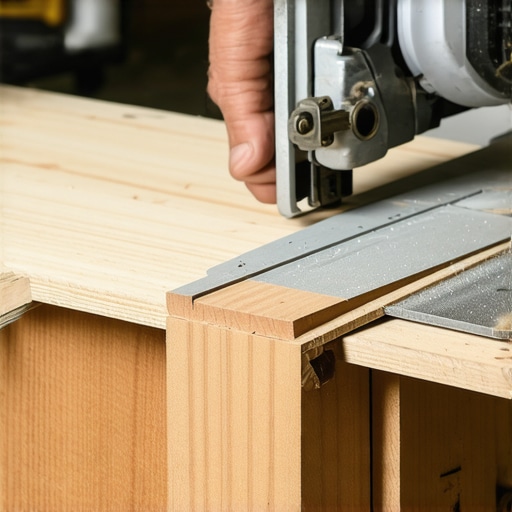
Cut the Boards with Stability
Secure your board firmly on the saw’s rest, keeping your fingers clear of the blade. Cut slowly and steadily, ensuring the saw maintains a consistent angle. For long boards, support them with sawhorses to prevent wobbling. I recall one messy cut where the board shifted, causing a gap in the joint—stability during cutting guarantees tight-fitting corners.
Dry Fit Before Final Assembly
Place the cut pieces together to check the fit. Look for tight, seamless joints. If gaps appear, lightly sand or trim the edges. This step caught my mistake when I realized my angle was slightly off, saving me from glueing mismatched pieces. A dry fit ensures for a clean assembly.
Fixing Imperfections Quickly
If you notice a minor misalignment during assembly, use a rapid-setting wood adhesive or small clamps to hold the pieces as the glue cures. For small gaps, a bit of wood filler and sanding can hide imperfections. I once used quick clamps to adjust a joint and achieved a nearly invisible seam—patience and minor adjustments pay off.
Finish with Consistent Sealant and Protection
After assembly, apply a suitable sealer or finish to protect your corner joints from weathering, especially on outdoor decks or stairs. Proper sealing prolongs lifespan and maintains appearance. If your deck will be exposed to harsh elements, consider referencing [designing safe and stylish stairs](https://deckdesignbuild.com/designing-safe-and-stylish-stairs-for-outdoor-decks-in-2025) to ensure safety and durability.
Many DIY enthusiasts and even seasoned carpenters fall prey to misconceptions about outdoor stairs and decking. One prevalent myth is that installing standard pressure-treated wood is always the most cost-effective and durable choice, but modern composite decking options offer lower maintenance and longer lifespan when properly selected. Relying solely on traditional materials without understanding their limitations can lead to premature wear or safety hazards. For example, some believe that all composite boards warp equally, but choosing boards with high cap warranties can prevent issues like warping or mold, as highlighted in recent industry studies.
Why do some outdoor stairs seem to look good initially but fail prematurely?
It often boils down to overlooked nuances like proper framing, correct joist spacing, and waterproofing details, which are crucial for long-term durability. An advanced mistake many overlook is not incorporating adequate drainage beneath the deck or stairs, leading to moisture accumulation and rot. These details are vital because a well-designed stair doesn’t just look good; it maintains safety and longevity over decades. For ideas on choosing the right materials and design strategies, you can explore professional tips on composite decking that withstands weather and usage. Avoiding common pitfalls can save you money and stress, especially if you plan to enjoy your outdoor space for years. Remember, a professional deck builder can help identify these nuanced details that often escape DIYers. For more insights, see how working with a pro can elevate your project and ensure safety. Have you ever fallen into this trap? Let me know in the comments.
Investing in the Right Tools for Lasting Outdoor Living Projects
When it comes to maintaining your outdoor deck or stairs, quality tools can make all the difference. I personally rely on a high-quality cordless impact driver — it offers the versatility and power needed for tightening fasteners without overdriving or damaging composite material, which can be sensitive to overtightening. Additionally, a digital moisture meter helps me monitor wood and composite board conditions over time, preventing issues like warping or mold before they become serious problems.
For cutting and trimming, I prefer a precision miter saw with adjustable angle stops. It ensures consistent, accurate angles—crucial for tight corner joints and seamless transitions. I also swear by a laser level for ensuring that all railing, stairs, and deck boards are perfectly aligned, which is especially important on larger projects where small inaccuracies tend to snowball over the long term.
Keep Your Deck Looking Great for Years
Long-term results depend on consistent maintenance. I recommend setting a seasonal schedule that includes power washing with a gentle, composite-appropriate cleaner and applying a high-quality sealant every 2-3 years. This upkeep preserves the vibrancy of composite decking colors and prevents moisture ingress that could lead to rot or mold—things that can get overlooked when distracted by other projects. Modern sealers with UV blockers also slow down the fading process, keeping your outdoor space vibrant and inviting.
Another tip is to regularly inspect fasteners and brackets. Over time, exposure to the elements can cause hardware to loosen or corrode. Using hidden fasteners designed for durability helps maintain a sleek look while reducing maintenance frequency.
How can I keep my stairs and deck accessories in top shape over the years?
Proper drainage management is key. By ensuring that water drains efficiently beneath the deck and around stairs, you prevent moisture build-up that accelerates decay and mold growth. Installing proper drainage systems and adding protective coatings on exposed metal components extend your deck’s lifespan significantly. As the industry moves towards more sustainable materials, I predict a shift towards recycled composite blends combined with innovative protective coatings that require even less upkeep in the future.
Making these adjustments now can save you costly repairs later. Incorporate tools like a moisture meter into your regular inspections — it’s a small investment that pays off by catching issues early. Give one of these advanced maintenance tips a try today, and enjoy your outdoor space well into the future!
Lessons from the Trenches of Decking
- I realized early on that rushing through measuring and marking often leads to ill-fitting corner joints, which can be frustrating and time-consuming to fix. Precision from the start, even if it takes a few extra minutes, saves headaches later.
- Investing in sharp, high-quality blades and proper saw adjustments isn’t just about cleaner cuts—it’s about creating a foundation for durable, seamless joints that stand the test of weather and time.
- Don’t underestimate the power of a dry fit. It’s tempting to skip this step, but catching misalignments before final assembly prevents major setbacks and makes finishing much smoother.
- Understanding the nuances of material choices, like selecting composite boards with high cap warranties, can prevent warping and mold, which are common pitfalls many overlook in outdoor projects.
My Go-To Arsenal for Outdoor Deck Success
- cordless impact driver: For fastening composite decking without damaging delicate surfaces, I trust a high-quality impact driver that offers control and power.
- digital moisture meter: Monitoring moisture levels before and during project work helps prevent rot and warping, especially in climates with fluctuating humidity.
- precision miter saw with adjustable stops: Ensuring accurate, consistent cuts is vital for corner joints and clean transitions. I also recommend a laser level for flawless alignment.
- decent sealant and UV protectant: Protecting your investment from the elements prolongs your deck’s life and keeps it looking vibrant for years.
Transform Your Outdoor Space—It’s Worth It
Don’t hesitate to bring your outdoor living dreams to life with the confidence that comes from knowing the subtle details—like perfect corner joints and proper drainage—make all the difference. Remember, a well-crafted deck not only enhances your home’s beauty but also provides a safe, inviting space for years to come. For inspired ideas on maximizing your outdoor area, check out these creative deck ideas. Embrace the process, learn from each step, and enjoy turning your vision into reality. How will you improve your next outdoor project? Share your plans below and let’s build something great together!