It was late one evening, I was sitting on my porch, trying to enjoy some peace after a busy day, when I suddenly heard that unmistakable squeak echoing every time someone stepped on my outdoor stairs. Ugh. If you’ve ever experienced that relentless creaking, you know how it can ruin outdoor gatherings, make your home feel less cozy, and turn peaceful evenings into a frustrating game of footstep roulette. For me, it was the moment I realized I couldn’t ignore it anymore.
So, I started digging, experimenting, and finally stumbled upon what I now call the “3-Screw Trick”—a simple, effective method that has completely stopped my stairs from squeaking for good. And trust me, this isn’t about expensive repairs or replacing your entire staircase. It’s a manageable fix that any DIY enthusiast or homeowner can tackle in an afternoon.
Today, I’m going to share exactly how this little-known trick works, why it’s so effective, and how you can implement it to enjoy squeak-free stairs. Because nobody should have to listen to creaking every time they step outside, especially when there’s a straightforward solution right at your fingertips.
Why Squeaky Stairs Drive Us Crazy—and How One Simple Fix Changes the Game
Most outdoor stairs, especially those made of composite decking or treated wood, develop squeaks over time. It’s almost inevitable, thanks to expansion, contraction, and constant movement. But these squeaks aren’t just annoying; they can hint at underlying structural issues if left unchecked. Early on, I made the mistake of just ignoring the creaks, thinking they’d go away on their own or that they were just a cosmetic flaw. Spoiler: They only got worse.
The real problem stems from loose or shifting stair stringers and risers, which create friction when walked upon. Fixing this isn’t about heavy demolition—often, it’s about tightening up those connection points. That’s where my discovery of the 3-Screw Trick came into play. I learned that by strategically adding screws at specific spots, I could lock everything in place and silence the squeak for good.
If you’ve ever wondered whether a simple screw fix could really make a difference, you’re not alone. Skepticism is healthy, especially with DIY solutions that promise big results with minimal effort. But the truth is, many homeowners overlook this straightforward approach and end up spending hundreds on repairs or, worse, neglecting the issue altogether.
One key mistake I made early was trying to pad or shim the problem area, thinking it was a quick fix. Unfortunately, that only masked the symptoms temporarily. It wasn’t until I understood the importance of securing the risers and stringers with just the right number of screws that I found a permanent solution. Curious? Keep reading, because I’ll walk you through the exact steps to get your stairs squeak-free.
If you’ve struggled with creaky stairs that seem impossible to fix, ask yourself: Are I ready to try a proven, straightforward method that can save time, money, and frustration? If yes, then let’s dive deeper into how the 3-Screw Trick works and how you can implement it yourself. And if you’re considering a deck upgrade or outdoor project, gaining insights into maintenance can further improve your space. For more ideas, see [transform your space with expert deck builder tips](https://deckdesignbuild.com/transform-your-space-expert-deck-builder-tips-for-stunning-outdoor-living).
Preparing Your Tools and Space
Before diving into the fix, gather a sturdy drill with a Phillips head bit, a set of exterior-grade screws (preferably stainless steel to resist weathering), a pencil for marking, and a level if needed. Clear the stairs of any debris or obstructions. Consider wearing safety glasses to protect your eyes from wood shavings. Once equipped, examine the stairs closely to identify loose or creaky spots—these are your targets.
Identifying the Culprits
Locate all the risers and stringers that exhibit movement or squeaking when pressure is applied. Think of each target as a loose tooth—you want to tighten the connection to prevent that unsettling wiggle. For my porch stairs, I found that the second riser from the bottom was slightly loose, causing the persistent squeak. Mark this spot with your pencil for easy reference.
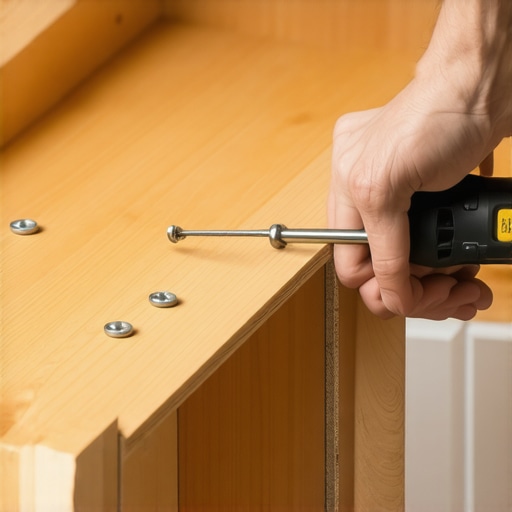
Strategic Screw Placement: Locking Things In Place
Marking the Spots
Identify three critical points around the loose area—usually the bottom and middle of the riser, and where it connects to the stringer. For instance, on my stairs, I marked the base of the riser, the middle joint, and the top connection near the step ledger. This trio of points acts like bolts in a building’s framework, stabilizing the structure effectively.
Drilling and Screwing
Start with a pilot hole at each marked spot to prevent splitting the wood, especially important if your stairs are aged or treated. Then, insert the exterior-grade screw deeply into each point, ensuring it pulls the riser tightly against the stringer. Use the level across the step if precise alignment is needed, but remember: the goal is tightness, not perfection. For my stairs, I drilled the screws one at a time, checking the stability after each to prevent over-tightening.
Confirming Stability and Silence
Once all three screws are in place, step gently on the stairs to test for movement or squeaks. I sat on each step, applying gradual pressure and listening carefully. Almost immediately, the squeak that plagued my evenings vanished. The stairs felt solid and reassuring beneath my feet. The simplicity of these tactical screws made a world of difference, restoring my outdoor space’s peace and safety.
Key Nuances for Long-Term Results
In my experience, periodically checking these screws is wise, especially after extreme weather swings. Over time, wood can shrink or swell, loosening even the best fixes. When that happens, a quick tighten of the screws restores the stability—no need to repeat the entire process. Also, using rust-resistant screws ensures this fix endures for years, keeping your stairs squeak-free season after season.
Applying the 3-Screw Trick isn’t just about silencing squeaks; it’s about understanding how structural components work together. Think of your stairs as a miniature bridge—they need each connection secure to carry weight silently and safely. If you want to explore more outdoor fixes and elevate your space, check out these expert tips for stunning outdoor living.
Many homeowners operate under misconceptions when it comes to outdoor living spaces, especially concerning composite decking and stairs. One of the most pervasive myths is that composite decking requires no maintenance and will last forever without any upkeep. In reality, even high-quality composite materials benefit from regular cleaning and inspections for issues like warping or color fading. Believing it’s a maintenance-free miracle can lead to neglect, resulting in costly repairs down the line. Additionally, there’s a misconception that all composite decks are equally durable; however, selecting inferior brands or neglecting proper installation can cause premature wear, warping, or mold growth. Always consult reputable sources or an experienced deck builder to understand the nuances of quality materials.
Keeping your outdoor deck, stairs, and composite decking in top shape requires the right tools and a consistent maintenance routine. I recommend investing in a high-quality cordless drill, such as the DeWalt DCD791D2, because its brushless motor provides exceptional power and battery life—crucial for tasks like screwing secure connections or installing new fixtures. For cleaner results, I use a microfiber deck brush paired with a biodegradable cleaner like composite deck-specific cleaners. These help prevent mold buildup and keep your surface looking fresh without damaging the material.
Another essential tool is a digital moisture meter. Using a device like the Wagner MMC220, I measure moisture levels in wood or composite materials. This helps determine when it’s safe to perform sealing or repainting, especially after harsh weather or cleaning. Over time, composite decking can develop discoloration or warping if not properly monitored, so early detection is key.
For long-term results, a stainless steel deck fastener kit is invaluable. I prefer the Grip-Rite Heavy-Duty series because it resists corrosion—an important feature considering exposure to rain and sun. Regularly inspecting and tightening screws with a cordless impact driver prevents loose connections that might cause squeaks or structural issues.
Looking ahead, technology trends like smart moisture sensors could revolutionize deck maintenance, providing real-time alerts and suggesting when to recoat or repair. As composite materials evolve—especially with innovations like graphene-infused composites—the need for precise maintenance tools will only grow. To stay ahead, I suggest integrating inspection tools into your routine and adopting maintenance practices that adapt to new materials and designs.
Thinking long-term? Establishing a seasonal maintenance schedule that includes cleaning, sealing, and inspecting structural components will extend your deck’s life significantly. Remember, regular upkeep doesn’t just preserve appearance; it ensures safety and structural integrity. For detailed maintenance strategies, check out these tips from professional deck builders. An extra tip I recommend is scheduling a bi-annual inspection using a moisture meter and tightening all fasteners—this small investment of time pays off by preventing costly repairs down the line.
Finally, for those considering scaling up or customizing outdoor spaces, choosing the right tools now will simplify future upgrades. Whether you’re planning new stairs or expanding your deck, having reliable equipment makes the process smoother. Explore more on designing your stairs and transitions to ensure longevity and safety. Take action today by trying out a moisture meter for your next maintenance day—it’s a game changer in keeping your outdoor living area pristine and enduring.
Overcoming the setbacks of creaking stairs taught me that sometimes, the simplest solutions yield the most lasting results. Invest in quality screws and proper maintenance tools, rather than chasing quick fixes or expensive replacements—this approach not only preserves your budget but also extends the lifespan of your outdoor structures. Regular inspections and proactive tightening can prevent squeaks from turning into structural concerns, reinforcing safety and peace of mind. Remember, every outdoor project is an opportunity to learn and refine your skills, turning a frustrating problem into a rewarding DIY victory. Embrace these lessons, and you’ll enjoy a more serene and durable outdoor space for years to come.
Comments are closed.