It was a frustrating afternoon that finally led me to discover a simple trick that transformed my outdoor stairs from amateurish to professional-looking. I had spent countless weekends trying to make my deck stairs look just right, but every time I thought I nailed the finish, a crooked board or an uneven overhang gave away my amateur status. You know that feeling—seeing a glaring flaw you can’t unsee, despite your best efforts. That was me, until I realized that the secret to a clean, polished stair finish isn’t about fancy tools or complicated cuts, but a straightforward overhang adjustment.
The Power of the 2-Inch Overhang for Flawless Stairs
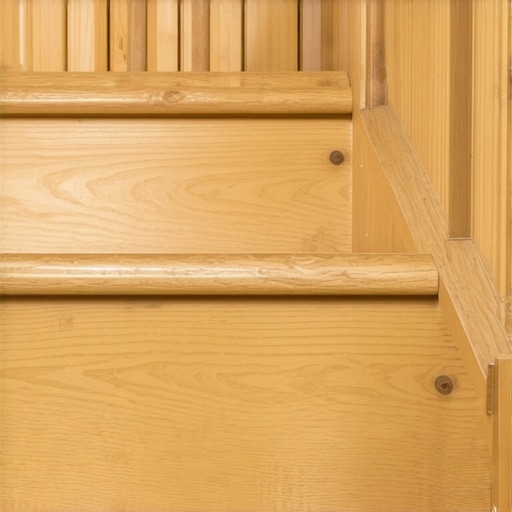
Imagine looking at a set of stairs that seem to just flow perfectly—every tread aligned, every riser smooth, and the edges refined. The difference? A well-executed overhang that sticks out just enough to hide the framing underneath and creates a crisp edge. This technique isn’t just about aesthetics; it helps prevent water infiltration, reduces splintering, and enhances durability. I promise, mastering this simple 2-inch overhang makes all your outdoor stairs look professionally finished, even if you’re a DIYer.
Is This Trick Really Better Than Using a Level and Ruler?”
When I first learned about the overhang trick, I was skeptical. Honestly, I thought it was just another gimmick—until I made a mistake early on by merely eyeballing the overhang without measuring. That mistake led to uneven edges and a finish that looked more haphazard than intentional. But once I adopted the 2-inch overhang rule, everything changed. This approach ensures consistency and saves time, making your stairs not only more attractive but also more functional. For more insights on perfecting outdoor structures, check out [the benefits of partnering with professional deck builders](https://deckdesignbuild.com/the-benefits-of-working-with-a-professional-deck-builder-in-your-outdoor-projects). Now, let’s delve into how you can implement this trick step-by-step in your own project.
Measure and Mark Your Overhang Accurately
Start by locating the edge of each tread and riser precisely where you want your overhang to sit. Use a reliable tape measure and a carpenter’s pencil to mark the points that will define the 2-inch extension beyond the framing. I once skipped this step and eyeballed the overhang, which led to uneven edges. Proper measurement is crucial—think of it as setting anchor points for your finish.
Use a Straight Edge or Chalk Line for Consistency
Once your points are marked, draw a straight line across each tread using a chalk line or a straightedge. This visual guide ensures your overhang is uniform across all stairs. During my first attempt, I didn’t use a straight edge, resulting in waviness—like a rollercoaster. Taking this extra step simplifies aligning your boards and produces a clean, professional look.
Cut Your Boards with Precision
Transfer the chalk line onto your composite or wood tread boards. For accuracy, use a circular saw with a guide or a straightedge clamp. Double-check your measurements before cutting—an extra measurement can save you from re-cutting and wasting material. Remember, a clean cut at the 2-inch mark creates that crisp edge that hides framing imperfections and adds visual impact.
Pre-Drill and Secure the Boards Properly
Pre-drilling holes prevents splitting, especially on composite decking, which can be brittle when cut. Position the screws about 1/4-inch from the edge of the overhang to avoid splitting and to keep the surfaces smooth. During my project, I used hidden fasteners for a sleek finish, but traditional screws work if countersunk properly. This careful securing ensures your overhang stays flush and sturdy over time.
Check for Level and Consistency as You Proceed
Use a level or laser line to verify each tread’s overhang before final fastening. Minor discrepancies can add up, leading to an uneven staircase. I once corrected a crooked board by slight adjustments before final tightening, which saved me from a wobbling step. Consistency here is key—measure twice, secure once.
Finish with Proper Edging and Sealant
Apply a trim or fascia board along the overhang edge to hide any rough cuts and framing. Sealants or paint can further enhance durability and aesthetics. A neat finish is the hallmark of a professional carpenter—think of it as putting on the jewelry after a great haircut.
Mastering the Technique Saves Time and Looks Sharp
Implementing this precise overhang method has transformed my outdoor stairs from jarring and amateurish to sleek and inviting. It’s not about expensive tools but about attention to detail—measure carefully, cut confidently, and secure thoroughly. If you’d like to explore more ways to elevate your outdoor living space, check out these inspiring deck and stair ideas. Want personalized guidance or expert craftsmanship? Visit our contact page.
When it comes to outdoor spaces, many homeowners believe they understand everything about composite decking and the nuances of building durable, beautiful decks. However, even seasoned DIYers often fall for misconceptions that can compromise their projects. Let’s dig deeper into some hidden nuances and mistakes—things that only true experts recognize—and how you can avoid them. One widespread myth is that all composite decking brands are created equal. In reality, as highlighted in [composite decking trends for 2025](https://deckdesignbuild.com/composite-decking-trends-2025-the-ultimate-guide-for-outdoor-enthusiasts), formulation differences greatly impact durability and coloration over time. Many assume that low-cost or generic brands will suffice, but skimping on quality often results in fading, warping, or mold growth that erodes your investment. An advanced mistake is underestimating the importance of proper installation techniques, especially when attaching fasteners and flashing. Incorrect fastening or inadequate flashing can lead to early-deck failure, as explained in [the hidden danger of using interior screws on an outdoor deck](https://deckdesignbuild.com/the-hidden-danger-of-using-interior-screws-on-an-outdoor-deck). The nuance here is that corrosion-resistant fasteners and correct spacing are vital for longevity. For example, skipping pre-drilling or using nails instead of screws can cause boards to loosen or warp prematurely. Plus, many overlook the significance of designing seamless transitions, particularly for stairs—these should not only look good but also enhance safety. Better stair design considers load distribution, wind resistance, and slip prevention, which many amateurs ignore, leading to dangerous wobbling or squeaking over time. When planning your outdoor living space, think about these advanced issues—more than just aesthetics. Is your deck builder taking into account species-specific wood or composite formulations’ expansion rates? Recognizing the subtle effects of climate and material behavior can save you costly repairs. A common misconception is that composite decks require no maintenance, but, as experts confirm, regular cleaning and inspections are necessary to maintain appearance and safety. For comprehensive guidance, check out [the maintenance routine for composite decks near saltwater](https://deckdesignbuild.com/the-maintenance-routine-for-composite-decks-near-saltwater). Remember that professional consultation can make a real difference. Partnering with experienced deck builders ensures your project accounts for these advanced nuances, avoiding pitfalls that even experienced DIYers encounter. To learn more about how a skilled contractor can elevate your outdoor space, visit [the benefits of working with a professional deck builder](https://deckdesignbuild.com/the-benefits-of-working-with-a-professional-deck-builder-in-your-outdoor-projects). So, have you ever fallen into this trap of oversimplification? Let me know in the comments.
Keep Your Decks in Top Shape with the Right Tools
Investing in quality tools is essential for maintaining and scaling your outdoor living spaces effectively. I rely heavily on a **cordless impact driver**, specifically the Milwaukee M18 Fuel, for fastening composite boards securely without stripping screws or compromising material integrity. Its superior torque and battery life make repetitive tasks less tedious, and the adjustable clutch helps prevent overdriving fasteners, which is critical for a sleek finish. Additionally, a **laser distance measurer** like the Bosch GLM 50 C is invaluable for precise measurements, especially when aligning multiple stair treads or creating seamless transitions. Its digital display and Bluetooth connectivity allow me to record measurements easily, reducing errors and saving time during projects.
For routine inspections and cleaning, I recommend a **high-quality telescoping pole** to reach ceiling surfaces or high joists safely, coupled with a soft-bristle brush attachment to gently remove dirt and algae. In terms of software, I use **SketchUp** to plan elevations and check alignment before drilling or cutting, ensuring precision in every step. Keeping your tools well-maintained—regularly lubricating moving parts and charging batteries—extends their lifespan and maintains consistent performance, which is key for both DIY enthusiasts and professional deck builders.
What Does the Future Hold for Exterior Maintenance?
As technology advances, I predict more homeowners and builders will adopt **automated drone inspections** for assessing large or hard-to-reach decks. These drones can detect loose fasteners, water damage, or warped boards early, preventing costly repairs. Similarly, **smart sensors embedded in decking materials** might inform you when maintenance is due or if structural issues arise. Embracing such innovations will make maintaining outdoor structures more proactive and less labor-intensive.
How do I maintain composite decking over time?
Proper maintenance extends the life and appearance of your deck. I suggest annual cleaning with a gentle deck cleaner like BrightWipe or a mixture of mild soap and water, avoiding harsh power washers which can damage the surface. Regularly inspect for any loose fasteners or signs of wear—addressing these promptly prevents bigger issues later. Applying a **protective sealant designed for composite surfaces** every few years can also help resist staining and UV damage. To learn more about choosing the right materials, visit this guide on composite decking. Remember, maintaining your outdoor space isn’t just about aesthetics—it’s about ensuring safety and longevity when you scale up your projects.
If you’re serious about long-term results, consider integrating **inspection drones** or IoT sensors that notify you of potential issues early. Also, investing in high-quality, impact-resistant fasteners and power tools will make ongoing maintenance less daunting. Ready to take your deck maintenance to the next level? Try calibrating your impact driver to the exact torque needed for composite fasteners, ensuring a professional finish every time. Feel free to contact us for tailored advice or project support here.

Lessons I Wish I Had Learned Sooner About Outdoor Stair Finishing
One of the most enlightening moments in my outdoor renovation journey was realizing that precision measurement and a simple overhang trick could drastically elevate my stair’s appearance. I used to struggle with uneven edges and rough finishes that betrayed my amateur status, but embracing the 2-inch overhang rule transformed my project. It taught me that sometimes, the smallest adjustments make the biggest difference, and patience with measurements ensures a professional-looking result every time.
Another insight was understanding that the right tools and techniques often outweigh expensive equipment. My impact driver and laser measurer became my best friends, providing accuracy and ease that shortcuts or eyeballing just couldn’t match. Investing time in planning and execution, rather than rushing, resulted in stairs that not only looked better but lasted longer, aligning with my goal to combine beauty and durability in outdoor spaces.
Finally, I learned the importance of seamless transitions—carefully scribing, cutting, and securing boards—create a finished look that sounds simple but requires attention to detail. When I stopped viewing my stairs as just functional structures and started treating them as showcase elements of my outdoor living space, the difference was remarkable. These lessons remind me that mastery in outdoor carpentry isn’t about complexity but about deliberate, thoughtful execution that anyone can achieve with patience and care.
Tools and Resources That Made the Difference
Over the years, I’ve relied on a few key tools that consistently deliver quality results. The Milwaukee M18 Fuel impact driver not only speeds up fastening but ensures each screw is set just right, preventing damage and ensuring longevity. My Bosch GLM 50 C laser distance measurer provides the precision I need to mark and cut accurately, especially across multiple stairs and varying terrain. For planning, I often turn to SketchUp, which helps visualize my stairs and verify measurements before I start cutting—saving time and reducing errors.
Beyond tools, I trust online resources like professional deck-building insights to deepen my understanding of best practices and innovative techniques. Engaging with expert guides and tutorials empowers me to face new challenges confidently, turning a DIY project into a rewarding learning experience. Remember, the right tools and trusted sources continually elevate your craft, turning good intentions into stunning outdoor features.
Embrace Your Outdoor Living Vision Today
Putting the finishing touches on your outdoor stairs isn’t just about aesthetics—it’s about creating a welcoming, polished transition from your home to nature. By applying these lessons, you’ll find that precision, patience, and the right tools unlock new levels of quality and enjoyment. Don’t wait for perfect conditions or infinite resources—start small, learn as you go, and watch your outdoor space transform into a true extension of your home.
What part of outdoor stair building or finishing are you most excited to tackle next? Share your thoughts below and let’s grow our skills together!