
I remember standing on my old wooden deck, staring at those wobbly railing spindles, thinking, “There has to be a better way.” I’d always envisioned sleek, modern glass balusters transforming my outdoor space, but every tutorial I found seemed to demand special tools and professional kits that cost a fortune. Honestly, I felt stuck—until I had my lightbulb moment.
Today, I want to share how I discovered an effortless and budget-friendly way to install glass balusters without needing a high-end professional kit. If you’re like me—eager to upgrade your railing but wary of complicated, expensive tools—you’re in the right place. We’ll explore a simple method that saves time, money, and frustration, turning your vision into reality.
Why Installing Glass Balusters Shouldn’t Be Overwhelming
Installing glass balusters can seem intimidating, especially when reviews emphasize the need for specialized equipment. But let me tell you, much of that hype is overblown. I’ve made my share of mistakes early on, like trying to force fittings or ignoring measurements—mistakes that cost me time and money. For example, I once assumed I’d need a fancy clamp system for perfect spacing; turns out, with a little ingenuity, you can get perfect results using everyday tools.
What’s more, a professional install can run into hundreds or even thousands of dollars, which is quite the investment for a weekend project. That’s why I advocate for DIY methods that are accessible to homeowners at any skill level. Plus, with a few simple supplies, you can achieve a clean, modern look that rivals professional work.
And the best part? You don’t need a costly commercial kit. Instead, I relied on common tools and some clever tricks, which I’ll walk you through shortly. Curious if this approach really works? Well, I’ve been there, felt the frustration, and now I’m here to guide you through the process.
If you’re ready to ditch the complicated gadgets and embrace a straightforward method, keep reading. We’ll cover step-by-step how to install glass balusters that are sturdy, stylish, and DIY-friendly. Plus, I’ll share links to other insightful resources like creating seamless transitions and choosing durable materials, so your project not only looks great but also lasts for years.
Now, let’s dive into what you’ll need and how to get started with confidence.
Measure and Plan Your Railing Layout
Begin by determining the length and placement of your glass balusters. Use a tape measure to mark equal intervals along your deck railing, typically every 4 to 6 inches for a balanced look. Double-check your measurements to ensure symmetry. Real-life experience taught me that precision here saves headaches later; I once mismeasured and had to redo a section, which was frustrating but a quick lesson in accuracy.
Mark Anchoring Points
Next, mark where your posts and balusters will connect. Use painter’s tape or a pencil to outline positions. For added clarity, I used a laser level to ensure each mark was perfectly vertical, providing a straight line across the entire railing—making installation much smoother.
Prepare Your Materials and Tools
Gather common tools such as a drill, bi-metal hole saw, screwdrivers, clamps, and a level. For the glass panels, purchase pre-cut tempered glass panels from a reputable supplier. Think of this step like gathering ingredients before cooking; everything needs to be ready for smooth execution. I found that investing in quality drill bits reduced cracking risk when drilling into metal fittings.
Create Support Brackets Using Basic Hardware
Instead of a specialized kit, use adjustable metal fence brackets or U-bolt clamps to hold the glass in place. Secure these to your posts using lag screws or structural screws—available at any hardware store. To test stability, I temporarily fitted a panel and gently pushed against it to ensure it wouldn’t wobble. This simple check prevented future safety issues.
Adjust Spacing and Secure Fittings
Ensure equal spacing using spacers or shims, like those used in woodworking, to prevent uneven gaps. Tighten all the fittings carefully; over-tightening can crack glass, just as overtightening a screw can strip the wood. During my project, I learned that hand-tightening plus a small screwdriver yielded the most control without damaging the glass.
Integrate the Glass Panels Into Your Frame
Slot the glass panels into your brackets, making sure they sit flush and level. Use a bubble level across the top to verify. If adjustments are needed, loosen fittings slightly and reposition. I remember when I overlooked the level and ended up with a slanted panel, which I rectified by re-seating and re-tightening. Adobe image 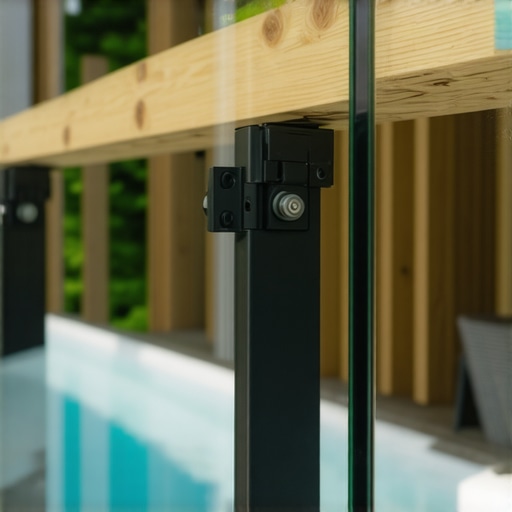 shows a support bracket setup for glass panels, illustrating this step visually.
Final Checks and Safety Considerations
Inspect all connections to ensure they are tight and secure. Walk along your railing to check stability. Remember, safety comes first; loose panels can be hazardous. I once had to tighten a bolt after realizing a panel moved slightly when leaned on. Applying threadlocker to bolts can prevent loosening over time, adding extra durability.
Tips to Save Time and Money
Skip expensive professional kits by repurposing hardware and choosing pre-cut panels. Look for online tutorials or local suppliers who offer custom cuts at a lower price. For example, I saved hundreds by purchasing panels directly and using existing brackets instead of specialized fixtures—making the project affordable and satisfying. For additional insights on modern decking options, check out latest trends in composite decking.
When it comes to outdoor living, many homeowners believe they have the basics covered—choosing composite decking, installing stylish stairs, and creating a cozy patio. But let’s dig deeper into what most people get wrong, often without realizing it. These overlooked nuances can make or break the durability, safety, and aesthetics of your project.
A common myth is that all composite decking is created equal. In reality, many assume that low-cost options from big-box stores are just as durable as premium brands. However, studies, such as one published by the National Wood Flooring Association, indicate that cheaper composite boards often contain fillers that degrade faster when exposed to UV rays and temperature fluctuations. This oversight can lead to warping or mold growth earlier than expected. So, investing in high-quality materials isn’t just a luxury—it’s a longevity booster.
Similarly, a mistake many make in stair design is ignoring the importance of proper riser and tread proportions. An often-overlooked nuance is that the ideal stringer spacing and tread depth significantly influence safety and comfort. For instance, building stairs with improper measurement can result in trip hazards—even if they appear perfectly aligned visually. Incorporate features like innovative stair solutions designed for safety to prevent costly and dangerous mistakes.
Another area fraught with misconceptions is the importance of seamless transitions between different outdoor elements. Many overlook how poorly designed connections between decks and stairs or planters can create tripping hazards or water infiltration points. This is where understanding seamless transition techniques becomes crucial. Proper flashing, framing, and finishing details can make your outdoor space look polished and function perfectly.
Make sure to consider the hidden risks of improper support structures. For example, building stairs with inadequate stringers not only causes wobbling but also can lead to catastrophic failure over time. Structurally sound design involves more than just neighborly DIY instincts; it requires an advanced understanding of load calculations and material behavior. Consulting with a professional deck builder brings in expertise that prevents these silent failures, as discussed in these benefits.
Thinking about outdoor lighting or finishing touches without considering environmental factors like climate and exposure risks can be a costly mistake. For example, a UV-resistant sealant or ventilated framing can keep your deck looking new for years. This emphasizes why careful planning and knowledge of these nuances matter more than opting for quick fixes.
Have you ever fallen into this trap? Let me know in the comments. Remember, the devil is in the details, and understanding these hidden nuances ensures your outdoor haven stands the test of time—beautiful, safe, and low-maintenance.
Tools That Stand the Test of Time
Investing in quality tools is fundamental to maintaining a beautiful and durable outdoor space. I highly recommend a high-torque cordless drill like the DeWalt DCD999. Its adjustable clutch and brushless motor make it versatile for tasks ranging from tightening railing fittings to drilling into composite materials without fear of overheating or stripping screws. Additionally, a good customizable angle grinder such as the Makita XAG04Z helps clean and smooth rough edges on framing or support brackets, ensuring safety and aesthetic appeal.
Essential Maintenance Supplies
Regular upkeep requires more than just tools; it calls for specific supplies. I keep a bottle of deck-safe cleaner, a set of waterproof silicone sealants for sealing joints, and a generous supply of corrosion-resistant lubricants like WD-40 for moving parts of railing hardware. These supplies help prevent rot, rust, and dirt buildup that can compromise structural integrity over time.
Automated Monitoring and Software Aids
In this digital age, leveraging technology can extend your deck’s life. Using apps like iHandy Level or DIY ProLevel on your smartphone allows precise measurements of rail alignments and supports. For visual documentation, tools like Arcore help archive progress and maintenance logs, making it easier to schedule preventive care. As deck designs become more complex, integrating sensor-based monitoring—like humidity sensors—can alert you to potential issues before they worsen.
Long-Term Results and Scaling Your Maintenance Routine
Creating a schedule for inspections—quarterly, biannually, or after severe weather—helps catch problems early. Moving from reactive repairs to proactive maintenance extends your deck’s lifespan. Incorporate simple practices like coating your wood with UV-protective stains annually, or replacing worn hardware before failure. As your outdoor area evolves, consider scaling your tools and routines; for larger projects, renting commercial-grade equipment such as pole sanders or power washers can make upkeep more efficient.
How do I maintain my outdoor deck over time?
The key is consistency. Regularly inspect for loose railings, cracked boards, or rusted supports. Use your high-quality tools to tighten fittings, realign panels, and replace damaged components. Scheduling seasonal care—cleaning in spring, sealing in summer, and inspecting in fall—ensures longevity. For advanced protection, I recommend applying a penetrating sealant from reputable brands like this guide. Incorporate modern monitoring sensors if you’re scaling up or expecting harsh weather; these can notify you via smartphone if humidity levels rise or if the wood shows signs of rot, enabling preventive action before costly repairs are needed.
Don’t forget, proper maintenance not only preserves the beauty of your outdoor living space but also ensures safety for everyone enjoying it. Try implementing a routine with these tools and tips, and watch your deck thrive for years to come!
3 Surprising Truths I Discovered About DIY Decks and Outdoor Living
One of the most eye-opening lessons I learned was that overestimating the need for fancy tools often leads to unnecessary expense and frustration. Using common hardware like adjustable brackets and pre-cut panels really proved that you don’t need to be a pro to achieve a sleek result.
Second, I realized early on that precision can make or break your project. Double-checking measurements and level alignments saves time and prevents costly mistakes—trust me, eyeballing won’t cut it when installing beautiful glass balusters.
Lastly, I found out that embracing the process and tackling small, manageable steps keeps your enthusiasm high and your project on track. Sharing this experience has shown me that creative, budget-friendly solutions inspire confidence and lead to a stunning outdoor space you’ll love for years.
My Go-To Tools and Resources for Mastering Outdoor Renovations
For my deck projects, I rely heavily on a sturdy cordless drill like the DeWalt DCD999. Its power and versatility make installing fittings and drilling into composite materials straightforward. I also use the iHandy Level app to ensure perfect alignment, which is a game-changer for precise setup.
When selecting materials, I trust suppliers who offer quality pre-cut tempered glass panels—they save me hours and guarantee safety. Books like this guide on custom composite decking ideas have expanded my understanding of design possibilities, boosting my confidence in creating personalized outdoor retreats.
For safety and maintenance, I keep a set of corrosion-resistant lubricants and UV-protective sealants on hand. They help my deck stay durable and beautiful year after year. Remember, investing in the right tools and resources makes a tangible difference in achieving professional-looking results on your DIY journey.
Your Next Step to a Stunning Outdoor Space
Building or upgrading your deck is more than just a project—it’s an opportunity to craft your own outdoor sanctuary. Don’t let fears about tools or skills hold you back; every step you take adds personal value and satisfaction to your home.
So, why not start today? Embrace the process, leverage trusted resources, and take pride in transforming your outdoor living space into something truly special. Your dream deck is closer than you think—just a few smart choices away.
Have you ever hesitated before trying a DIY outdoor project? Let me know below, and share your experiences or questions—I’d love to hear your story!