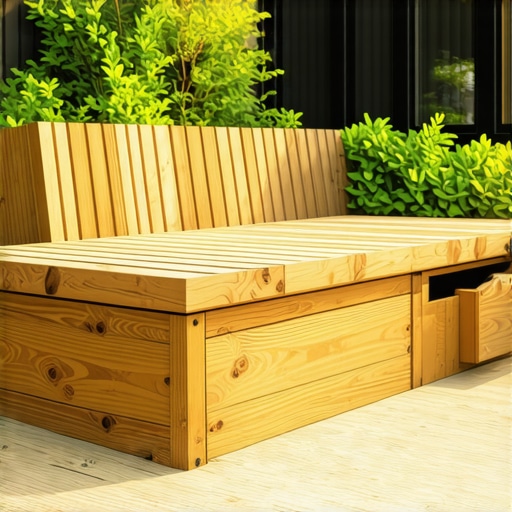
I remember the first time I worked on my deck, eager to create a perfect outdoor retreat. But as I started planning, I hit a frustrating wall: I needed extra storage, but bulky storage boxes just seemed to clutter the space. Plus, I didn’t want friends to trip over unsightly clutter or have my tools and cushions vulnerable to weather. That lightbulb moment came when I realized I could seamlessly integrate hidden storage into a deck bench—functional, stylish, and practically invisible. If you’ve ever faced similar dilemmas—struggling to keep your outdoor space tidy without sacrificing style—you’re not alone. Today, I’ll share how I designed and built a deck bench with built-in storage that transformed my backyard into a clutter-free oasis, and how you can do the same.
The Secret to a Clutter-Free Deck: Hidden Storage Bench
There’s something incredibly satisfying about sitting on a beautiful bench that not only looks great but also hides your outdoor essentials. The problem is that most traditional benches are either too plain or take up space without offering any storage. My solution was to craft a bench that **conceals cushions, garden tools, or even outdoor games** beneath a stylish top—keeping everything accessible yet out of sight. When I finally added the hidden storage feature, the difference was night and day. My deck instantly looked more organized, and I loved how the bench became a focal point of comfort and utility. If this idea resonates with you, stay tuned. I’ll guide you through the entire process, sharing tips based on my firsthand experience to help you create your own multi-functional outdoor centerpiece.
Could a Hidden Storage Bench Really Make My Deck Better?
At first, I was skeptical. Would it look good? Would it be sturdy enough? And honestly, I feared I might make a rookie mistake—like designing a bench that’s too complicated or unstable. Early on, I failed to consider the weight of the lid and how to make it all weatherproof. But I learned from that mistake, and now I can confidently say that with some planning, building a hidden storage bench is well within reach for most DIY enthusiasts. It’s a project that not only elevates your outdoor space but also maximizes functionality without sacrificing style. Curious? Let’s look at why this project is worth your time and how it can transform your deck into a more organized, inviting place to gather and relax.
As an added tip, check out this expert guide for other inspiring ideas to enhance your outdoor living area. Ready to dive into the steps? Let’s start designing your perfect hidden storage solution!
,
Selecting the Right Location and Dimensions
Start by analyzing your deck layout to find a spot that balances accessibility and aesthetics. During one project, I chose a corner that was underutilized but visible enough for convenience. Measure the space to determine the length, width, and height of your bench. Think of it like designing a comfortable seat; it needs to fit comfortably and match your outdoor vibe. Use a tape measure and chalk to mark your dimensions precisely, avoiding common mistakes like misjudging space that I once faced when I estimated without double-checking. It’s crucial to plan the size so you can store cushions, tools, or even small garden supplies without cramming.
Designing and Framing the Structure
Sketch your bench design, considering whether you want a simple box or a more detailed style. I kept mine straightforward—a rectangular box with a hinged lid. Use pressure-treated lumber for durability, and attach the frame with galvanized screws for rust resistance. Think of the frame like a skeleton; it needs to be sturdy enough to hold weight and withstand weather. During assembly, I used a square to ensure corners were perfectly right-angled, preventing wobbly benches. For especially long benches, add internal supports to prevent sagging, much like reinforcing a stretched tarp. Building a strong, level frame is the backbone of a lasting storage bench.
Creating the Lid and Hiding the Storage
The lid must be both functional and weatherproof. I cut a piece of composite decking, which is low-maintenance and resistant to rot, to serve as a top. Use weatherproof hinges, and attach them securely to allow easy access and prevent sagging over time. I faced a challenge when my first hinge placement was uneven, causing the lid to stick; I overcame this by adjusting hinges and adding support braces underneath. To keep stored items dry, seal all edges with a waterproof sealant and install a small lip or overhang to prevent water runoff from entering. For visual appeal, paint or stain the bench to match your deck or use decorative hardware to make it stand out. Proper sealing ensures your cushions stay dry, much like weatherproofing a boat’s cabin.
Ensuring Weather Resistance and Final Touches
Protect your bench from the elements with a high-quality outdoor sealant or stain. I applied a breathable waterproofer that allowed moisture to escape while blocking rain intrusion. Adding drainage holes at the bottom prevents water from pooling inside, crucial for long-term durability. When I tested the storage by pouring water into a test hole, I noticed it drained quickly—a good sign. Incorporate handles on the lid for ease of opening, and consider installing a lock or latch for security if needed. Finish by placing the bench in your desired spot, ensuring it’s level and stable. Think of this final step as giving your DIY project a custom suit—details matter for sleekness and longevity.
While it’s tempting to believe that mastering basic deck construction is enough, savvy builders know there’s more lurking beneath the surface. Many enthusiasts fall prey to misconceptions that can compromise durability, safety, or aesthetic appeal. For instance, a widespread myth is that pressure-treated wood needs no additional sealing—but in reality, proper sealing and sealing techniques extend the lifespan significantly, as experts emphasize in their guides on composite decking.
One common oversight relates to deck joist spacing. Some believe that sticking to a standard 16-inch OC (on-center) spacing is sufficient in all cases; however, certain composite boards and heavier loads necessitate closer spacing or reinforcement, a nuance often overlooked by DIYers. This is where understanding the advanced deck framing techniques becomes critical for long-term stability.
What do most builders miss about outdoor stair safety and durability?
A significant number of builders underestimate the importance of proper stringer support and attention to water runoff, leading to warped or collapse-prone stairs over time. Many think installing standard code-compliant stairs is enough, but neglecting details like proper draining slopes or using weather-resistant materials can cause issues within just a few seasons. Experts suggest that incorporating features like innovative outdoor stair designs with enhanced drainage and support drastically reduces these risks.
Moreover, some conclude that composite decking is entirely maintenance-free—however, this is a misconception. While less demanding than wood, composite decks still benefit from regular inspections for mold, debris buildup, and sealant integrity. From an advanced perspective, applying a professional-grade cleaning and sealing plan can significantly extend lifespan and appearance.
In the end, understanding the subtle intricacies and myth-busting common misconceptions empower you to make smarter choices, ensuring your outdoor space remains beautiful, safe, and functional. Have you ever fallen into this trap? Let me know in the comments.
Keeping It Working: Essential Tools for Deck Maintenance
To ensure your outdoor deck remains beautiful and functional over the years, investing in the right tools is crucial. I personally rely on a cordless impact driver, like the Milwaukee M18 Fuel, for fastening composite boards securely without stripping screws. Its lightweight design and powerful torque make quick work of deck projects, especially when tightening fasteners in tight spaces. For cleaning, I recommend a quality-pressure washer with adjustable pressure settings—I’ve found the Sun Joe MegaTANK to be effective yet gentle enough to avoid damaging the surface. Regular use of a deck brush or synthetic scrub pad helps remove debris and mildew buildup, maintaining the wood’s or composite’s integrity. Remember, choosing durable, weather-resistant hardware, such as stainless-steel screws, prevents rust and corrosion based on my experience, prolonging your deck’s lifespan.
How do I maintain my deck’s appearance and safety over time?
Consistent inspections and proactive maintenance are key. Every season, I check for loose fasteners, splintered boards, or warped stairs. Applying a high-quality sealant or stain helps protect against moisture infiltration and UV damage. I prefer using a penetrating, breathable porch stain, which I apply with a pump sprayer for even coverage—this technique minimizes mess and ensures thorough protection. Periodic cleaning with a deck-specific cleaner, like BEHR’s Deckplus, preserves the surface and prevents mold growth. To spot issues early, I schedule a comprehensive inspection every two years, which often catches problems before they become costly repairs. Staying ahead of wear and tear not only enhances safety but also keeps the deck looking pristine for years to come, especially when paired with proper hardware like adjustable post caps and weatherproof stairs hinges.
Leveraging Software and Planning for Longevity
Besides physical tools, I utilize project management software such as Trello to track maintenance schedules and repair timelines. This helps me plan seasonal sealings or replacements proactively. For design tweaks or upgrades, I turn to 3D modeling tools like SketchUp, which allows me to visualize modifications—be it adding built-in lighting or extending the deck—before breaking ground. In the future, I predict that integration of IoT devices, like moisture sensors and smart lights, will revolutionize outdoor living maintenance by providing real-time data, minimizing guesswork, and extending the lifespan of your deck components.
How do I keep my outdoor stairs safe and durable?
Stairs are often overlooked in maintenance but are vital for safety. I recommend routinely inspecting stringers and treads for rot and warping—an issue I tackled by reinforcing with galvanized brackets and applying anti-slip tape on the surface. Proper drainage around stairs prevents water accumulation that causes decay; I ensure this by grading the ground for proper runoff and installing weep holes where needed. For added durability, I choose composite stair treads with capped polymer surfaces, which resist staining and splintering, as highlighted in the 2025 composite decking trends guide. Regularly cleaning and sealing these components keeps them in top shape. Don’t forget, adding LED step lights can enhance night safety, but wiring should be weatherproof and inspected annually. Implementing these measures can keep your stairs safe and attractive for many years.
Finally, embrace advanced techniques like sealing cut ends with a waterproof resin to prevent moisture intrusion—one of the simplest yet most effective maintenance steps I recommend. Try applying a penetrating sealant to your deck’s cut edges and observe how it significantly improves durability, especially for composite materials susceptible to edge damage. Regular upkeep, combined with the right tools, will ensure your outdoor living space continues to impress and function seamlessly over time.
How I Realized Small Details Make the Big Difference
One of my most profound lessons was understanding that the success of a deck project often hinges on seemingly minor details—like sealing cut edges or reinforcing stair stringers. These small adjustments, which many overlook, dramatically extend lifespan and safety. I once ignored sealing a few cut ends, only to face moisture seepage months later; now I always seal everything meticulously. This insight taught me that patience and attention to detail aren’t just virtues—they’re essentials for long-term outdoor living success.
My Go-To Tools That Keep My Projects Coming Together
Over the years, I’ve curated a toolkit that makes deck building and maintenance less daunting. My impact driver—preferably cordless like the Milwaukee M18 Fuel—saves me time and effort, especially when installing composite decking. A high-quality pressure washer, such as the Sun Joe MegaTANK, helps me maintain the surface without damage. Stainless-steel screws prevent rust and ensure durability, saving me from frequent repairs. Trusting these tools has consistently led to results that both look great and last through the seasons.
Embrace Your Outdoor Building Journey Today
There’s a unique joy in transforming your backyard into a sanctuary, and with the right knowledge and tools, you’re fully capable of creating a space that’s both functional and inspiring. Remember, every project teaches you something new—whether it’s about choosing the right materials or designing safer stairs. Don’t wait for the perfect moment; start planning your outdoor upgrade now. Your future self will thank you for taking that first step toward your dream backyard.
What’s been your biggest challenge when building or maintaining your outdoor space? Share your story below—I’m excited to hear your experiences and help you solve them!
,