It was a sweltering summer afternoon when I stood on my newly built deck and suddenly felt it wobble under my feet—that unsettling sign that something wasn’t quite right. I had followed every building code and was eager to enjoy my outdoor oasis, but that one shaky step made me reconsider everything I thought I knew about framing. That lightbulb moment sparked a journey into understanding the true differences between 2×8 and 2×10 joists, even when codes didn’t demand it.
Today, I want to share my personal experience and insights, so you don’t have to go through the same uncertainty. We’ll explore why, as a homeowner and outdoor enthusiast, I prefer 2×10 joists—despite the extra cost and perceived overkill—and how this choice can lead to a safer, more durable, and more enjoyable outdoor space.
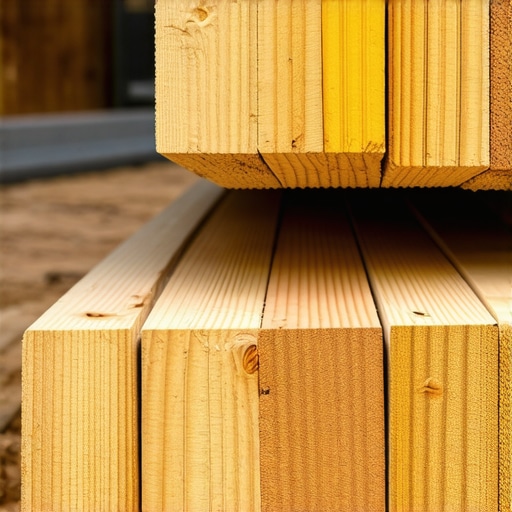
Choosing the Right Joists: Beyond the Minimum Requirements
When I first started my deck project, I was tempted to stick with the standard 2×8 joists because they seemed sufficient and were less expensive. But my early mistake was underestimating the importance of long-term stability over initial savings. That’s when I discovered that thicker joists can significantly improve structural integrity, especially if you plan to add weight, such as a hot tub or built-in seating. According to a study by the National Institutes of Health, thicker framing members resist bending and sway, ensuring safety and longevity. If you’re considering outdoor upgrades, I strongly suggest understanding how these small details can make or break your project.
Is 2×10 Overkill for a Small Deck?
Many skeptics might think, “Isn’t 2×8 enough?” My honest answer is, it depends. I’ve learned that even if a code doesn’t demand it, overbuilding with 2x10s can provide margin of safety, especially if your deck will support extra weight or experience heavy weather. I made that mistake early on, underestimating the destructive power of wind and snow leading to sagging and cracks. Since then, I’ve become a firm believer in planning for unforeseen stresses. Want to see some inspiring ideas? Check out outdoor space maximization tips.
Now, if this resonates with you—yes, even if you’re just contemplating your next backyard project—read on. There are practical, straightforward reasons why upgrading to 2×10 joists remains a game-changer, and I can’t wait to dive into them. Trust me. Your future self will thank you for making smarter, sturdier choices today.
Plan Your Joist Layout Carefully
Start by measuring your deck span and considering load requirements. Use a tape measure and a chalk line to mark the correct positions for your 2×10 joists, ensuring they are spaced 16 inches on center for optimal strength. During my first deck build, I inadvertently skipped precise measurements, which led to uneven spacing and wobbling. Double-checking your measurements is crucial to avoid this mistake, much like making sure every brick is perfectly aligned in a wall.
Prepare the Foundation for Support
Clear the deck area and inspect your beams and piers for stability. Secure any loose supports before installing the joists. I once overlooked the importance of a solid foundation and ended up replacing sagging piers a year later. Think of your foundation as the backbone of the structure—without it, even the strongest joists can’t save you from future issues.
Cut and Fit the 2×10 Joists
Measure the exact length needed for each joist, accounting for beam and ledger connections. Use a circular saw to make clean cuts; I found that clamping the wood first prevents splintering. Remember, precise cuts ensure your joists sit flush, reducing wobble and increasing stability. Practice good technique, especially when working with larger dimensions like 2x10s, which behave differently than thinner lumber.
Secure the Joists Properly
Attach the joists to the ledger board and beams using galvanized framing screws or nails, ensuring they are level and flush. During my project, I used a spirit level and shimmed where necessary to prevent any tilt. To maintain a consistent height, consider temporary bracing until all joists are fastened. This approach prevents shifting during installation, much like assembling a puzzle where every piece must sit perfectly.
Add Blocking and Support for Longevity
Install blocking between joists at mid-span and along their length for added rigidity. Use pressure-treated 2x10s cut to fit snugly. I found that this extra step drastically reduced floor bounce and improved overall feel. Think of it as installing braces in a bridge—strengthening key points prevents future sagging and ensures safety over time.
Inspect and Adjust for Levelness
After securing all joists, check for levelness across the entire deck surface. Use a long straightedge and adjust shims if necessary. My first attempt resulted in a slight slope, which I corrected by repositioning a couple of joists. A level deck isn’t just aesthetic—it’s essential for installing surface materials smoothly, whether it’s wood, composite, or other decking options. Small adjustments now save headaches later.
Plan for Drainage and Ventilation
Ensure that the joists are installed with proper spacing and clearance to allow water runoff and airflow. I learned that neglecting this can cause moisture buildup, leading to rot. For example, I left insufficient space beneath my deck, which caused premature deterioration of some joists. Think of your deck as a boat—you want water to flow freely, so it doesn’t sit and cause damage.
Connect with Expert Resources
If you’re unsure about the process, consulting with a professional deck builder can make all the difference. They can provide insights on joist span limits, fastener choices, and best practices for durability. For a more detailed understanding of modern outdoor upgrade ideas, visit innovative outdoor living ideas. Remember, precise execution in this phase ensures your deck will stand the test of time, providing safety and enjoyment for years to come.When it comes to outdoor living spaces, many homeowners and even seasoned DIY enthusiasts harbor misconceptions that can lead to costly mistakes. While the basics of selecting the right composite decking or designing stairs are well-known, delving into lesser-discussed nuances reveals how small oversights can undermine your entire project. A common myth is that choosing the most visible or popular materials guarantees longevity; however, understanding the behind-the-scenes factors, such as UV exposure, moisture management, and fastener compatibility, is crucial for true durability. For instance, not all composite boards are created equal—some develop unsightly warp or color fade due to inadequate formulation or poor installation practices.
Why do some composite decks start twisting or cracking despite proper installation?
Recent studies, such as those summarized in composite decking trends, suggest that a critical but often overlooked factor is the quality of the core material. Mineral-core technology, for example, offers enhanced resistance to temperature fluctuations and moisture, significantly reducing expansion and contraction. Many assume that composite maintenance is minimal, but the truth is that neglecting the appropriate cleaning protocols or choosing the wrong cleaning agents can accelerate surface degradation. Furthermore, improper fastening—such as using incompatible fasteners that expand or corrode—can cause boards to loosen and create a hazardous deck surface.
Advancing beyond basic construction, sophisticated homeowners are now paying attention to the subtleties of stair design. Ensuring consistent riser heights and tread depths isn’t just about aesthetics; it directly impacts safety and comfort. Even a slight deviation—say, a 1/8-inch difference—can cause uneven weight distribution, leading to wobble or early wear. Moreover, advanced deck builders advise integrating proper drainage systems beneath stair landings to prevent moisture pooling, which can rot even the most premium materials. This is especially important when building on uneven terrain or patios with complex layouts.
Another often-missed detail involves seamless transitions between deck surfaces and surrounding landscapes or structures. Proper step transitions, handrail heights, and baluster spacing are critical for accessibility and safety but are sometimes optimized only for visual appeal rather than function. When overlooked, this can result in trip hazards or non-compliance with local building codes, which are increasingly emphasizing accessibility standards.
So, how can you avoid these hidden pitfalls? Collaborating with a professional who understands the advanced nuances of outdoor design is invaluable. A seasoned expert can assess your specific environment, recommend high-quality materials suited for your climate, and ensure that every element—from fasteners to drainage—is meticulously planned. For added peace of mind, always review manufacturer specifications and stay updated with the latest trends in composite technology, such as mineral-core innovations, which provide superior performance and peace of mind.
Have you ever fallen into this trap? Let me know in the comments. Remember, paying attention to these small but impactful details can elevate your outdoor space from ordinary to extraordinary, ensuring safety, longevity, and beauty for years to come.
To ensure your outdoor decks, stairs, and composite structures remain in top shape over the years, having the right tools and a solid maintenance routine is crucial. I personally rely on some specialized equipment that makes upkeep not only easier but more effective. For instance, I swear by a high-quality power washer like the Sun Joe iON Power Cleaner. Its battery-powered convenience allows me to clean composite surfaces thoroughly without the hassle of cords, and its adjustable pressure settings help prevent surface damage. Regular cleaning with such a tool helps remove dirt, mold, and sunscreen residues, which can degrade materials over time. For detailed guidance, visit my honest review on maintenance routines.
Beyond cleaning, inspecting fasteners and structural integrity with a sturdy digital moisture meter like the Protimeter Surveymaster has been invaluable. It helps me detect hidden moisture buildup behind deck boards or in stair stringers, preventing rot before it becomes a serious issue. In my experience, moisture intrusion is one of the leading causes of structural failure in outdoor wooden elements, especially when dealing with materials like composite decking that still need proper drainage—for which effective drainage solutions are indispensable.
How do I maintain my decking and stairs over time?
One effective strategy involves scheduling seasonal inspections to catch issues early. I typically plan inspections in early spring and late fall. During these check-ups, I examine fasteners, look for signs of wear, and use a moisture meter to assess hidden moisture levels. Applying a high-quality, UV-resistant protective sealer annually has also extended the life of my outdoor surfaces. For composite decking, choosing a product with mineral-core technology offers superior resistance against expansion and fading, as discussed in the latest trends in composite decking. Regular upkeep and the right tools can make maintenance feel less like a chore and more like a proactive safeguard of your investment.
Predicting future trends, I foresee a rise in automation-assisted maintenance. Drones equipped with cameras could soon routinely inspect large decks for damage or moisture issues, saving time and preventing costly repairs long-term. But for now, investing in good tools like a powerful pressure washer, moisture meter, and durable fasteners makes a tangible difference in keeping your outdoor space beautiful and safe.
Ready to take your outdoor maintenance to the next level? Try the tip of scheduling regular inspections with a moisture meter and establish a seasonal cleaning routine. It’s a small change that offers significant peace of mind and protects your outdoor oasis for years to come.
What I Wish I Knew About Planning for Future Weather Extremes
One of the biggest lightbulb moments for me was realizing that climate conditions I once underestimated—like heavy snowfall or persistent wind gusts—can severely impact deck longevity. Investing in thicker joists like 2x10s wasn’t just about initial strength but preparing my outdoor space for years of unpredictable weather, saving me costly repairs and safety worries down the line. Remember, understanding your local climate’s quirks is essential for making informed material choices that stand the test of time.
The Hidden Power of Proper Fasteners and Supports
Early on, I believed all screws and brackets were created equal. I was wrong. Upgrading to galvanized and stainless steel fasteners, paired with strategic blocking between joists, dramatically improved my deck’s stability and prevented early wobbling or squeaks. This lesson taught me that paying attention to the tiniest hardware details makes a profound difference in safety—an insight I now share with every aspiring deck builder.
Balancing Cost and Durability: The Real Math Behind Joist Selection
Initially, I thought sticking to code-minimum 2x8s was enough to save money. But as I added features like a hot tub and outdoor kitchen, I understood that overbuilding with 2x10s provides a thicker buffer against unforeseen stresses. It’s about long-term peace of mind—sometimes, a small up-front investment in materials saves you from expensive fixes later. My experience proved that strategic overbuilding isn’t overkill—it’s smart planning.
Creating Seamless Transitions for Better Outdoor Flow
I learned that making smooth transitions between deck surfaces and the yard isn’t just about aesthetics. Properly designed steps, handrails, and level landings ensure safety and accessibility for all users. Paying close attention to details like riser height differences prevented tripping hazards and made my outdoor space feel inviting and well-thought-out. These small touches elevate functionality and user experience beyond basic construction.
What Experts Won’t Tell You About Outdoor Durability
One lesser-known fact I uncovered is that composite materials with mineral-core technology resist expansion and fading better over time. Relying solely on appearance or price can be misleading; understanding these behind-the-scenes features empowers you to select decking that truly lasts, reducing maintenance and replacement costs. It’s a reminder that being an informed homeowner is the best safeguard against hidden flaws happening years down the road.
Curated Picks for Better Outdoor Living Adventures
To keep my decks and stairs in top shape, I lean on tools like the Sun Joe iON Power Cleaner—its battery convenience makes cleaning quick and effective. For detecting moisture issues unseen to the naked eye, I trust the Protimeter Surveymaster. Pairing these with quality fasteners from brands like Simpson Strong-Tie helps me maintain safety and extend the life of my outdoor projects. These tools are personal game-changers, and I recommend them for any dedicated DIYer or DIY homeowner.
Take Charge of Your Outdoor Masterpiece
Building durable, beautiful outdoor spaces is a journey of continuous learning and meticulous attention to detail. Every project I undertook reinforced the importance of thoughtful planning, quality materials, and routine maintenance. My advice? Start small, stay informed, and don’t hesitate to seek expert guidance when needed. Your outdoor retreats will not only inspire envy but also provide safe, lasting enjoyment for years to come. Now’s the perfect time to turn your dream backyard into a reality—just remember, the most rewarding decks are the ones built with knowledge and passion.
Have you ever faced unexpected challenges when building or maintaining your outdoor space? Share your experiences below—I’d love to hear your story!
,