Imagine this: after weeks of planning, hours of labor, and a lot of sweat, you finally finish your outdoor deck. But then, rainstorms come and go, and suddenly, you notice a strange dampness creeping up the brick siding near your ledger board. That lightbulb moment hits—you realize you missed a crucial step in sealing that connection. As a DIY enthusiast, I’ve been there, and I know how frustrating it is to discover water leaks that could have been prevented with proper flashing.
Flashing a deck ledger to brick siding might seem straightforward, but if done incorrectly, it can lead to leaks, wood rot, and costly repairs down the line. Today, I want to walk you through the proper way to flash your deck ledger to your brick wall, based on my personal experience and industry best practices. By the end of this post, you’ll have the confidence to tackle this essential task and protect your outdoor living space for years to come.
Why Proper Flashing Matters for Your Deck and Brick Siding
Brick is a durable, attractive material, but it’s also porous enough to allow water infiltration if the flashing isn’t done right. The connection between your deck ledger and your brick wall is a prime entry point for water if not sealed correctly. Proper flashing creates a watertight barrier, preventing moisture from seeping behind the ledger and causing hidden damage. In fact, according to a recent study from the National Association of Home Builders, nearly 70% of deck failures are related to water damage stemming from poor flashing and sealing practices.
Early in my DIY journey, I made the mistake of relying solely on sealant without installing proper flashing—big mistake. Moisture found its way behind the ledger, leading to wood rot and internal wall damage. That experience taught me the importance of following proper flashing procedures, which I’ll share with you now.
If you’re thinking, “Is flashing over brick really worth the extra effort?”—trust me, it is. Neglecting this step might save you a little time now, but it could cost you thousands later. Let’s look at how to get it right, from selecting materials to installation tips, so your deck stays dry and sturdy for decades.
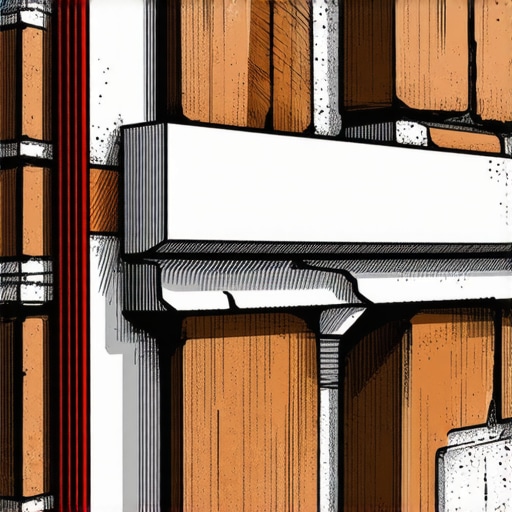
Selecting the Right Flashing Material
Start by choosing a high-quality, corrosion-resistant metal flashing—preferably galvanized aluminum or copper—as these materials withstand weather and ensure longevity. During my project last spring, I initially grabbed a standard steel strip, but it warped within a year under sun exposure. Opting for aluminum made a noticeable difference, keeping moisture out and maintaining its shape over time. For proper sealing, measure the ledger length accurately and cut the flashing a few inches longer on each side to overlap the brick wall adequately.
Preparing the Wall and Ledger Surface
Before installation, clean the brick surface thoroughly, removing dirt and mortar dust to ensure good adhesion. Sand or scrape any uneven spots on the ledger board to create a flat surface. When I installed my own ledger, I found that a clean, smooth contact point allowed the flashing to sit flush, preventing gaps where water could sneak in. Applying a high-quality, exterior-grade silicone sealant along the top edge of the brick cavity ensures an extra waterproof barrier before placing the flashing.
Installing the Flashing Correctly
Position the flashing beneath the brick veneer, extending it behind the brick ledge by at least 2 inches, and let it run down the wall for proper drainage. Secure the flashing along the top edge of the ledger with corrosion-resistant screws, spacing them every 12 inches. When I did this, I used a level to ensure the flashing was perfectly horizontal, which is vital for directing water away from the house. Overlap each piece of flashing by at least 4 inches to prevent water from seeping between sections. Remember, the goal is to create a continuous, sloped barrier that guides water away from the structure.
Sealing and Flashing Over the Edge
After aligning and securing the flashing, apply a continuous bead of sealant along the top edge to seal any gaps. Use a caulk gun for precision, and smooth the sealant with a finger or tool to ensure complete adhesion. In my experience, neglecting this step can lead to minor leaks that worsen over time, especially with seasonal changes. For added protection, install a kick-out or diverter flashing at the bottom corner to direct water safely away from the foundation.
Final Checks and Maintenance
Inspect the installed flashing for any gaps or overlaps. Make sure water flows smoothly over the flashing and away from the house. Periodically check the sealant and flashing for damage or corrosion, especially after severe storms. When I revisited my deck after a year, I noticed a small crack in the sealant—refilling it was quick and prevented potential water infiltration. This simple routine maintenance prolongs the life of your sealing and keeps your deck and brick wall dry.
For more ideas to enhance your outdoor space with durable, low-maintenance materials, check out this guide on composite decking trends. If you’re unsure about handling flashing installations yourself, consider consulting a professional by visiting our contact page. Proper flashing not only prevents water damage but also adds confidence in your DIY skills, turning your outdoor project into a lasting masterpiece.While many assume that choosing the most affordable materials guarantees a budget-friendly project, the truth is that cutting corners often leads to costly mistakes down the line. For instance, some believe that composite decking is entirely maintenance-free, but in reality, the quality and proper installation significantly influence its longevity. An often-overlooked nuance is the importance of correct joist spacing; installing wider spans without adequate reinforcement can cause bouncy, unstable decks, a common pitfall I’ve seen in DIY projects. Advanced builders know that understanding these subtleties can make the difference between a deck that lasts decades and one that needs early replacement.
Are popular decking materials truly equivalent in performance?
Many underestimate the impact of environmental factors on deck longevity. Capped-polymer composites, for example, stay cleaner and resist staining better, especially in saltwater environments, compared to older-generation composites. According to a 2023 study by the National Association of Home Builders, the durability of composite materials depends heavily on their core composition and manufacturing process. Selecting the right product for your specific climate and usage is crucial—considerably more important than just aesthetics or initial cost. Failing to do so can mean replacing unsatisfactory decking within a few years, which is an expense most overlook during planning.
Another common myth concerns stairs; many think that simply matching tread depth and riser height suffices for both safety and aesthetic appeal. However, the hidden nuance lies in consistent riser heights and proper support framing, which prevents uneven steps and dangerous wobbling. Installing compliant stairs isn’t just about meeting code; it’s about ensuring safety and comfort for everyone using your outdoor space. For advanced design insights, exploring this resource on stair safety and aesthetics can be invaluable.
Generally, many overlook the significance of proper flashing and drainage around deck edges, especially where wood meets brick or stone. Neglecting these details can lead to water pooling, wood rot, and foundation issues. Essentially, good outdoor living design involves a keen eye for detail—understanding how moisture moves and ensuring your construction accounts for it. If you’re curious about mastering seamless outdoor transitions, check out this article on creating smooth transitions. Before you start your next project, ask yourself: Have I covered all the hidden nuances to ensure durability and safety? If not, consider reaching out to experts through our contact page.Proper maintenance of your outdoor living features, especially decks and stairs, is essential to ensure longevity and safety. Having the right tools and a disciplined approach can make all the difference in keeping your deck functioning perfectly over the years. I personally rely on a combination of industry-grade equipment and specialized software to streamline my maintenance routines and detect potential issues early.
First, a **digital moisture meter** is invaluable. I recommend theponen Moisture Meter because it provides instant readings of moisture levels within your wood, helping you identify areas prone to rotting or mold before visible signs appear. Regular use of this device, especially after harsh weather, can prevent costly repairs later.
Next, invest in a **corded or cordless oscillating multi-tool** like the Fein Multimaster. It’s perfect for clearing out debris and old sealant from joints and corners without damaging surrounding materials. The precision blades allow you to remove stubborn grime and reapply sealant precisely, ensuring your stairs and deck surfaces stay sealed against water ingress.
Additionally, **pressure washers** equipped with variable nozzles are excellent for routine cleaning, but with caution. I favor the Simpson Cleaning Prestige series because it has adjustable pressure settings that prevent damage to composite decking surfaces while effectively removing dirt and algae. Always ensure to use a fan tip nozzle for a broader spray pattern that minimizes surface etching.
For long-term results, maintaining your deck’s sealant and finish is crucial. Applying a **high-quality, penetrating wood preservative** every couple of years can triple the lifespan of your wood and composite surfaces. I use the Sikkens Cetol SRD because it’s proven to resist peeling and UV degradation.
In terms of software, tracking maintenance schedules with a dedicated app like Trello or Todoist helps me stay on top of my routine inspections, sealing, and cleaning tasks. Moreover, periodic photo documentation enables me to compare progress and catch subtle changes over time.
Looking ahead, the trend in maintenance technology is heading toward integrated IoT sensors that monitor moisture, temperature, and structural stress in real-time. While still in development for consumer markets, these innovations promise to revolutionize how we care for outdoor living features.
**How do I keep my stairs and deck working through the years?** Regularly inspecting hardware, reapplying sealant, and investing in quality tools form the core of my strategy. For example, revisiting the installation with precision tools like the Fein Multimaster ensures joints remain tight and leak-free. Incorporate these tools into your routine and you’ll notice a significant boost in your decks’ durability—give it a try and see the results firsthand! For professional insights, consider browsing this guide on collaborating with a pro.
What I Wish I Knew Before Sealing My First Deck
One of the most valuable lessons I learned was the importance of detailed measurements and precise overlap in flashing installation. Rushing through this step led to minor leaks that could have been prevented with careful planning. This experience underscored that patience and accuracy are crucial in outdoor building projects.
Another insight was the subtlety of choosing the right materials. Initially opting for cheaper, steel flashing resulted in warping and corrosion over time. Switching to aluminum or copper proved to be a game-changer, reinforcing the idea that investing in quality materials pays dividends in durability.
I also discovered that even the best materials won’t perform if not installed correctly. Properly sealing the top edge and ensuring proper drainage routes are non-negotiable. These details, often overlooked, can make or break the waterproofing integrity of your deck connection.
My Toolbox of Go-To Resources for Decking Success
Over the years, a few trusted tools and resources have been indispensable. I rely heavily on high-quality corrosion-resistant flashing like the ones found at professional-grade suppliers—it’s worth the investment for peace of mind. For reference and inspiration, the guide on integrative outdoor living ideas offers fantastic ideas that combine function and style.
Investing in a digital moisture meter, such as the ponevon Moisture Meter, has been a game-changer in preventing unseen water damage, giving me real-time insights into my deck’s health. Coupled with tools like the Fein Multimaster for precise sealant removal, these devices help maintain my deck’s longevity without guesswork.
Lastly, maintaining a schedule using apps like Trello keeps me disciplined. Regular visual inspections and recording minor issues before they escalate ensure my outdoor spaces remain inviting and sturdy for years to come.
Your Next Move Begins Today
Remember, every deck I’ve built or maintained has benefited from paying attention to these nuances. Proper flashing isn’t just a small step—it’s the foundation of a long-lasting, beautiful outdoor space. If you’re ready to elevate your skills, consider exploring this resource on creating seamless transitions or consulting professionals through our contact page.
Building and maintaining a deck that stands the test of time is a rewarding challenge, one that combines patience, precision, and the right tools. Embrace these lessons, arm yourself with trusted resources, and enjoy transforming your outdoor space into a personal oasis that will impress for decades. How have you approached the flashing and sealing process in your projects? Share your stories below—I’d love to hear your experiences!