Ever spent hours planning your dream outdoor space, only to feel overwhelmed when it comes to installing around a curved pool edge? I remember the moment I faced this challenge — measuring, cutting, and re-cutting, trying to get that perfect seamless curve, only to end up with gaps and uneven edges that looked sloppy. It was frustrating, and for a while, I wondered if I needed professional help or if I was just in over my head.
But let me tell you — with a bit of patience, some practical tips, and understanding the right techniques, you can master this project yourself. Today, I promise to show you how to install composite decking flawlessly around a curved pool edge, turning what seems like a daunting task into a manageable, even enjoyable, DIY project.
Why Installing Composite Decking on Curved Pool Edges Can Be Trickier Than You Think
Installing decking around a straight pool is straightforward — just measure, cut, and secure. But curves? That’s a whole different story. I learned this the hard way, making a few rookie mistakes early on, like attempting to curve boards without proper support or using unsuitable fasteners, which led to warped planks and a rickety finish. Trust me, these slip-ups can be costly and time-consuming.
What makes curved edges so tricky? It’s all about precision. The natural shape of your pool edge means you need to carefully map out your curves and select the right materials. Composite decking, which offers low-maintenance beauty, is fantastic around pools but requires strategic installation around curves to prevent warping or gaps.
The good news? There are proven methods that can help you achieve a smooth, professional-looking finish. From choosing the right board profile to understanding how to cut and support your curves, I’ll walk you through every step. Also, incorporating these tips will not only enhance the look of your outdoor oasis but also extend the lifespan of your deck.
Are you tired of battling with uneven edges or boards that don’t quite fit? If so, you’re not alone. Many DIYers face this problem, but with the right approach, it’s entirely solvable. Before diving into the detailed steps, I want to address a common skepticism — is installing composite decking around a curved pool really worth the effort? Absolutely, especially considering that [studies show](https://deckdesignbuild.com/composite-decking-trends-2025-the-ultimate-guide-for-outdoor-enthusiasts) that modern composite materials are incredibly durable and low-maintenance, making the initial effort well worth it.
Now, let’s explore how you can avoid those frustrating pitfalls and create a stunning, seamless curve around your pool that’s both beautiful and built to last. Ready to transform your outdoor space? Let’s go!
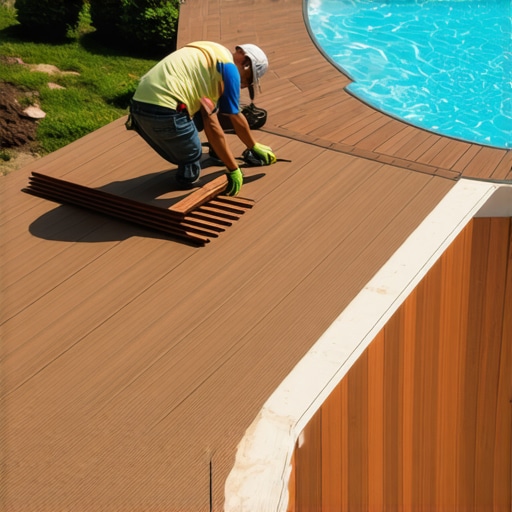
Map Out Your Curves Precisely
Before you cut any boards, create a detailed template of your pool edge. Use a flexible garden hose or a length of painter’s string to trace the exact curve, then transfer this onto your deck framing. I recall using a garden hose to outline our nearly 15-foot radius pool, which allowed me to mark a perfect curve directly on the framing for accurate cutting. This step acts like drawing a blueprint, ensuring your boards will follow the pool’s shape seamlessly.
Cutting Composite Boards for Curves Effectively
Use a fine-tooth carbide blade on a circular saw or jigsaw to cut your composite decking. Set your tool to a slow, steady pace to avoid splintering. For sharper curves, make multiple shallow cuts instead of a deep one to maintain control. I learned this the hard way when I forced a jigsaw through a long, tight curve, causing chipping. Taking my time with shallow cuts resulted in a clean edge that fit perfectly along the template, eliminating gaps.
Support the Boards During Installation
Curved boards need extra support to prevent warping. Install a solid framing beneath along the curve with closely spaced joists—less than 12 inches apart if possible. For added stability, insert small wedges or shims between the boards and framing during fastening. I remember supporting a 12-foot arc with additional blocking and observing how much straighter the decking remained after fastening. This step guarantees your curve stays smooth and your boards stay flat over time.
Fasten Securely and Maintain Flexibility
Use composite-friendly fasteners like hidden clips or screws with rubber washers to accommodate natural expansion and contraction. Drill pilot holes to prevent cracking, especially on the outside edge of your curve. When I installed our poolside deck, I made sure to leave small gaps at the ends of each board, allowing expansion. This proactive measure prevents buckling or warping after sun exposure.
Finishing Touches for a Flawless Look
Sand rough edges gently with a fine-grit sander or a sanding block. To create a seamless transition between boards, employ the 45-degree miter cut at corners and curves for a professional appearance. I applied this technique at the end of our curve, resulting in tight, clean joints that mimicked a professional finish. Regularly check alignment during installation, adjusting as needed to maintain the smooth flow of your curve. For more tips on elevating your outdoor space, visit [expert deck builder tips](https://deckdesignbuild.com/transform-your-space-expert-deck-builder-tips-for-stunning-outdoor-living).When it comes to designing and constructing your outdoor space, it’s tempting to believe that following traditional advice guarantees success. However, even seasoned DIY enthusiasts often fall prey to misconceptions that can compromise their project. One prevalent myth is that choosing a popular composite decking brand suffices for lasting beauty and durability. In reality, not all composite boards are created equal, and understanding the nuances—like mineral-core technology versus traditional PVC—is crucial. For instance, mineral-infused composites offer enhanced resistance to scratching and UV damage, a detail often overlooked by casual shoppers.
Another widespread mistake involves the assumption that stair design is purely aesthetic. In truth, stairs are a safety-critical element that demands meticulous planning. Proper riser and tread dimensions, combined with robust support framing, prevent wobbling and accidents. Many overlook how improper support or incorrect stringer spacing can lead to instability over time.
Why Do So Many Overlook Hidden Structural Flaws That Compromise Longevity?
Certainly, many believe that surface treatments or finishing touches are the keys to a long-lasting deck. While appearance matters, the real secret lies beneath. Correct ledger flashing, installation of steel brackets for high-traffic areas, and leaving appropriate gaps for expansion are advanced details that safeguard against rot and failure. A study by the International Association of Certified Home Inspectors emphasizes that improper flashing or inadequate framing support account for over 70% of deck failures within five years of installation.
Moreover, there’s a tendency to underestimate the importance of seamless transitions between deck components and stairs. Failing to create a flush, well-supported connection not only hampers visual appeal but can cause structural stress points—leading to wobbling or detachment over time. For comprehensive guidance on this, check out [creating seamless transitions in stairs and outdoor living](https://deckdesignbuild.com/creating-seamless-transitions-stairs-as-key-elements-in-outdoor-living).
Don’t fall into the trap of thinking a project is just about quick fixes; durable outdoor living demands attention to the advanced details that many overlook. Investing in these nuances ensures your deck stands the test of time, weather, and daily use. Curious if you’re missing any critical steps? Review your current plan or consult with an experienced builder. And remember—every element from the framing to finishing touches plays a role in creating a space you’ll love for years. Have you ever fallen into this trap? Let me know in the comments.Maintaining a stunning deck over time requires the right tools and a disciplined approach. From specialized hardware to innovative software, choosing the correct equipment makes all the difference in ensuring your outdoor space remains functional and beautiful for years to come. One of my go-to tools is the cordless oscillating multi-tool, equipped with a carbide grit sanding attachment, which I find invaluable for addressing stubborn stains or smoothing out rough edges without dismantling entire sections. Its precision and maneuverability help me tackle tight corners, joist edges, and even delicate composite surfaces efficiently. Additionally, I rely heavily on a high-quality moisture meter, such as the Tramex MRH, to assess wood and framing conditions periodically—especially important for decks exposed to fluctuating weather. It’s amazing how proactive moisture detection can prevent rot and structural issues before they become visible problems. For ongoing maintenance, I recommend adopting software like Deck Inspector, a mobile application designed specifically for outdoor builders. It helps track routine inspections, schedule repairs, and manage warranties, making long-term upkeep smoother and more organized. Looking ahead, the trend is shifting toward IoT-enabled sensors that monitor temperature, humidity, and structural integrity in real-time, alerting owners and contractors to potential issues as they develop. Embracing these technologies will elevate your maintenance game, saving money and preventing costly repairs. How do I maintain deck integrity over time? Regular inspections paired with targeted cleaning, sealing, and hardware checks are essential. For instance, periodically applying a penetrating deck sealant like Seal-Once provides a long-lasting barrier against moisture and UV damage. Moreover, inspecting and replacing fasteners that show signs of corrosion will prevent wobbling and structural fatigue. Remember, proactive maintenance not only extends the lifespan of your composite decking but also preserves its aesthetic appeal. For more advanced strategies, consider exploring techniques outlined in the latest [composite decking trends](https://deckdesignbuild.com/composite-decking-trends-2025-the-ultimate-guide-for-outdoor-enthusiasts), which highlight innovative protective coatings and support systems. Don’t be shy—try implementing a moisture meter check before weather extremes or invest in a smart sensor setup this season. Simple steps today will pay dividends when your outdoor living space faces the test of time.
Lessons from the Hard Knocks of Outdoor Renovation
One of the most eye-opening revelations for me was realizing that patience trumps speed when working with curves in composite decking. Rushing to fit boards around a pool edge often led to misalignments, which only complicated the finishing process. Learning to accept that careful, deliberate cuts yield the best results was a game-changer.
Another insight was understanding the importance of proper support beneath curved boards. Initially, I underestimated how critical closely spaced joists and supportive shims are to maintaining a smooth, gap-free finish. These small touches prevent warping and give your deck the professional appearance you desire.
Finally, I discovered that every project benefits from meticulous planning. Creating detailed templates and testing cuts on scrap material saved me hours of frustration. This preparation step is invaluable, especially when dealing with intricate pool curves or complex designs.
My Top Picks for Deck Building and Maintenance Tools
Among the tools I swear by are a fine-tooth carbide blade for smooth cuts on composite boards, which ensures precision around curves. A moisture meter like the Tramex MRH helps monitor framing conditions, preventing hidden rot that can compromise your work over time. For ongoing upkeep, I recommend [Deck Inspector](https://deckdesignbuild.com/deck-inspector-app), an app that keeps track of inspections and maintenance schedules, prolonging your deck’s lifespan. Looking ahead, IoT sensors that monitor environmental changes are becoming increasingly affordable and can give you early warnings of potential issues.
As for resources, I trust the comprehensive guides on [composite decking trends](https://deckdesignbuild.com/composite-decking-trends-2025-the-ultimate-guide-for-outdoor-enthusiasts) to stay updated on new materials and techniques. Additionally, consulting with a seasoned [outdoor deck builder](https://deckdesignbuild.com/the-benefits-of-working-with-a-professional-deck-builder-in-your-outdoor-projects) can provide personalized insights and tailored advice for your unique space.
Now It’s Your Turn to Elevate Outdoor Living
Mastering curved composite decking around your pool may seem daunting at first, but with the right knowledge and tools, you can create a stunning, durable outdoor space that reflects your style. Remember, every curve you perfect adds to your confidence and skill as a builder—so don’t shy away from challenging projects.
What part of installing curved decking do you find most intimidating? Share your experiences or questions below—I’m here to help you achieve your dream outdoor oasis.
,