
It was my daughter’s graduation party, the burgers were sizzling on the grill, and the playlist was finally hitting its stride—until my brother-in-law caught his heel on a stray speaker wire I’d ‘temporarily’ taped down. He didn’t fall, but my pride certainly did. Looking at those ugly black lines snaking across my brand-new boards made me realize I’d built a high-end space but finished it with a low-budget mess. I spent thousands on the best materials, yet I was one trip-hazard away from a lawsuit.
I Learned the Hard Way That Visible Wires Ruin the Vibe
If you are like me, you probably spent weeks researching modern composite decking trends to ensure your backyard looked like a magazine cover. But nothing kills that ‘private oasis’ feeling faster than a tangle of wires that looks like a spaghetti factory exploded under your patio furniture. I made the classic rookie mistake of finishing the entire surface before thinking about the sound system. I thought I could just ‘tuck them in later.’ Spoiler alert: you can’t. Not easily, anyway. Today, I want to show you how to avoid my early failures and integrate your audio so perfectly that guests will wonder where the music is even coming from. We are going to look at using the joist bays to our advantage and why routing low-voltage lines during the build phase is the only way to go. Have you ever stood back to admire your handiwork only to be blinded by a bright white extension cord? It’s a gut-punch, isn’t it?
Is Hiding Wires Actually Worth the Extra Labor?
Some folks tell me they don’t mind a few cables if the sound is good, but they are usually the ones who haven’t dealt with wire rot yet. According to experts at Audioholics, using standard speaker wire outdoors without proper protection leads to oxidation that can kill your expensive speakers in less than two seasons. By hiding your cables within the structure, you aren’t just making it look pretty; you are protecting your investment from UV rays and moisture. When I was applying joist tape to the frame on my last project, I realized that the same ‘hidden’ philosophy applies to tech. You want the performance without the visual noise. We are going to dive into the specific techniques for running lines through sleeves and how to exit the deck boards without creating a gap that invites pests or rot. It’s about more than just aesthetics; it’s about building a system that lasts as long as the deck itself.
Use the Framing to Your Advantage
Imagine your deck framing is a skeleton; you want the nervous system—the wires—protected inside the bones, not taped to the skin. I remember my first ‘pro’ attempt where I used a discarded garden hose as a makeshift conduit. I thought I was a genius until the first freeze-thaw cycle turned that hose into an ice-filled pipe that snapped the speaker wire like a twig. Now, I use 1/2-inch PVC electrical conduit. It’s cheap insurance against the elements and inquisitive rodents.
Why PVC is Better Than Tucking Wires
When you’re working with a skilled deck builder, they’ll tell you that the best time to run these lines is right after the joists are set but before a single board is laid. You treat the joist bays like a highway. I prefer to strap the conduit to the side of the joist about three inches down from the top. This keeps the wires clear of any future composite board screws that might come down from above. 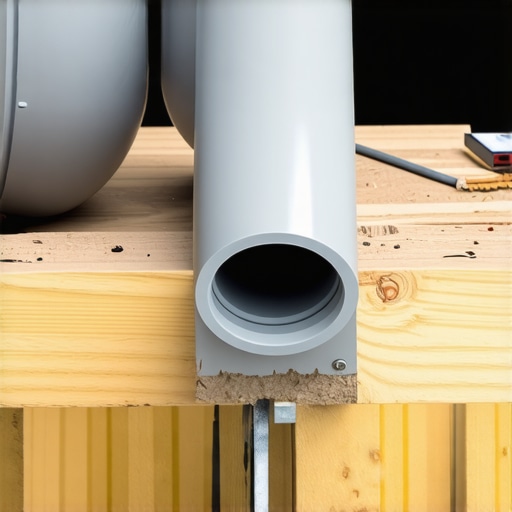
Avoid the Spaghetti Mess Under the Joists
Don’t just let the wires dangle. I use J-hooks or conduit straps every four feet. If you just zip-tie them to the cross-bracing, they’ll eventually sag and become a home for cobwebs or, worse, a chew toy for squirrels. It’s about creating a clean, professional path that won’t interfere with the structural integrity of your build. This also makes it significantly easier to pull new wires later if you decide to upgrade your speakers.
Why I Stopped Fishing Wires Through Finished Stairs
If you’re building a multi-level space, especially one with innovative stairs solutions, you have to plan the path around the stringers. I once spent three hours trying to fish a wire through a finished stair riser because I forgot to pre-drill a hole for the step-light line. It was a nightmare that ended with me bruised and frustrated. It’s one of the main reasons why I stopped using wood for deck stair stringers and moved toward systems that allow for easier cable management during the assembly phase. Pre-drilling your stringers before they are mounted is a game-changer for integrated lighting.
The Cleanest Way to Exit the Deck Surface
When it’s time to bring the wire up to the speaker, don’t just shove it through a gap. Use a dedicated clam-shell cover or a small grommet. If you are picture framing your deck, the perimeter board is the perfect place to hide these exit points. I drill a hole just slightly larger than the wire, pull it through, and then use a dab of silicone to seal the gap. This stops water from tracking down the wire and potentially causing moisture issues or rot in the substructure.
Powering the Whole System Safely
Before you get too deep into the layout, remember that your amplifier and outdoor tech need stable juice. This isn’t just about speakers; if you’re adding a fridge or a big TV, your deck needs a dedicated circuit to prevent tripping the breaker every time the bass hits or the compressor kicks in. I usually mount my weather-proof hub near the house ledger, keeping the ‘brains’ of the operation accessible but shielded from the direct line of rain and sun.
Most homeowners believe that once the last board is snapped into place, the job is done for the next twenty years. While choosing the right composite decking is a huge first step, the ‘set it and forget it’ mentality is often where the most expensive mistakes begin. I see it every season: a beautiful space that looks like a million bucks in July but starts to groan and buckle by the following March. It’s not usually the material’s fault; it’s a failure to account for the physical realities of synthetic materials. Let’s look at the nuances that separate a weekend DIY job from a professional-grade retreat.
How Do You Stop Your Deck from Buckling in the Summer Heat?
The biggest myth I encounter is that composite decking is dimensionally stable like stone. In reality, composites expand and contract significantly with temperature swings. Many people want their deck to look like their living room floor, so they butt the boards tight against each other. This is a massive ‘oops’ factor. In my experience, if you don’t respect the thermal expansion coefficient, those boards will have nowhere to go but up, resulting in a wavy, warped surface. A study by the Forest Products Laboratory highlights that composite materials can experience linear expansion much more drastically than traditional wood. This is why your composite boards are expanding more than expected if you live in a climate with high temperature volatility. Using the spacing secret for installing composite decking in winter is vital; you need to leave room for the material to breathe when the sun finally hits it.
Beyond the boards, the substructure is where the true expertise shows. People often assume that if a frame is strong enough to hold people, it’s finished. But there is a huge difference between ‘safe’ and ‘solid.’ If you’ve ever walked across a high-end deck and felt a slight vibration or ‘bounce’ in your step, you’re feeling a lack of lateral bracing or improper joist spans. This is the structural reason your deck feels bouncy, and it’s something that even some pros overlook in the rush to get the surface boards down. It’s about more than just meeting code; it’s about the tactile experience of the space.
The Stair Trap That Ruins Your Curb Appeal
Then there are the stairs. Everyone focuses on the view from the chair, but the transition to the ground is where most projects fail both aesthetically and legally. The most common error is inconsistent riser heights. Even a quarter-inch difference is enough to trigger a trip reflex in the human brain. This is the mistake that makes your deck stairs trip hazards. I always recommend using the bracket that makes your deck stairs feel rock solid to ensure that over time, the wood doesn’t settle or pull away from the main structure. We often think of the truth about maintenance-free decking claims as applying only to the color of the boards, but the real maintenance is ensuring the structural connections stay as tight as the day they were installed. Have you ever fallen into the ‘tighter is better’ gap trap or dealt with a bouncy deck? Let me know in the comments.
The Gear That Separates Pro Projects From Amateur Flops
If you’re serious about this, put down the hammer and pick up a laptop for a moment. I learned early on that the most powerful tool in my arsenal isn’t a saw—it’s visualization software. That’s why I never start a complex deck project without a digital 3d walkthrough first. It allows you to see the interference between your speaker conduits and your joist hangers before you’ve even cut a single board. Beyond software, I’ve completely swapped my hardware kit. I strictly use structural screws now instead of the heavy, clunky bolts of the past. The reason we use structural screws instead of old-fashioned lag bolts comes down to superior shear strength and the speed of installation without the need for pre-drilling. It saves your wrists and ensures the frame stays tight for thirty years, not just three.
How do I keep my composite deck looking brand new for decades?
Maintenance on a ‘low-maintenance’ deck is actually about what you don’t do. I’ve seen well-meaning homeowners destroy a $20,000 surface in twenty minutes with a pressure washer. This is why you should never power wash your composite deck; the high pressure can actually delaminate the protective cap or create micro-pitted surfaces that trap mold and pollen. Instead, I use a soft-bristle brush and a simple pH-neutral soap. Also, pay attention to the water shedding. I’ve found that why I always add a drip edge to deck stairs is the secret to preventing that nasty ‘black mold’ look on your risers. According to the North American Deck and Railing Association (NADRA), the majority of deck failures in the United States are caused by moisture-related rot at the ledger or stair connections. By focusing on smart drainage rather than harsh chemicals, you’re playing the long game for your home’s value.

Digital Twins and Smart Decks: The Next Frontier
Looking ahead, the ‘dumb’ deck is slowly dying. I predict that by 2026, we’ll see integrated moisture sensors and load-bearing analytics as standard features for high-end builds. We are already seeing composite decking trends 2025 lean heavily into ‘smart’ integration. Imagine your deck sending a notification to your phone because the ledger flashing has a leak after a heavy storm. It sounds like sci-fi, but it’s the natural evolution of how a skilled deck builder ensures long-term safety and peace of mind. If you’re ready to stop guessing and start building a space that actually lasts, contact us to see how we can map out your project with precision. My best advice for right now? Go buy a box of structural screws and replace those rusted lag bolts on your ledger today—it’s the single best structural upgrade you can make for under fifty dollars.
Hard-Won Secrets for a Bulletproof Substructure
After years of fixing decks that looked good on day one, I’ve realized that most failures happen because of what people don’t see. First, never underestimate the power of the gap; composite boards expand more than you think in the summer heat, and skipping that breathing room leads to buckled planks every time. Second, the connection point to your house is your project’s lifeblood. Working with a professional deck builder often highlights that moisture at the ledger is the primary cause of rot—flashing it perfectly is not optional. Finally, when it comes to your stairs, don’t rely on luck. Using specialized brackets makes your stairs feel rock solid and prevents that unsettling sway as guests move between levels.
The Short List of Gear I Never Build Without
I’ve spent thousands on miracle tools, but these are the few that actually earned their keep in my kit. I strictly use structural screws instead of old-fashioned lag bolts because they offer superior shear strength and don’t require the tedious pre-drilling that wears out your drill batteries and your wrists. For the planning phase, using a digital designer is the best way to catch conduit conflicts before you even buy your first piece of lumber. Lastly, keep a bottle of pH-neutral soap and a soft brush handy; it is the safest way to keep your composite decking looking brand new without the surface-pitting risks associated with power washing.
Ready to Build Your Private Retreat?
Your backyard isn’t just another home improvement project; it’s an investment in your personal sanity and family connection. Whether you are adding a sound system that disappears into the architecture or crafting custom composite decking ideas that reflect your personal style, the key is patience in the initial planning. High-end outdoor living is achieved by solving problems before they happen—like routing those speaker wires before the first board is snapped into place. If you want to ensure your vision is executed with technical precision, reach out to us today to map out a structure that will stand the test of time. Are you planning to run smart lighting or a complex sound system on your next build? Let me know in the comments below and let’s troubleshoot your wire paths together!