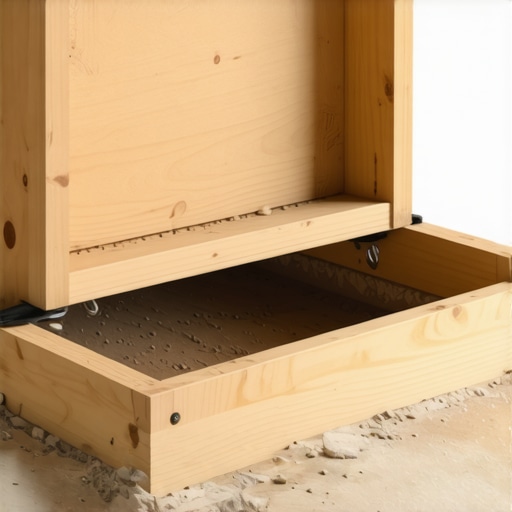
Ever spent hours struggling to open a stubborn trap door in your crawl space, only to realize it was poorly framed from the start? I know that feeling all too well. One weekend, I was knee-deep under my porch, fighting with a flimsy, sagging cover that made me question my DIY skills. It hit me then: a trap door isn’t just a quick cutout; it deserves as much attention as any major project in my outdoor space. Proper framing isn’t just about aesthetics—it’s about safety, durability, and making future access hassle-free.
Your Crawl Space Access Needs More Than Just a Flimsy Panel
A well-designed trap door is like the gateway to maintaining your home’s foundation, ensuring pests stay out and inspections are easy. Yet, many homeowners—myself included early on—tend to overlook this crucial detail. I used a scrap piece of plywood and some hinges, thinking that would do. Big mistake. Not only was it prone to warping, but it also made access clunky and unsafe. That’s when I started researching better ways to frame these little portals.
Did you know, according to Home Innovation Research Labs, improperly framed access points can lead to air leaks, moisture intrusion, and even pest entry? This realization pushed me into learning the proper techniques.
In this guide, I’ll walk you through the step-by-step process I’ve perfected over years of trial, error, and improvement. We’ll cover the best framing materials, techniques to ensure airtightness and stability, and tips on finishing that make the trap door blend seamlessly into your outdoor aesthetic.
But first, let’s address a common concern I hear from fellow DIYers and homeowners: “Is taking the time to frame a trap door really worth it?” Absolutely. Proper framing offers a sturdy, easy-to-open access point that stands the test of time, weather, and foot traffic. Plus, a professionally framed door can enhance the overall look of your deck or porch, boosting your home’s curb appeal.
Are you tired of popping up and struggling with your current trap door? If you’ve faced this frustration, you’re not alone. The good news is, with the right approach, you can turn a weak, problematic hatch into a model of durability and convenience. Ready to learn the secrets? Let’s dive into the core techniques that will change how you access your crawl space forever.
Choose the Right Materials for Durability
Start by selecting pressure-treated dimensional lumber—such as 2x4s or 2x6s—for framing your trap door. I once used untreated scrap wood, hoping it would hold up, but it warped within a year, making the door hard to open. Using treated wood ensures resistance to moisture, pests, and rot, which is critical for outdoor-access points.
Measure and Cut Precisely for a Tight Fit
Accurate measurements are key. I measured the opening carefully, adding about 1/4 inch to accommodate any expansion or contraction. Cutting precisely with a miter saw or a circular saw guarantees a snug fit that won’t rattle or wobble over time. Take your time to double-check dimensions; a miscut can lead to gaps and future leaks.
Build a Solid Frame with Proper Supports
Construct the frame as a rectangular box, ensuring the corners are square using a carpenter’s square. I reinforced my frame with metal angle brackets at the joints, which added stability. Double-Joist framing provides extra support, especially if you plan to step on the door frequently. Remember, the strength of your frame directly influences safety and longevity.
Secure the Frame to the Opening
Position the frame into the opening and shim it for alignment. Use structural screws—like deck screws or lag bolts—to attach the frame securely to existing supports or wall drywall. I used a level to ensure the frame was perfectly horizontal, preventing it from sagging or tilting over time. Proper fastening prevents shifting and maintains a seal around the edges.
Seal and Insulate for Airtightness
Apply weatherproof caulk along all joints and face the frame with spray foam insulation to prevent air leaks and moisture intrusion. I found that sealing around the frame reduced drafts and improved energy efficiency. Additionally, installing a weather strip or gasket at the door’s edges can enhance airtightness and prevent pests from sneaking in.
Finish with a Functional Cover
Attach a durable, weather-resistant panel—such as a composite deck board or a treated plywood sheet—that swings on hinges. I used heavy-duty hinges rated for outdoor use, which withstand the elements. Make sure the cover fits tightly to prevent water infiltration and lock or latch the door for safety.
While many believe that choosing the right composite decking is enough to ensure a durable, low-maintenance outdoor space, the real nuances lie beneath the surface. In my experience, one common myth is that all composite materials are created equal—this couldn’t be further from the truth. Some products degrade faster under UV exposure or as a result of poor fabrication, leading to costly repairs and dissatisfaction. According to a study by the Wood Plastic Composites Consortium, the durability of composite decking can vary dramatically based on resin content and manufacturing quality, making research before purchasing essential.
A frequently overlooked aspect is the framing support for your deck or stairs. Skimping here often results in instability or dangerous wobbling over time, especially if you’re handling heavier loads or frequent foot traffic. Many DIYers make the mistake of relying solely on quick fixes like metal brackets without ensuring proper load distribution and anchoring. For instance, double-joist framing can dramatically improve longevity and safety, a detail often ignored by amateurs.
When it comes to stairs, the key is not just aesthetics but also safety. Proper rise and run measurements, nose over the stair stringer, and slip-resistant surfaces are critical. A common trap is to assume that standard stringers suffice; however, the [Expert Guide to Building Safe Outdoor Stairs](https://deckdesignbuild.com/designing-safe-and-stylish-stairs-for-outdoor-decks-in-2025) highlights how choosing the right support system can prevent accidents.
Why do many outdoor living projects falter over time despite initial planning?
Investing in high-quality materials and precise construction techniques is crucial, but neglecting proper drainage and ventilation can undermine your efforts. For example, inadequate drainage leads to water pooling that accelerates materials’ deterioration, especially in shaded or poorly ventilated areas. Installing a subtle sloped surface or incorporating drainage channels isn’t just about looks—it’s about protecting your investment for the long haul. This is backed by *The International Association of Certified Home Inspectors*, which stresses that poor drainage is among the top causes of deck failure in outdoor structures.
And let’s not forget aesthetics. Many overlook how a well-integrated design with your home’s existing style can enhance both beauty and function. Blending composite decking with natural materials or utilizing innovative stair designs can elevate your outdoor space from ordinary to extraordinary. Check out [these inspiring ideas for maximizing outdoor space](https://deckdesignbuild.com/maximizing-outdoor-space-inspiring-deck-and-stair-ideas-for-every-budget) to see what I mean.
Have you ever fallen into this trap? Let me know in the comments. Mastering the subtleties of deck building and outdoor living isn’t just about the big picture—it’s the small details that ensure a safe, beautiful, and lasting transformation.Maintaining your outdoor deck is essential to ensure longevity, safety, and beauty. Having the right tools on hand makes regular upkeep manageable and effective. I personally swear by a few specific pieces of equipment that have become indispensable in my deck care routine. First, a high-quality orbital sander is perfect for smoothing out wear and preparing surfaces for sealing or staining. I prefer the Bosch ROS20VSC, thanks to its variable speed control and ergonomic design, which minimizes fatigue during prolonged use.
For cleaning, I rely heavily on a cordless pressure washer like the Karcher K1700. Its adjustable pressure settings help me remove dirt and mildew without risking damage to composite decking surfaces, aligning with advice from [DeckDesignBuild](https://deckdesignbuild.com/why-you-should-never-power-wash-your-composite-deck). This tool allows me to incorporate cleaning into my maintenance schedule swiftly, especially after harsh winter months.
To monitor the structural integrity of my deck, I utilize a digital level combined with a moisture meter, such as the Fluke 15B+. These tools help identify subtle shifts or water intrusion before they escalate into costly repairs. Staying proactive with these measurements ensures my deck stays in top shape and ready for outdoor gatherings.
When it comes to long-term results, investing in quality maintenance products like waterproof sealants and weather-resistant paints pays off. I opt for a penetrating sealant like Ready Seal because it enhances durability while respecting the natural look of the wood or composite surfaces.
Looking ahead, the trend is moving towards smart maintenance solutions. Emerging technologies include NFC-enabled moisture sensors and app-connected weather stations that notify you when your deck needs attention. I predict that integrating these smart tools will become a standard part of deck care, making maintenance more precise and less labor-intensive.
**How do I maintain my outdoor living spaces over time?** I schedule seasonal inspections, clean thoroughly, and reseal surfaces biennially. Regularly checking for loose fasteners and damaged components helps prevent safety hazards and costly repairs, ultimately extending the life of my deck.
For those serious about keeping their outdoor spaces in pristine condition, I highly recommend trying the advanced technique of using a moisture meter before staining or sealing. This step ensures you apply finishes only when the wood or composite is properly dry, leading to better adhesion and longer-lasting results. Incorporate this small step into your routine, and you’ll see a dramatic difference in the look and durability of your deck. Curious to see how it could work on your project? Give it a try today and enjoy a deck that stays beautiful for years to come.
The Hidden Lessons That Changed My Approach to Outdoor Access Points
One of the most valuable insights I gained was that a well-framed trap door isn’t just a small detail—it’s the backbone of safe, durable outdoor living spaces. I learned to prioritize quality materials over quick fixes, realizing that untreated wood almost always leads to warping and safety hazards. Additionally, precise measurements and proper support ensure that your access point remains secure and easy to use decades down the road. My biggest lightbulb moment? Sealing and insulating the frame makes all the difference in preventing drafts, moisture intrusion, and pest entry, ultimately saving me time and money on repairs.
Finally, integrating a weather-resistant cover that swings smoothly on heavy-duty hinges has transformed my crawl space access from a headache into a reliable feature that enhances my outdoor experience. Taking the time to refine these details was a game-changer I wish I had known from the start—small steps that yield big results in outdoor living.