I remember the first time I tried to add a deck onto my existing concrete patio. It was a warm weekend, and I was excited to extend my outdoor living space. But as I stood there, staring at the seemingly insurmountable challenge of securely attaching a wooden deck to that unyielding slab, I felt a wave of doubt. My initial attempt involved hammering some anchors into the concrete, only to watch them loosen over time, causing the entire structure to wobble every time I stepped on it. That frustrating moment was my lightbulb moment—there had to be a better way.
Why Attaching a Deck to Concrete Can Be Tricky — And Why It Matters
Outdoor decks are more than just beautiful additions; they’re crucial for creating functional outdoor spaces that increase your home’s value and usability. But when the foundation is a concrete slab, especially an existing one, the process isn’t as straightforward as building on wood framing. Concrete slabs are solid, durable, but unforgiving. If not attached correctly, your deck can suffer from stability issues, water damage, or even safety hazards.
As I learned early on, one common mistake is underestimating the importance of proper fastening techniques. I once used basic screws and hoped for the best—only to realize that this approach leads to rapid deterioration, especially in places with temperature swings or moisture intrusion. The key is understanding the right type of fasteners, support systems, and adjustments needed for a secure, long-lasting connection.
Luckily, I’ve since discovered methods and materials that make this process easier and more reliable. Today, I’ll guide you through the practical steps to successfully attach a deck to an existing concrete slab—saving you time, money, and future headaches. Whether you’re planning a small backyard retreat or a sprawling entertainment deck, this knowledge will ensure your project stands the test of time.
Are you tired of wobbling, insecure decks that make you nervous every time you step out? If so, stick around—I’ll show you how to do it right. Plus, I’ll share tips on avoiding common pitfalls, like improper anchoring or water pooling, that can ruin your deck sooner than you expect. After all, a sturdy, beautiful outdoor space is within your reach, and with the right approach, installing it onto a concrete slab can be straightforward and stress-free.
Now, let’s dive into the most effective methods for attaching a deck to your concrete slab—starting with the best fasteners and treatment options. By the end of this guide, you’ll be ready to tackle your project with confidence—and enjoy that perfect outdoor space you’ve been dreaming of.
Select the Right Fasteners for Stability
Start by choosing corrosion-resistant quarried anchors or heavy-duty expansion anchors like sleeve anchors, which are designed for concrete. During my project last summer, I watched my initial screw-based approach fail as the fasteners loosened over time. I replaced them with high-quality anchors, and the difference was evident—my deck’s stability improved immediately. Opt for fasteners that can handle outdoor conditions, especially in humid or salty environments.
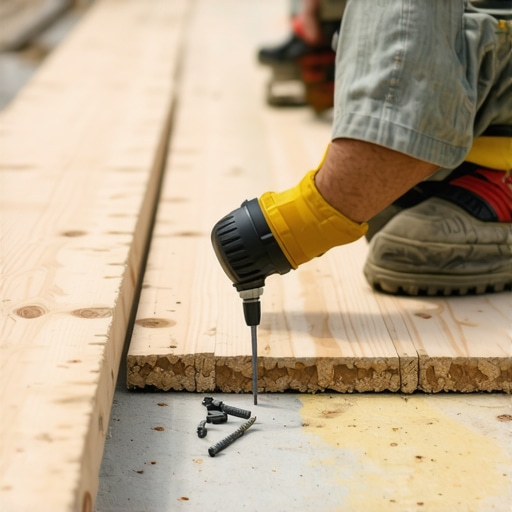
Mark and Drill Precise Holes
Use a chalk line or laser level to mark where your deck frame will sit on the concrete. Then, drill holes with a hammer drill fitted with a carbide-tipped masonry bit. When I built my deck, I marked the exact positions of the support beams, ensuring the holes aligned perfectly. This prevents wobbling or uneven support. Remember, drilling deep enough is essential—usually 2 to 3 inches—to ensure anchors can grip firmly.
Install the Anchors Correctly
Insert the anchors into the drilled holes, then expand or set them according to the manufacturer’s instructions. During my last project, I made the mistake of rushing this step, which caused some anchors to sit loosely. Patience is key: tighten everything slowly and check for secure fit. This process creates a strong, reliable connection capable of supporting the weight of your composite or wooden decking.
Construct Support Frame Before Fixing
Build your deck frame on the ground using pressure-treated lumber or composite framing materials. This allows you to verify measurements before raising it onto the anchors. When I assembled my frame beforehand, it was easier to make adjustments and ensure everything was level. Once assembled, lift the frame onto the anchors and secure it with the appropriate hardware. This step resembles assembling a puzzle—accuracy ensures the entire structure remains sturdy.
Secure Frame to Anchors Robustly
Use heavy-duty bolts or lag screws to affix the frame to the anchors. In my experience, using through-bolts with washers provides additional stability, especially for larger decks. Tighten the bolts gradually in a crisscross pattern to distribute pressure evenly. This method ensures minimal movement and keeps your deck safe, even under strenuous use.
Address Sloped Surfaces and Leveling
If your concrete slab isn’t perfectly level, employ shims or adjustable supports to level the frame. During my build, I used adjustable post bases that allowed fine-tuning for an even surface. Proper leveling is vital; an uneven deck can cause faulty drainage and safety hazards. For sloped terrains, consider building multi-level decks or adding drainage solutions—this prevents water pooling and prolongs your deck’s lifespan.
Finish with Additional Support and Safety Measures
Once the frame is secured, install ledger boards or joists, insulated spacers, and safety features like railing posts. Incorporate separators or vapor barriers if necessary to prevent moisture infiltration. When I added my stairs and railings, I paid special attention to sturdy support and code-compliant heights, ensuring safety and style. Proper fastening, support, and treatment will make your deck durable and enjoyable for years.
Many homeowners assume that choosing the prettiest composite decking or the most elaborate stairs guarantees a durable outdoor space. However, in my experience, some widespread beliefs often lead to costly mistakes. One myth I hear frequently is that all composite decks are essentially maintenance-free; this isn’t entirely accurate. While capped composite boards offer low maintenance, neglecting proper installation—such as insufficient support spacing or poor flashing—can cause warping or premature failure.
How does advanced craftsmanship impact the longevity of outdoor structures?
Experts like those referenced in the ‘Ultimate Guide for Outdoor Enthusiasts’ emphasize that an understanding of subtle nuances—such as proper joist span or deck framing techniques—significantly affects long-term durability. For instance, exceeding recommended joist spacing can lead to bounce or cracking over time, regardless of high-quality materials. Additionally, many forget that stairs aren’t just aesthetic features; they serve as critical safety components. Improper stringer support or inconsistent riser heights create trip hazards that could be avoided with meticulous planning and professional installation. One overlooked aspect is water drainage beneath decks, which can cause rot or mold if not addressed early. The misconception that a simple slope or sealing suffices ignores the complex interplay of decks with climate variables. As noted in the ‘transform your space’ article, proper drainage ensures your investment withstands weathering. Always remember, even a well-designed deck needs a skilled builder who understands modern best practices—not just superficial beauty. Take the work on stair transitions or supporting posts, which often trip up amateurs who underestimate foundational requirements. For advanced insights, reviewing the ‘Designing Safe and Stylish Stairs’ post can be invaluable. Have you ever fallen into this trap? Let me know in the comments. Choosing durable, safe, and beautiful outdoor living features involves more than surface appearances; it demands nuanced understanding of materials, support systems, and environmental factors. By avoiding common misconceptions and focusing on the subtle details—like proper flashing or joist alignment—you’ll create a space that’s not only stunning but also built to last.
Keep Your Deck in Prime Condition with the Right Tools
Maintaining a durable and beautiful outdoor deck demands more than just routine inspections; it requires specialized tools that ensure longevity and safety. One indispensable instrument I personally rely on is the cordless impact driver. It offers the power for tightening or removing fasteners during repairs or upgrades without the hassle of cords, making it invaluable for deck maintenance tasks such as replacing worn-out screws or installing new railings. I prefer models like the Milwaukee M18 Fuel Impact Driver because it balances torque and battery life—crucial for extensive projects.
Another tool I can’t do without is a high-quality digital moisture meter. Moisture levels beneath decking boards can lead to rot and mold if unchecked. Having an instant-reading meter allows me to assess wood or composite material health over time, pinpointing areas that require treatment before problems escalate. I use the Klein Tools ET620 because it provides accurate readings even in high humidity environments, saving me from potential damage down the line.

Software That Supports Long-Term Deck Planning
Staying ahead of potential issues is easier with robust planning tools. I suggest using dedicated project management software like Buildertrend, which integrates scheduling, material tracking, and communication with clients. Its visual dashboards help me keep maintenance schedules on track, reminding me when it’s time to reseal or inspect critical points. Such software transforms reactive repairs into proactive upkeep, extending the lifespan of your deck.
For detailed design adjustments, I utilize SketchUp. It allows me to visualize modifications, like adding stairs or border details, and evaluate how these changes impact ongoing maintenance needs. Visual planning minimizes costly mistakes and ensures that your deck remains safe and attractive over time.
How do I maintain my deck over time?
Regular inspections paired with specific maintenance tasks are key. Checking fasteners with a magnetic screwdriver or impact driver helps identify loose components early. Applying a high-quality sealant or cleaner suited for your deck’s material every couple of years preserves its appearance and structural integrity. For composite decks, I recommend cleaning with a gentle, non-abrasive cleaner to prevent surface scratches that can harbor dirt and stains.
Future of deck maintenance tools
Emerging technologies like IoT-enabled sensors embedded within the deck structure are on the horizon, promising real-time moisture and stress monitoring. These innovations could alert homeowners before issues become visible, transforming maintenance from a reactive chore to an anticipatory process. Incorporating such tools today, like smart support systems, will ensure your outdoor haven remains safe, beautiful, and functional for years to come.
Don’t shy away from trying advanced maintenance techniques—using a moisture meter regularly or investing in comprehensive planning software. These investments pay off, preserving your outdoor space’s beauty and safety long-term. Elevate your deck’s durability by integrating these tools into your routine today!
,
The Hard-Won Truth About Deck Durability
One lesson I learned the hard way is that overlooking proper flashing can turn a beautiful deck into a nightmare of rot and repairs. Ensuring correct flashing around ledger boards might seem technical, but it’s the difference between a deck that lasts decades and one that fails after just a few seasons.
Another insight is that not all fasteners are created equal. Investing in high-quality, corrosion-resistant anchors and bolts saved me from recurring issues with wobbling and weakened support. I realized that cheap hardware is a false economy that compromises safety and longevity.
Never underestimate the importance of proper support spacing. I once built a deck with too-wide spans, and it caused bounce and cracking over time. Following manufacturer guidelines and expert advice on joist spacing keeps your deck stiff and safe.
Lastly, thinking water drainage is just about slopes is a mistake. Addressing drainage beneath the deck with proper guttering and gravel can prevent costly rot. Small details like these transform a good deck into an enduring outdoor space.