I remember the first time I decided to lay down landscape fabric beneath my deck, thinking I was doing the right thing to prevent weed growth and keep the area tidy. But soon enough, I realized that what seemed like a simple, budget-friendly fix was actually causing more headaches than solutions. Over years of building and maintaining outdoor spaces, I’ve learned that sticking to cheap landscape fabric is one of the quickest ways to invite water pooling, mold, and even structural issues to your outdoor oasis.
The Hidden Pitfalls of Cheap Landscape Fabric
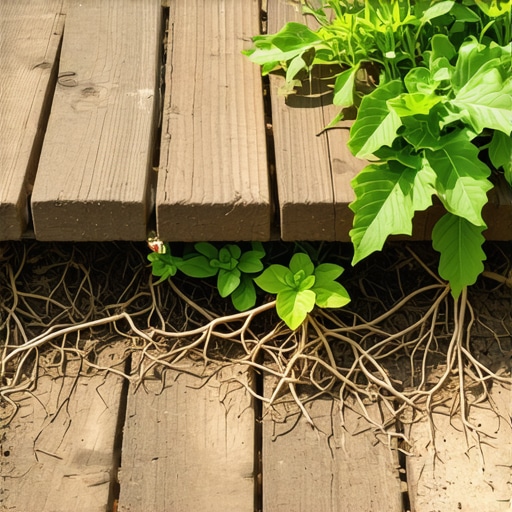
Many homeowners, myself included in the beginning, believe that a thin, inexpensive layer of landscape fabric will keep weeds at bay without breaking the bank. But the reality is, not all fabric layers are created equal. The thinner, low-cost options often tear easily and allow weeds to emerge, defeating their purpose. More importantly, they trap moisture against the underside of your deck, leading to wood rot, mold, and a significant deterioration of your investment over time.
From personal experience, I once installed a roll of bargain fabric thinking I’d save some money. Within a few seasons, I was fighting moldy deck boards, squeaky stairs, and persistent weed growth that seemed to thrive right through the fabric. It was frustrating. Research supports this, indicating that inadequate drainage and trapped moisture under decks contribute to rot and decay—issues that can be costly and time-consuming to fix. An article from [Deck Design & Build](https://deckdesignbuild.com/the-drainage-secret-for-keeping-the-area-under-your-deck-dry) emphasizes the importance of proper drainage and moisture control for long-lasting outdoor structures.
So, what’s the better way? That’s what we’ll cover next. But first, tell me—have you faced similar struggles when trying to keep your outdoor space neat and weed-free? If so, you’re not alone, and there’s a smarter solution waiting for you.
Is this cheap fabric really worth the hype?
One of my biggest mistakes early on was opting for those tiny, super-affordable rolls. I convinced myself that saving a few dollars was worth avoiding a few extra steps. But the truth is, investing in high-quality landscape protection and proper drainage methods can extend the life of your deck and outdoor living areas significantly. It’s a small upfront cost for a huge long-term payoff.
Armed with this knowledge, I was able to redesign the under-deck area with better drainage solutions and durable, breathable fabrics. The difference has been night and day—less mold, fewer repairs, and a preserved aesthetic. If you’re tired of wasting money on short-lived fixes and want your outdoor space to truly stand the test of time, understanding these pitfalls is the first step. Now, let’s look at how to choose the best materials and techniques for a dry, safe, and beautiful deck.
For more on creating seamless transitions between your deck and stairs, check out [this guide](https://deckdesignbuild.com/creating-seamless-transitions-stairs-as-key-elements-in-outdoor-living). It’s all about making your outdoor space both functional and stunning.
Start with a Solid Foundation
Before laying any decking, ensure your ground is well-prepared. Clear the area of debris, level uneven spots with gravel or compacted soil, and consider installing a perimeter support frame. Think of it like building a sturdy bookshelf; without a level and stable base, everything else will wobble.
Choose the Right Composite Decking Materials
Select composite boards that are low-maintenance, resistant to mold, and UV-stable. I recommend checking out this guide to identify optimal options. Match the color to your outdoor aesthetic but also consider how footprints and dirt will show over time.
Measure and Plan Your Deck Layout
Map out your deck’s size, considering the placement of stairs, seating areas, and any built-in features. Use stakes and string to outline the perimeter, ensuring right angles with the 3-4-5 triangle method—think of it as folding a paper into a perfect right-angled triangle. Precision here prevents headaches down the line.
Frame the Deck Using Proper Support
Build a sturdy frame with pressure-treated 2×10 or 2×12 joists, spaced 16 inches apart on center. Secure them with galvanized screws and verify levelness frequently with a laser level or long straightedge. An example from my experience: I once ignored the slight incline on my yard, resulting in a wobbly deck that I had to redo—don’t make that mistake.
Install the Deck Boards Carefully
Lay the composite boards perpendicular to the joists for added strength. Use concealed fasteners or clips to avoid visible screws and create a clean look. When installing, leave a 1/4-inch gap between boards for drainage, mimicking the natural expansion of wood. Remember, composite decking is like a sponge when wet—proper spacing prevents water pooling and mold growth.
Address Water Drainage Proactively
Integrate a slight slope, about 1/8 inch per foot, away from your house to channel water effectively. I once skipped this step, resulting in water pooling at the deck’s edge after heavy rain—leading to wood rot and mold. Install a drainage system beneath the deck if necessary, such as a fabric membrane with gravel, to keep the area dry and prolong deck life.
Create Safe, Attractive Stairs
Build stairs with 7-inch risers and 11-inch treads for comfort. Position railing posts at proper spacing for safety, attaching balusters securely. For seamless transitions, incorporate designs like those found here. Use framing techniques that prevent wobbling, such as adding cross-bracing and anchoring stringers to the ground or support beams.
Secure and Finish the Staircase
Install stair stringers with corrosion-resistant hardware, avoiding pressure-treated lumber that can warp or crack over time. When finishing, stain or seal the wood components to improve durability and match your deck. Use non-slip stair treads or textured composite for safety, especially in wet weather.
Finishing Touches for Longevity
Seal all cut edges of composite and support posts with appropriate sealant to prevent moisture ingress. Add lighting along stairs and railing to enhance safety and ambiance. Regularly inspect fasteners and supports, tightening or replacing where necessary to maintain structural integrity. Think of your deck as an outdoor room—maintaining it keeps your investment pristine and inviting.
Many homeowners assume that choosing composite decking automatically guarantees low maintenance and durability, but let’s dig deeper into what most people overlook. A common misconception is believing that all composite boards are created equal; in reality, quality varies significantly, and opting for the cheapest options often results in quicker wear and unexpected issues. For instance, lower-grade composites may fade unevenly or develop surface scratches, defeating their supposed ‘maintenance-free’ promise. Additionally, misunderstandings about fastener compatibility can lead to squeaky or loose decks over time. Using standard fasteners instead of specialized clips can cause deck boards to lift or shift, especially under temperature fluctuations.
When it comes to stairs, many think that simply matching the tread and riser dimensions is sufficient, but the true nuance lies in precise calculation and structural support. Incorrect stringer spacing or neglecting to reinforce stair stringers can lead to wobbling or worst-case failure. Advanced builders often incorporate hidden supports or steel brackets, which not only enhance safety but also ensure longevity. Moreover, the transition between decks and stairs is more than aesthetic; improper framing can cause water pooling, leading to rot and mold. Incorporating careful drainage solutions and slope design is crucial.
The ‘hidden’ knowledge also extends to choosing the right decking material for your climate. For coastal areas with high humidity or salt exposure, some composites resist corrosion better, but only if you select products with mineral core technology. A study by the American Society of Civil Engineers highlights how material resistance to environmental stressors impacts overall deck lifespan. This is an advanced consideration many overlook when selecting decking, leading to costly premature replacements.
Another common trap involves the misconception that installing a deck is a DIY task without expert consultation. While minor projects are manageable, complex structures benefit from professional design to prevent issues like improper load distribution or non-compliance with local codes. An experienced deck builder can incorporate innovative ideas—such as multi-level layouts or integrated seating—that maximize your outdoor space’s potential. Check out various innovative outdoor living ideas to elevate your backyard design.
In conclusion, understanding these nuanced pitfalls and myths can save you time, money, and frustration while enhancing your outdoor environment. Have you ever fallen into this trap? Let me know in the comments and share your experience to help others navigate these hidden challenges.Maintaining a durable and beautiful composite deck over time requires more than just good initial construction; it demands the right tools and ongoing care. I personally rely on a few key pieces of equipment to keep my outdoor living space in top shape. First, a high-quality cordless drill with adjustable torque settings is essential for installing fasteners precisely—overdriving can crack composite boards, while underdriving leaves screws loose. I recommend the Makita XDT16 for its power and ergonomics. Additionally, a digital angle finder helps me ensure that stairs and framing remain perfectly level, preventing water pooling and structural issues—this is especially crucial for long-term stability. For cleaning, I swear by a pressure washer with a turbo nozzle, but I always use it at a low setting to avoid damaging the surface. Regular inspections, using a flashlight to spot hidden issues, combined with a moisture meter, help me identify early signs of water intrusion or rot, so I can address problems before they escalate. Looking ahead, advances in smart tools—like app-connected moisture sensors—may revolutionize deck maintenance in the coming years. How do I maintain my composite decking and stairs over time? I incorporate routine inspections, gentle cleaning, and timely repairs, which extend the lifespan significantly. For example, sealing cut edges and fastener holes with a weatherproof sealant protects vulnerable areas from moisture ingress. I also make sure to check fasteners periodically—like those hidden clips—and replace any that have corroded or loosened. It’s a small investment of time that pays off big, ensuring your deck remains safe and stunning for years. If you haven’t already, try using a moisture meter during your annual checkup—early detection of trapped water can prevent costly rot. Want to see how innovative tools can make this process even easier? Check out the latest advancements in outdoor living technology in [this guide](https://deckdesignbuild.com/innovative-outdoor-living-ideas-with-composite-decking-in-2025). Staying proactive with your maintenance tools and techniques not only preserves your investment but also enhances your outdoor experience—so grab that moisture meter or upgrade your fastener kit today and give your space the lasting care it deserves.
Lessons That Changed My Deck Building Perspective
One of the most eye-opening lessons I learned was the importance of investing in quality materials from the start; skimping on a good support system or durable decking often leads to costly repairs down the line. I realized that understanding the nuances of drainage and moisture control is crucial—merely installing a thin, inexpensive fabric isn’t enough to prevent mold or wood rot; proper slope and ventilation are key. The real game-changer was discovering that professional guidance in planning and support framing can make or break the longevity of your outdoor space. Lastly, I found that staying proactive with maintenance, like sealing cut edges and inspecting fasteners regularly, keeps my deck looking brand new and functioning well for years.