I remember the first time I noticed my deck stairs starting to wobble unexpectedly, as if they had a mind of their own. Turns out, the culprit wasn’t just wear and tear—rot had quietly crept in, undermining the very structure that made my outdoor space inviting. It was a lightbulb moment for me: the way deck stairs connect to the house can make all the difference in their longevity. Over the years, I’ve learned that a simple, often overlooked trick—adding ledger flashing—can save you from costly repairs and a potential safety hazard.
Why Proper Flashing Shields Your Deck from Rot and Damage
When I first built my deck, I didn’t realize that improper flashing around the ledger board could lead to water infiltration, eventually causing rot and compromising the entire structure. Water seeping behind the ledger allows moisture to settle in, especially where the deck meets the house, accelerating decay. This isn’t just a minor issue; the National Association of Home Builders reports that improper ledger flashing is one of the leading causes of deck failure due to structural rot and mold.
Fortunately, a simple ledger flashing trick changed everything. By installing a proper flashing between the house and the ledger board, water is directed away, preventing those silent, destructive leaks. This little addition acts as a barrier, keeping moisture out and extending the life of your deck components. If you’re like me, keen on outdoor living but wary of falling victim to rot, understanding and implementing this technique is a game-changer.
Is Ledger Flashing Truly Worth the Effort?
But I bet you’re wondering—does this really make that much difference? I’ll admit, initially, I brushed it off as an optional extra, convinced that regular inspections and maintenance were enough. I made the mistake of not installing proper flashing early on, which led to a small leak turning into a full-blown rot problem. Don’t repeat my mistake. Proper flashing is a proactive measure that can save you hundreds, if not thousands, in repair costs. For a detailed guide on creating a seamless transition and waterproofing your stairs, check out this comprehensive resource.
As we move forward, I’ll share step-by-step how to implement this trick and reinforce your deck’s resilience. Trust me—preventive care beats repair every time. Ready to ensure your outdoor space remains safe, beautiful, and long-lasting? Let’s dive into the practical side of things and make sure those stairs stay sturdy for years to come.
.
Prepare Your Workspace and Gather Materials
Before diving into installation, clear the area around your deck’s ledger board. Gather all necessary materials: a high-quality metal ledger flashing, construction sealant, galvanized screws or nails, a drill, a measuring tape, and a level. I remember wasting time searching for missing screws midway, so organizing everything beforehand ensures a smooth process.
Remove Old or Damaged Flashing and Inspect the Ledger
Start by detaching any existing flashing or debris from the ledger. Carefully inspect the wood for rot or damage. I once overlooked a small rot spot, which later escalated into a costly repair. Address any issues before installing new flashing to ensure a secure and waterproof connection.
Measure and Cut the Flashing to Fit
Measure the length of your ledger board and cut the flashing slightly longer to overlap the siding and allow water to shed properly. Use a tin snip or metal shears for clean cuts. When I cut my first piece, I accidentally bent it—reminding me to handle the metal gently and double-check measurements.
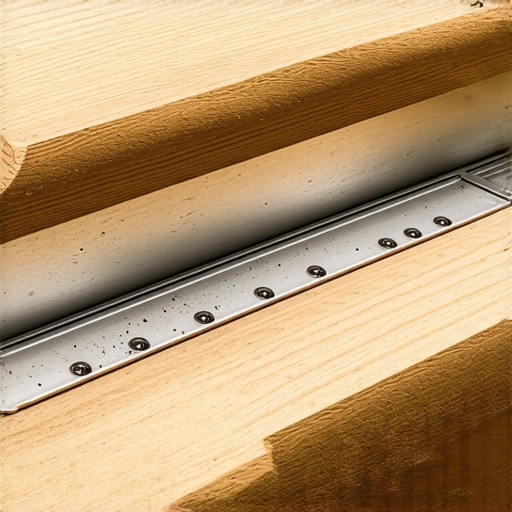
Position the Flashing Correctly
Align the flashing so that it extends over the siding and wraps up behind the house’s siding or trim. The top edge should be under the house siding, and the bottom edge should extend a few inches beyond the bottom of the ledger. I learned that positioning it correctly prevents water from seeping behind, which is critical for durability.
Seal and Secure the Flashing
Apply a continuous bead of exterior-grade sealant along the top edge of the flashing where it meets the house wall. This creates a waterproof seal. Fasten the flashing to the ledger with galvanized screws or nails, spacing them every 12 inches. Make sure the fasteners are snug but not overly tight to avoid warping the metal.
Tip: Use Sealant Beneath the Flange
For extra protection, run a bead of sealant underneath the flange before securing it. This prevents water from slipping underneath and seeping into the wood. I once skipped this step and noticed slight water intrusion after heavy rain; applying sealant made all the difference.
Finish by Adding Weatherproofing Measures
Finally, cover the edge of the flashing with siding or trim as appropriate. Consider installing a drip edge or gutter above the ledger to divert water away from the joint. Properly sealing and flashing your ledger not only prolongs its life but also ensures safety on your deck.
For comprehensive details and visual guidance, check out this resource. Implementing these steps faithfully will give you peace of mind knowing your deck is protected from hidden water damage and long-term rot.
Many homeowners assume that composite decking automatically solves all outdoor durability issues, but in reality, there are nuanced pitfalls even seasoned deck builders encounter. A prevalent myth is that composite materials require no maintenance—yet, without proper installation and design, even the best composites can warp, fade, or develop mold. For example, many overlook the importance of proper ventilation beneath decks, which can trap moisture and lead to rot in wooden substructures. This is a common mistake that undermines the very low-maintenance reputation of composite decks. Advanced challenges also arise when integrating stairs into outdoor spaces; novice builders often underestimate the importance of precise framing and weatherproofing, leading to wobbling or creaking stairs over time.
How Do Hidden Installation Errors Impact Long-Term Performance?
These subtle errors, such as improper fastener spacing or inadequate flashing, can cause failures that are invisible initially but become evident after a few seasons. Experts emphasize that meticulous attention to detail in flashing and sealant application is crucial to prevent moisture intrusion—something that many DIYers dismiss or overlook. According to a study by the Wood Preservation Research Group, moisture-related issues account for over 65% of deck failures within five years, even in composite installations when poorly executed. This highlights that understanding the intricacies of advanced installation practices is essential for a long-lasting outdoor living setup. Ready to go beyond the basics? Check out this guide on seamless transitions and stair integration to elevate your project. Have you ever fallen into this trap? Let me know in the comments.
Keeping It Working: Tools I Recommend for Deck Maintenance and Building
Maintaining your outdoor living space, especially a composite deck and its associated stairs, requires precise and reliable tools. Over the years, I’ve honed a toolkit that ensures longevity, safety, and aesthetic appeal. The first staple is a high-quality cordless drill, like the Makita XFD10Z, which offers the power and battery life needed for removing old fasteners, installing new ones, or securing protective flashing. Its variable speed and bit accuracy make all tasks smoother and more controlled, preventing damage to delicate composite surfaces.
For measuring and ensuring perfect fit, I rely on a laser distance measurer, the Bosch GLM 50 C. Its precision helps in custom-cutting flashing components and verifying dimensions, especially when working on seamless transitions in stairs and railings. Accurate measurements are crucial; I’ve seen minor errors escalate into water infiltration issues, as improper flashing or mismatched gaps can lead to moisture buildup behind the siding—a leading cause of rot in decks, as discussed in this comprehensive guide.
Safe and secure fastenings are non-negotiable. I prefer stainless steel impact drivers paired with corrosion-resistant fasteners, like Simpson Strong-Tie SDWS screws. These ensure that structural elements like stairs and joists remain sturdy despite the outdoor elements, and they resist rust that can compromise long-term safety. Proper fastening also plays a critical role in preventing wobble or creakiness over time, which DIYers often overlook.
Sealing and flashing require specific hand tools, such as a quality caulking gun and metal snips. For sealant, I choose a high-quality exterior-grade polyurethane, which remains flexible and adheres well to composite and siding materials. The metal snips must be sharp and comfortable to handle since precise cuts improve the flashing’s fit and water resistance. During installation, I recommend applying sealant along the top edge of flashing to prevent water intrusion, a preventive measure that can save you costly repairs—something I learned the hard way.
As for long-term results, I stay ahead by periodically inspecting my deck’s flashing, fasteners, and caulk joints. A digital inspection camera, like the Hikvision DS-2CV2A21G0-IRE, allows me to peek behind siding or under the deck surface without dismantling everything. Regular checks help catch early signs of water ingress or corrosion, keeping the deck safe and functional for years to come.
Looking into the future, I believe automation and smart sensors will play a bigger role in maintenance. Imagine using moisture sensors connected to your smartphone, alerting you when water begins seeping in or when fasteners loosen—making upkeep even more efficient. For now, though, combining these tried-and-true tools with consistent inspection routines is the best way to keep your outdoor structures in top shape.
How do I maintain my decking and stairs over time?
One proven method is scheduling seasonal inspections, focusing on flashings, fasteners, and caulking joints. I also recommend reapplying sealant on flashing edges every few years to maintain their waterproof barrier. For stairs specifically, checking for wobbling or creaking and tightening fasteners can prevent accidents and prolong the life of the structure. Experiment with applying liquid flashing products, which are increasingly popular for sealing tricky areas—an advanced technique I suggest trying to enhance your deck’s durability. Remember, using the right tools makes all the difference; a quality impact driver and proper sealants are investments that pay off by reducing repair costs and extending your outdoor space’s life. Want to see how integrating these tools can elevate your project? Visit this detailed guide for expert tips on seamless transitions and stair craftsmanship.
What I Wish I Knew About DIY Decks from the Start
One of my biggest lightbulb moments was realizing that overlooking small details like proper flashing and fastener placement could lead to significant rot and safety issues down the line. I used to think that a quick project wouldn’t require perfection, but now I understand that meticulous planning and implementation are the keys to lasting outdoor spaces.
Another lesson was about the importance of quality tools and materials. Investing in a good impact driver and durable sealants saved me headaches and costly repairs later. Skimping on quality is tempting initially, but it often results in double the effort and expense down the road, especially in composite decking where precision matters greatly.
The most eye-opening revelation was how seemingly minor mistakes during installation—like misaligned flashing or insufficient sealing—could cause water intrusion and rot in hidden areas. This underscored for me that proactive, detailed workmanship truly makes all the difference in outdoor living projects.
Comments are closed.