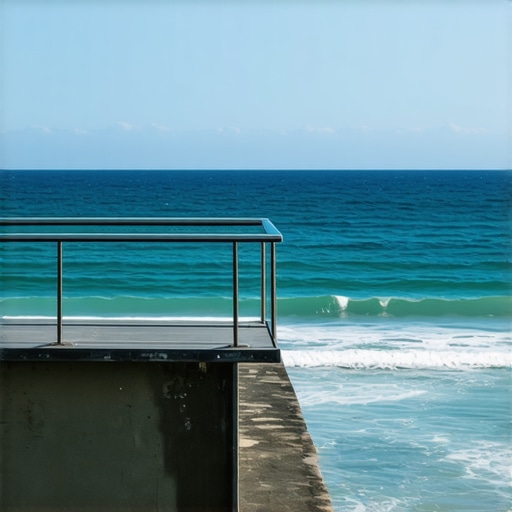
It was a sun-soaked summer afternoon when I finally looked out at my deck—and saw the damage. Rust spots creeping along the steel posts, paint bubbling up from the salty air, and my once-pristine rails now looking tired and worn. That’s when I realized I’d made a mistake choosing traditional materials for my outdoor space. If you’re living by the coast, you know the struggle all too well: saltwater air isn’t just a nuisance; it’s a relentless destroyer of outdoor fixtures.
The Coastal Challenge: Why Traditional Railings Just Don’t Cut It
Saltwater air is like a slow poison for many building materials. Ordinary steel, untreated wood, and even some composite options tend to succumb quickly, leading to costly repairs and a constant cycle of maintenance. Trust me, I’ve been there. Early on, I made the mistake of assuming that standard painted steel or wood would withstand the coastal environment. The reality? They rust, rot, or warp—fast. It was only after replacing my railing twice within a few years that I started exploring more durable options better suited for salty conditions.
What I needed was something that could stand tall against the salty breeze without demanding constant upkeep. That’s when I discovered aluminum railings—an elegant, practical solution designed precisely for harsh environments like ours.
The Biggest Skepticism: Is Aluminum Really Worth It?
I get it—some folks worry that aluminum is just too fragile or not aesthetically appealing. It’s a common misconception. Early in my research, I too wondered if aluminum could match the strength and style of traditional materials. To be honest, I also worried about long-term corrosion, even though aluminum is known for its resistance.
One crucial mistake I made in my initial planning was overlooking the fact that aluminum alloys used in outdoor railings are specially treated to prevent corrosion, even in saltwater exposure. According to the Metal Materials Industry Association, aluminum forms a natural, protective oxide layer that shields it from corrosion—an essential feature for coastal living (source: https://www.metalindustry.org). That gray, shiny appearance I once dismissed actually makes for a sleek, modern look that can effortlessly complement any outdoor aesthetic.
Over the years, I’ve learned that investing in aluminum railings isn’t just a matter of style—it’s about peace of mind. If you’ve faced similar struggles with rust and rot, you might be wondering if there’s a better way. Spoiler: There is—and I’ll show you how to choose the right material and get it installed for lasting beauty and durability.
Choose the Right Aluminum Railing System
Start by selecting a high-quality aluminum railing designed specifically for saltwater exposure. Look for powder-coated finishes that resist chipping and corrosion. I once visited a supplier and examined multiple samples—those with thicker coats lasted much longer without corrosion.
Prepare Your Deck Frame
Ensure your deck framing is solid and level. Using a transit level, verify the surface is even; uneven decks can cause railing misalignment. I used shims and a leveler to correct a slight slope, preventing wobbling and ensuring safety.
Mark Post Locations Accurately
Measure and mark where each post will sit, typically spacing them every 6 to 8 feet for stability. Double-check measurements, especially on curved or irregular patterns. I once missed a mark, which resulted in a crooked installation that I had to fix later.
Drill Foundation Holes Carefully
Using a hammer drill with a masonry bit, drill holes into the concrete footings or surface. Insert expansion anchors into these holes. I made sure to keep the drill perpendicular to prevent I misplaced the drill angle, causing anchors to become loose over time.
Mount the Aluminum Posts
Attach the posts to the anchors with stainless steel bolts. Use a torque wrench to tighten all connections uniformly. I strategically tightened bolts in a crisscross pattern, much like tightening lug nuts on a car wheel, ensuring an even fit.
Install the Top and Bottom Rails
Slide the horizontal rails into the posts or fasten them with brackets, depending on your system. Use a level to ensure horizontality. During my install, I temporarily left some bolts loose until I confirmed all rails were perfectly aligned.
Secure Curtain and Baluster Components
Attach the balusters or infill panels, making sure they are fixed tightly and evenly. I used a spacer tool to maintain uniform gaps, which improved the overall polished look.
Finish with Protective Coatings
Apply a corrosion-resistant sealant or touch-up paint on any exposed fasteners or cut edges. This last step extends the lifespan of your railings significantly. I applied a marine-grade sealant, observing how it repelled salt spray during a summer storm.
Test Durability and Safety
Once installed, test the stability by applying gentle pressure on the panels and top rails. Ensure no wobble or looseness exists. I tested mine and was pleased with the sturdy, rust-free feel—ready for years of coastal enjoyment.
If you want professional assistance or personalized design advice, consider consulting a [deck expert](https://deckdesignbuild.com/contact-us). Remember, correct installation is crucial for safety and longevity, especially in salty environments where materials face constant stress.
 When it comes to designing outdoor living spaces, many homeowners assume that choosing the right materials and layouts is straightforward. But in my experience, one of the biggest pitfalls is relying on popular myths that can lead to costly mistakes. Let’s dig deeper into some overlooked nuances that differentiate amateur projects from professional, enduring outdoor environments.
A widespread misconception is that all composite decking is equal in quality and durability. Many assume that a lower-cost brand will suffice, but the reality is that not all composites handle UV exposure, temperature fluctuations, and salt spray equally well. Experts in outdoor construction emphasize that selecting an advanced, UV-resistant, and mineral-core composite significantly extends the lifespan of your deck. For example, knowing how to choose the right composite can save you from frequent repairs.
Another common mistake involves stair design. Homeowners often ignore the importance of proper stringer support and tread depth, leading to unstable or unsafe stairs. Interestingly, the advanced concept of perimeter framing and steel brackets can dramatically enhance stability, especially in high-traffic areas or elevated decks. If you’re considering a staircase upgrade, see how professional stair design tips can make a difference.
A key misconception is that installing stairs is a simple DIY task. In reality, miscalculating the exact stair-rise or using improper fasteners can cause wobbling, creaking, and even safety hazards over time. An advanced approach involves precise measurement of a non-level ground surface and integrating steel brackets for long-term stability. Never underestimate the importance of proper planning—see how accurate stair calculations are crucial.
Let’s also address the myth that larger, multi-level decks are inherently more challenging to maintain. While they can be complex, understanding the nuances of framing and drainage systems is essential. Sometimes, the overlooked factor is proper ledger flashing and gutter design, which can prevent rot and water damage in multi-level assemblies. For comprehensive guidance, explore cost considerations and design tips.
Lastly, many forget that the success of outdoor improvements depends on engaging with professionals who understand these subtle yet critical details. A skilled deck builder isn’t just about assembly—they strategize with an eye for detail that alternatives like DIY or inexperienced contractors often miss. If you want to elevate your outdoor space with confidence, consider consulting a qualified expert who can help you avoid these common pitfalls. Have you ever fallen into this trap? Let me know in the comments.Maintaining your outdoor deck, especially one built with composite decking and other modern materials, requires more than just periodic cleaning. Having the right tools and adopting strategic methods can significantly extend the lifespan and aesthetic appeal of your investment. A key component of keeping your deck working is understanding the specialized equipment that ensures efficiency and precision. For instance, I personally rely on a cordless impact driver, such as the Milwaukee M18 Fuel, because its high torque and lightweight design make installing fasteners in tight or awkward spots much easier, reducing fatigue during longer projects. For sealing and touch-ups, I use a high-quality sprayer like the Wagner Control Spray Max, which provides uniform coverage on coatings and sealants, minimizing drips and overspray.
When dealing with stairs, precision is paramount. I recommend employing a digital angle finder like the Instagrammable Bosch Digital Levels, which helps verify that stair stringers and treads are perfectly aligned. This gadget minimizes errors and ensures compliance with safety standards laid out in guidelines such as those found in professional stair design resources. Keeping your tools sharp and well-maintained also plays a crucial role; dull blades or worn-out bits can cause uneven cuts and fastener stripping, leading to long-term structural issues.
Investing in a quality drill bit set aimed at composite materials, for example, the DeWalt Titanium Pilot Point set, helps prevent cracking or chipping on durable surfaces. Additionally, incorporating a moisture meter like the Extech MO290 allows me to check the moisture content of wood or composite surfaces before applying coatings, ensuring adhesion and durability over time.
As we look to the future, automation and smart tools are gaining prominence. Imagine using robotic device systems for precise, repeatable cuts or applying sealants automatically. These innovations promise to reduce labor costs and enhance consistency, making long-term maintenance more manageable.
How do I keep my outdoor deck tools effective over time?
Regularly cleaning and lubricating your tools with appropriate oils prevents rust and keeps them performing at their best. Storing equipment in a dry, organized space also reduces wear and tear. For power tools exposed to salty air, applying a corrosion inhibitor like Boeshield T-9 can prolong their lifespan significantly.
One tip I highly recommend is establishing a maintenance routine that aligns with seasonal changes. For example, before winter, inspecting fasteners and sealing gaps with a high-quality exterior caulk can prevent water infiltration and freeze-thaw damage. Don’t forget to revisit your deck’s drainage systems periodically to ensure water flows away efficiently, which is vital for composites and wooden structures alike. Using a professional-grade pressure washer with adjustable settings allows for a thorough but gentle cleaning that preserves surface integrity, especially on composite boards prone to surface damage from harsh abrasives.
Finally, consider consulting a deck maintenance expert for personalized advice tailored to your specific setup. Taking this proactive approach not only saves money in repairs but also ensures your outdoor living spaces remain stunning and safe for years to come. Why not try out a moisture meter or upgrade to a smart impact driver this season? Little investments like these can make a big difference in your maintenance routine.
Lessons the Salt Taught Me About Durability
One of the most eye-opening lessons I learned was that temporary fixes are tempting but costly in the long run. When I first installed my deck railing with standard materials, I underestimated the relentless power of salt air—leading to rust, warping, and repainting within a few seasons. It taught me that choosing the right materials, like high-quality aluminum with proper coatings, is an investment in peace of mind rather than just aesthetics. Now, I always remind myself that the true value lies in preemptive durability rather than reactive repairs.
Another unexpected revelation was how a small detail—like the type of fasteners—can dramatically influence longevity. Using stainless steel bolts instead of regular steel or coated fasteners made my aluminum railing setup withstand years of salty exposure without corrosion or loosening. It’s these little insights that save time and money later, reinforcing the importance of methodical planning over quick fixes.
I also discovered that embracing modern technology—such as powder-coated finishes and corrosion-resistant alloys—turns out to be a game-changer. Previously, I assumed that traditional finishes would suffice; now, I understand that advanced coatings form a vital barrier against the salty environment. Adopting these innovations ensures your outdoor spaces remain pristine and safe for family gatherings year after year.
Tools and Resources That Keep My Deck Stunning
A well-maintained deck starts with the right tools. I swear by my impact driver, specifically a model like the Milwaukee M18 Fuel, for installing fasteners swiftly and securely—saving my hands and reducing installation time. To ensure precise measurements, I rely on a digital level, which is especially useful when aligning rails and stairs correctly, preventing wobbling or misalignments.
For cleaning and sealing, I recommend a marine-grade sealant application tool—like the Wagner Control Spray Max—which provides even coverage on complex surfaces, prolonging the life of your aluminum railings. Another essential resource I use is the Extech MO290 moisture meter. Checking moisture levels before sealing or painting helps avoid adhesion issues, which can compromise the protective layers over time. These tools aren’t just accessories—they’re critical investments in maintaining the integrity of your outdoor environment.
Lastly, keep an eye on online guides and expert blogs, such as those from trusted deck builders, to stay updated on trends and techniques. Regularly consulting these resources ensures you’re always employing the most effective methods, turning your outdoor space into a durable, beautiful retreat.
Your Next Move Starts Today
Transforming your coastal outdoor space into a sanctuary requires more than just choosing durable materials—it’s about adopting a mindset of proactive care and expert-informed decisions. With the right knowledge, proper tools, and a little patience, you can create an outdoor oasis that withstands the test of salty air and time. Remember, every step you take today lays the foundation for a worry-free outdoor living experience tomorrow.
Which part of your outdoor project do you feel needs an upgrade or a fresh approach? Share your thoughts below—I’d love to hear your stories and insights on building lasting beauty in coastal environments!
,
Comments are closed.