It was a sunny Saturday afternoon when I finally looked out at my neglected backyard deck and realized I’d been putting off upgrades for too long. The paint was peeling, the stairs creaked under every step, and frankly, it was more of a safety hazard than a welcoming outdoor oasis. That lightbulb moment hit me hard—I needed a change, and fast. Have you ever faced that sudden realization, staring at your outdoor space, wishing it could be both stunning and safe?
Transforming Outdoor Living: Why the Right Deck and Stairs Matter
In my journey to upgrade my backyard, I learned that choosing the right materials and design isn’t just about aesthetics—it’s about durability, safety, and creating an inviting atmosphere. A well-designed composite deck combined with seamless stairs can totally change the vibe of your outdoor area. Plus, with the latest trends in 2024, there’s never been a better time to elevate your space without breaking the bank. Did you know that investing in durable materials like composite decking can extend the lifespan of your outdoor structures by up to 25 years, saving you money in the long run? (Source: [Decking Trends 2025](https://deckdesignbuild.com/composite-decking-trends-2025-the-ultimate-guide-for-outdoor-enthusiasts))
Is Composite Decking Really Worth the Hype?
Early in my project, I made the mistake of choosing cheaper, low-quality composite boards, thinking they’d save me money. Turns out, they warped and faded much faster than I expected, forcing me to re-do parts of the deck sooner than I’d hoped. That experience taught me that not all composite decking is created equal. To get it right, you need to understand what makes some options better than others and how professional guidance can help you avoid costly mistakes. Want to learn how to pick resilient materials and design features that actually last? Stick around, because I’ll be sharing the secrets I wish I knew when I started.
Select the Right Materials for Lasting Durability
Begin by choosing high-quality composite decking; think of this like picking the strongest bricks for a wall—your deck’s foundation must withstand weather and wear. I learned this firsthand when I impulsively bought cheaper boards, which warped quickly, forcing me into costly repairs. Instead, I researched reputable brands and found options with UV resistance and low maintenance, like those detailed in this guide. Pay attention to core density and surface finish, which influence lifespan and appearance.
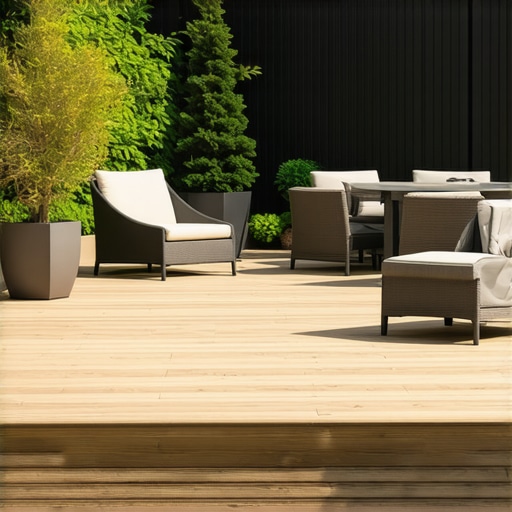
Design for Safety and Style
Plan your deck layout with accessibility in mind—consider wider stairs and railings that meet safety standards. Sketch your design, mocking up dimensions; it’s like drafting blueprints before construction. When I designed my stairs, I opted for a gentle slope with uniform step heights, inspired by professional advice. This prevented tripping hazards and added visual harmony. Use software or even simple graph paper to visualize and tweak your plan. Consistency in stair height and depth is critical, like building a staircase that feels natural underfoot.
Prepare Your Site and Frame Properly
Clear the area of debris and set a level foundation; think of this as laying a sturdy bed for your deck. Use stakes and string to outline your perimeter, ensuring precise measurements. When I built mine, I marked the perimeter and checked levels repeatedly, because a crooked deck looks amateurish and can be unsafe. Frame with pressure-treated lumber designed for outdoor use; it acts like a skeleton ensuring stability. Anchoring posts into concrete footings prevents shifting or sinking—think of this as securing the backbone of your project.
Build the Frame and Attach the Decking
Install the frame beams first, spacing joists according to manufacturer specs, usually 16-24 inches apart. Attach these securely with galvanized screws to prevent rust. When laying the composite planks, leave a small gap (about a quarter-inch) between boards for drainage—otherwise, water pooling can cause warping. I used spacers to maintain even gaps, ensuring proper airflow. For a seamless look, stagger joints or align patterns, and screw down the boards tightly. Remember, a solid foundation results in a deck that stays beautiful over years.
Install the Stairs with Attention to Detail
Cut stringers precisely using a template or calculations to match your step height and run. Think of stringers as the ‘spine’ of your stairs—must be straight and sturdy. Secure them into the framing and ensure they’re level. Then, attach treads and risers, using composite-specific fasteners. I chose a stylish yet functional design inspired by expert tips, which added elegance. Finish with handrails for safety and aesthetic appeal. Keep in mind that precise measurements and level placement are vital—mistakes here can make the whole staircase unstable.
Finishing Touches and Safety Checks
Sand rough edges and apply non-slip coatings if needed. Inspect all fasteners to ensure they’re tight and flush, preventing trip hazards. Before using your deck, test stability by walking on it and shaking the handrails—think of this as a safety rehearsal. My experience showed me that meticulous finishing prevents future issues and prolongs the life of your outdoor space.
While many DIY enthusiasts and even some professional builders focus on the basics of choosing materials and style, there’s a deeper layer of understanding often overlooked—one that can make or break the longevity and safety of your outdoor space. A common myth is that selecting the most popular composite decking brand guarantees lasting quality, but in reality, nuances such as core density and UV stability are critical factors. For example, not all composite boards are resistant to the same level of UV degradation; some fade faster, leading to an uneven appearance over time, a mistake that can be costly. Recognizing these subtleties requires a seasoned eye and thorough research, as detailed in the comprehensive trend guide for 2025. Moreover, many overlook the importance of professional guidance when designing stairs; a slight miscalculation in stringer cuts or rail height can result in significant safety hazards. Advanced installers consider not only the standard code compliance but also the ergonomic flow, moisture drainage, and future wear patterns—factors that laypeople typically miss. One frequently underestimated aspect is the importance of incorporating seamless transitions between different outdoor elements, which can subtly influence both aesthetics and safety, as this article emphasizes. Remember, shortcuts in understanding these nuanced details might save money initially but could lead to expensive repairs or safety issues later on. To truly master outdoor living, you need to delve into these hidden layers of design and materials, ensuring your project not only looks stunning but endures. Have you ever fallen into this trap? Let me know in the comments.To keep your outdoor living space looking pristine and functioning safely over the years, the right tools and maintenance routine are critical. I personally rely on a combination of professional-grade power equipment and meticulous inspection practices to ensure longevity. A high-quality cordless drill with interchangeable bits is indispensable for tightening fasteners and replacing damaged boards efficiently. I prefer a cordless model from Makita because of its lightweight design and long-lasting battery life, which makes those regular checks and adjustments less of a chore. Regular cleaning is essential to prevent mold, mildew, and dirt buildup that can accelerate material degradation.
For cleaning composite decking, I recommend using a gentle pressure washer with a maximum of 1500 PSI to avoid damaging the surface. Pair this with biodegradable cleaning solutions designed for composite materials to lift grime without compromising the finish. Personally, I incorporate a soft-bristle brush and a spray nozzle with adjustable pressure for stubborn stains—avoiding harsh chemicals ensures the deck stays looking newer longer. It’s also vital to inspect the screws, fasteners, and railings periodically, tightening anything that feels loose and replacing corroded hardware, which can affect both safety and aesthetics.
Advanced maintenance tools like moisture meters can be game-changers. I use a pin-style moisture meter before sealing or staining to assess whether the wood or composite has absorbed enough treatments, ensuring long-lasting results. These devices are highly accurate and help prevent issues like rot or warping before they start. Incorporating a multi-tool with oscillating blades is also helpful for minor repairs—like fixing warped boards or removing old caulking—saving both time and money.
Looking ahead, I believe automation and smart maintenance systems will become more integrated into outdoor living setups. Sensors that monitor humidity, temperature, and structural integrity could alert homeowners to potential issues before they escalate, leading to fewer surprises and more peace of mind. For those serious about long-term results, I recommend adopting a scheduled inspection and cleaning routine, supplemented with high-quality tools. For example, regularly checking for moisture infiltration with a calibrated device can preempt structural damage, as noted in technical guidelines from industry experts.
Why not try incorporating a moisture meter into your routine? It’s a surprisingly affordable upgrade that can significantly extend your deck’s lifespan. For more comprehensive guidance, you can explore advanced strategies through etailed professional resources or consult with a seasoned deck builder to tailor a maintenance plan that suits your space. Regular upkeep, combined with the right tools, will ensure your outdoor area remains a stunning, safe retreat for years to come.
What I Wish I Knew When Starting Out with My Deck Project
The biggest lesson I learned was the importance of meticulous planning, especially when it comes to measuring and designing stairs. Rushing through these steps can lead to safety hazards or extra costs down the line. I also discovered that not all composite decking brands are created equal; investing in high-quality, UV-resistant materials pays off with a longer lifespan and better appearance. Additionally, leaning on professional guidance early on helped me avoid common pitfalls and get the aesthetic I envisioned. Lastly, understanding the hidden nuances—like proper drainage and seamless transitions—can make your outdoor space both stunning and durable, turning your vision into reality with fewer surprises.
Tools and Resources That Transformed My Outdoor Living Makeover
For anyone eager to undertake a deck and stairs upgrade, I recommend: comprehensive outdoor living guides that offer step-by-step advice, which kept me on track. A high-quality cordless drill from Makita became my best friend for quick assembly and adjustments, while a pin-style moisture meter helped me assess the health of materials before sealing. For design inspiration, browsing through 2025 outdoor living ideas sparked new creativity. Lastly, consulting detailed tutorials and professional tips from trusted sources ensured my project was not only beautiful but safe and long-lasting.
Here’s Your Chance to Start Transforming Your Outdoor Oasis
Turning your outdoor space into a stunning, safe retreat is entirely within reach—you just need the right mindset and resources. Dive into the wealth of information available, choose quality materials, and don’t be afraid to seek expert advice. Remember, every great outdoor living space begins with a single step—so take yours today and enjoy the process of creating your personal haven. Your dream deck and stairs are closer than you think, and the satisfaction of crafting something durable and beautiful is truly rewarding.