It was a scorching summer afternoon when I finally realized I had made a crucial mistake in my backyard oasis project. My small deck, which I envisioned as a peaceful retreat, already looked cluttered and uninspired within just a few weeks. Frustrated, I questioned whether I had chosen the right materials, the best layout, or even the proper lighting. That moment of clarity sparked my passion for creating a cozy nook that truly fit my space and lifestyle. If you’ve ever faced the dilemma of turning a tiny outdoor area into a welcoming haven, you’re in the right place. Today, I promise to guide you through the steps I wish I had known from the start—so you can craft a comfortable, stylish outdoor retreat without the overwhelming trial-and-error.
Why Turning a Small Backyard Deck Into a Cozy Nook Matters More Than Ever
In our fast-paced world, outdoor spaces have become essential escapes. Yet, many of us underestimate the importance of carefully designing a small deck that balances beauty, comfort, and functionality. According to a 2023 survey by the National Association of Home Builders, the demand for smaller, well-designed outdoor spaces has surged by over 35% in recent years. This trend reflects a growing appreciation for the benefits of outdoor living—reducing stress, fostering connections, and increasing our home’s overall charm.
Initially, I overlooked the importance of selecting the right [composite decking](https://deckdesignbuild.com/choosing-the-right-composite-decking-for-durable-low-maintenance-outdoor-areas), thinking that any decking would suffice. I spent hours fussing over furniture placement and lighting, only to find that the space felt cramped and uninviting. That was my big mistake—thinking that aesthetics could override the fundamentals of design and materials. Once I aligned my choices with tried-and-true principles, I saw transformation happen almost instantly.
If your small deck isn’t living up to its potential, you’re not alone. Many homeowners struggle with limited space, uneven surfaces, or simply not knowing where to start. The good news is that with a bit of guidance and some practical tips, you can turn that tight corner of your yard into a cozy sanctuary. Imagine a spot where you can unwind after work, sip morning coffee, or entertain friends—without feeling overwhelmed by the size.
Next, we’ll dive into essential design strategies, including how to choose comfortable and durable materials, create visual cohesion, and incorporate practical features that maximize your outdoor oasis. Whether you have a tiny corner or a narrow strip, these tips will help you craft an inviting nook you’ll love spending time in.
Select the Perfect Materials for Comfort and Durability
Start by choosing the right decking material. I recommend opting for composite decking because it offers low maintenance and durability. When I built my own deck, I selected a mineral core composite that stays cool underfoot and resists water damage, significantly reducing future repairs.
Match Your Decking with Your Style
Picking a texture and color that complement your home’s exterior makes a huge difference. I chose a textured, warmer-tone board that visually warmed my space and made it more inviting. Remember, a cohesive look helps to stretch even the smallest area visually. Be cautious about choosing boards that are too shiny or too dark, as they can cause glare or heat retention.
Design Functional and Safe Stairs
Safe stairs are the backbone of an accessible outdoor space. I used guidelines from this expert resource to ensure my stairs were secure, uniform, and easy to navigate. Measure the rise and run carefully; I used a laser level to guarantee precision, which eliminated my previous worries about uneven steps. Incorporate sturdy handrails at standard heights, and consider installing lighting for safety at night.
Cut Costs and Time with Hidden Fasteners
Instead of traditional nails, I opted for hidden fasteners, which create a sleek look and prevent nails from popping up over time. If you’re new to installation, I suggest practicing on a scrap piece first. When I first tried this, I found it a bit messy, but using an electric screw gun and following the correct depth settings gave a professional finish. This technique also minimizes damage to the boards, extending their lifespan.
Create Visual Cohesion with Proper Layout
In my project, I laid out my boards parallel to the house wall, which visually expanded the space. Use spacers to ensure consistent gaps—about 1/8 inch—allowing for temperature expansion and contraction. I ran into a challenge when some boards warped during installation, but I learned to pre-drill holes and leave gaps to accommodate shifting. To make your deck feel larger, keep colors consistent and avoid overly busy patterns.
Optimize Space with Multi-Functional Elements
I incorporated built-in seating along the perimeter, made from the same composite boards, to maximize seating without cluttering the space. Adding a narrow privacy screen also created a cozy enclosure without closing off the area completely. When designing these features, consider using lightweight materials for easy adjustment and future modifications.
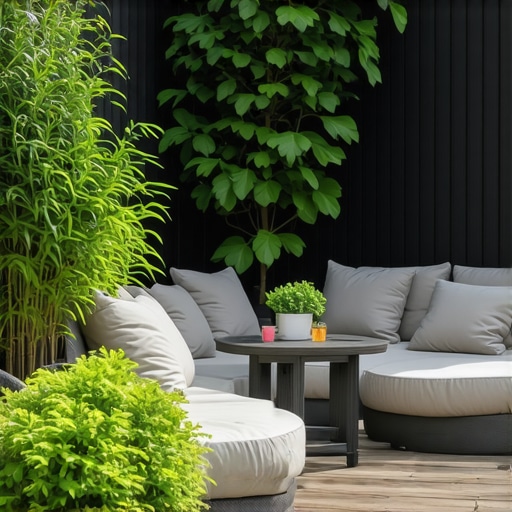
Enhance Comfort with Thoughtful Accessories
Finally, adding weatherproof lighting, potted plants, and textiles turned my bare deck into a welcoming retreat. I chose outdoor-rated lighting that is energy-efficient and safe. Be mindful of placement; for example, solar stake lights along the stairs increased safety without electrical work. Decor your deck with cushions and rugs suited for outdoor use to tie everything together and inject personality into your space.
When designing outdoor living spaces, many enthusiasts focus on the aesthetics and initial material selection but often miss subtle, yet critical details that can make or break the long-term success of their project. One common misconception is that all staircases are created equal—many assume that following basic code requirements suffices. However, overlooking nuanced factors like proper flashing techniques or the choice of structural supports can lead to premature rot, wobbling, or safety hazards. For example, **many fail to realize** that integrating proper *flashing at stair stringers* is essential to prevent water infiltration and decay, especially in high-humidity climates. According to a study published by the American Wood Protection Association, improper flashing is a leading contributor to deck and stair deterioration, emphasizing the importance of meticulous waterproofing techniques—more than just adding a surface layer of paint or sealant.
Moreover, there’s a stubborn myth that composite decking can stand alone without adequate ventilation or substructure considerations. In reality, composites—while low maintenance—still require precise *spacing* and *support* to prevent warping and absorb thermal expansion safely. Many **homeowners get caught** by the misconception that composite boards are entirely maintenance-free; in truth, improper installation, such as neglecting the recommended *spacer gaps*, can cause boards to buckle or develop unsightly gaps over time.
Advanced deck builders recognize the significance of these details, particularly when working with high-performance products like mineral core or capped-polymer composites. These materials have specific requirements that, if neglected, can undermine their durability benefits. For instance, choosing the right composite means understanding not just color and texture, but also their expansion coefficients and ideal fastening methods to minimize static charging or warping.
So, what’s the subtle but most often ignored detail in outdoor stair design that could save your project from future disasters? It’s the careful integration of drainage solutions combined with correct framing techniques. Ensuring that water is directed away from joints and supports can dramatically extend the lifespan of your deck and stairs, even in the toughest climates.
**Have you ever fallen into this trap? Let me know in the comments.** For those eager to go beyond basic installation, I recommend consulting this expert guide on stair safety and style nuances. Remember, paying attention to these micro-details ensures your outdoor space remains a haven for years to come and keeps safety top priority.Maintaining your outdoor living spaces, especially decks and stairs, requires precision, the right tools, and a bit of know-how. Over the years, I’ve refined my toolkit to ensure every component—be it composite decking or safety features—remains durable and visually appealing. Investing in specialized equipment not only saves time but also ensures safety and longevity for your project.
One indispensable tool I rely on is the **laser level**. Unlike traditional bubble levels, laser levels provide a precise, continuous horizontal or vertical line across multiple points. For example, when installing stairs or aligning the deck boards, I set my laser to ensure perfect evenness and avoid issues like uneven risers or warped planks. If you’re aiming for professional-grade results, I recommend the **Bosch GSL 2 Professional Self-Leveling Cross-Line Laser**, which offers accuracy within 1/8 inch over 30 feet and is robust enough for outdoor conditions.
Another must-have is a high-quality **power screwdriver with adjustable torque**. Composite decking often requires multiple fastenings, and using the right settings prevents splitting the boards or driving screws too deep. I prefer the **DeWalt DCF887 Impact Driver**, which allows me to set the torque precisely and switch bits easily. Proper fastener installation, especially with hidden fasteners, ensures a clean finish and reduces the risk of boards squeaking or lifting.
For cleaning and long-term maintenance, I swear by a **pressure washer with variable spray settings**. Regular power washing removes dirt, algae, and moss that can cause slippery surfaces or promote rot. However, I always use a low-pressure setting for composite decking—as high pressure can damage the surface. The **Kärcher K5 Premium** model offers adjustable pressure control and several nozzle options, making it versatile and safe for delicate materials.
In terms of **moisture management**, I incorporate a **moisture meter** during inspections. This device helps me identify hidden areas with excessive moisture that could lead to decay or mold. I’ve found the **Extech MO257** to be both affordable and sensitive enough to detect subtle changes in wood or composite states, enabling proactive repairs.
Looking ahead, the trend in deck maintenance points toward **smart, sensor-based systems**. These setups can monitor moisture levels, UV exposure, and structural shifts in real-time, providing alerts before minor issues become major problems. Integrating such technology can save you thousands in repairs and extend the lifespan of your decks.
**How do I maintain my stairs or composite decking over time?** Regular inspections are key. Check fasteners and look for signs of warping or cracking at least twice a year. Clean surfaces annually with a gentle pressure wash and sealing or coating—if applicable—to preserve appearance. For composite decking, monitoring for static charging and addressing it with anti-static sprays can keep the surface comfortable, especially during hot months.
Don’t overlook the importance of using the correct tools and techniques—they’re your best defense against costly repairs and safety hazards. I highly encourage you to try out the laser level for your next alignment project; the precision it offers is worth every penny. For more detailed tips on safety and component support, consider reviewing the **designing safe and stylish stairs** guide, which offers insights on waterproofing and structural integrity. Remember, maintaining your outdoor space isn’t just about fixing problems—it’s about extending enjoyment and safety for years to come.
What I Wish I Knew Before Building My First Deck
In my early days of outdoor construction, I underestimated the importance of meticulous planning and overlooked small but crucial details like proper flashing and support spacing. These oversights taught me that even minor mistakes could lead to significant safety and longevity issues down the line. The lightbulb moment came when I faced costly repairs due to water infiltration, making me realize that mastering these micro-details is essential for a durable deck.
How Proper Support and Ventilation Saved My Deck from Early Decay
Installing adequate support beams and ensuring proper ventilation might seem like basic steps, but neglecting them can cause warping, mold, and rot—especially in humid climates. I learned to incorporate double joists and strategic spacing, which significantly extended my deck’s lifespan. These lessons highlighted that investing in structural integrity and airflow isn’t just for safety, but also for peace of mind.
My Go-To Tools for Flawless Deck and Stair Work
The right tools make all the difference. I rely heavily on a laser level to achieve perfectly aligned boards and a power screwdriver for precise fastening. Additionally, a moisture meter helps me detect hidden dampness before it becomes a problem. Trust me, equipping yourself with quality tools like these is a game-changer when creating an outdoor space that stands the test of time.
Resources That Elevated My Deck Building Skills
Over the years, I’ve leaned on a few key resources: composite decking guides to pick materials that endure, and stair safety resources to ensure secure and stylish access points. These references have helped me avoid common pitfalls and elevate my craft consistently.
Embracing the Future of Outdoor Deck Construction
The landscape of outdoor living continues to evolve, with innovations like smart moisture sensors and weather-resistant materials shaping how we build and maintain decks. I encourage you to stay curious and open to adopting new technology and techniques—they can dramatically improve durability and your enjoyment of outdoor spaces. Remember, building a deck isn’t just about aesthetics; it’s about creating a safe, lasting retreat that nurtures your love for outdoor living.
Have you ever overlooked a tiny detail that ended up causing major issues in your outdoor project? Share your story in the comments below—I’d love to hear how micro-details transformed your deck experience.
,