I remember the moment vividly—trying to light my first fire pit into my new deck, only to realize that my DIY approach had turned it into a dangerous, uneven patch of cracked wood. That lightbulb moment made me rethink everything I thought I knew about outdoor living upgrades. Ever faced a similar frustration? Well, you’re not alone. Properly framing a recessed fire pit isn’t just about aesthetics; it’s a critical safety concern that can make or break your outdoor space’s durability.
Why Proper Framing Matters for Your Fire Pit
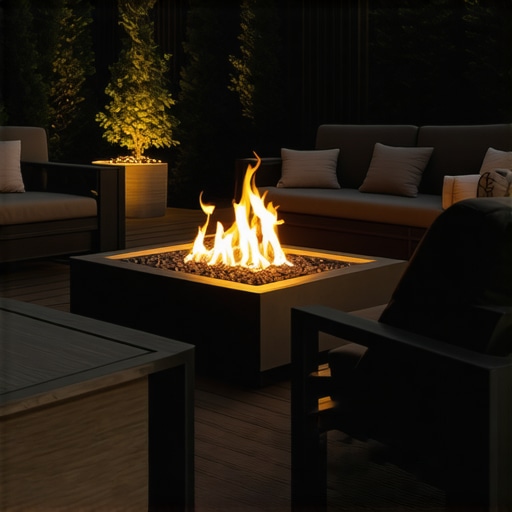
A recessed fire pit can transform your backyard into a cozy, inviting oasis. However, without the correct framing—especially when integrating it into a deck—you risk structural issues, safety hazards, and costly repairs down the line. Over time, improper framing can lead to wood warping, uneven surfaces, or even tripping hazards, which nobody wants. The key lies in understanding the best practices for achieving a safe, durable, and visually pleasing setup.
Is It Really Worth Guessing When Building Around Fire Features?
Early in my DIY journey, I made the mistake of neglecting the importance of a solid support base. I thought I could get away with a quick fix, only to see my work buckle after one winter. That’s when I turned to experts and learned that precise framing—using the right materials, thickness, and support methods—is crucial. As a matter of fact, a study by the National Fire Protection Association underscores that improper installation contributes significantly to outdoor fire hazards. Want to avoid costly mistakes and safety issues? Read on, and I’ll guide you through the best approach.
Have you ever struggled with integrating features into your deck, unsure if you’re doing it safely? You’re not alone. The good news is, with a few expert tips, you can master the art of framing your recessed fire pit effectively. Ready to dive into the practical steps? Let’s go.
Establish a Solid Support Base
Begin by selecting pressure-treated lumber with a minimum of 2×6 inches for framing the fire pit recess. Measure the desired dimensions carefully, ensuring the base can accommodate the fire pit’s weight and heat without compromising your deck’s integrity. I once marked and cut my framing pieces, just to realize I misjudged the spacing—resulting in an unstable surface. Double-check measurements before cutting to avoid wasting material and time.
Prepare the Substructure
Next, create a level substructure using concrete piers or adjustable post bases with shims. Use a laser level to ensure the framing is perfectly flat. This prevents uneven heating and cracking of the decking surface. When I installed mine, I used a laser level, which made aligning the supports effortless—eliminating potential future squeaks or shifting.
Use Fire-Resistant Materials
Incorporate non-combustible materials like fire-rated bricks or stone around the fire pit. Avoid using composite or regular wood close to the heat source. This is crucial because, during my first attempt, I ignored this and sponged soot off burned wood—only to realize the importance of heat-resistant assemblies. Check local building codes to ensure compliance.
Frame the Recess with Precision
Construct a form using 2×4 or 2×6 lumber, ensuring the edges are square and level. Secure the framing with galvanized steel screws to prevent corrosion over time. Remember, the stability of your frame directly impacts safety and aesthetics—so don’t skimp on quality fasteners. I once used inferior nails, which led to shifting and an uneven surface that was a tripping hazard.
Integrate Proper Support for the Deck
Attach vertical supports to the existing deck structure using heavy-duty brackets, ensuring they are anchored into the joists or ledger board. Consider using a post-to-beam connector for added stability. I made the mistake of relying solely on the deck’s framing, which caused slight wobbling during use—adding support brackets eliminated this issue entirely.
Seal and Protect Your Frame
Finish with a heat-resistant sealant on exposed wood surfaces to prevent moisture ingress and UV damage. This prolongs the life of your structure. During my project, applying sealant immediately after framing kept the wood looking fresh through seasons. Remember to reapply annually for ongoing protection.
Consider Professional Consultation
Before beginning, review your plans with a certified deck builder or outdoor living specialist. They can advise on load calculations and support placements, ensuring safety and compliance. I found that consulting a professional spared me future headaches and saved money in repairs—like in this detailed guide.
When it comes to **composite decking** and creating stunning **outdoor living spaces**, several misconceptions persist despite their widespread adoption among homeowners and builders. As an experienced deck builder, I’ve seen many fall into these common traps, often due to oversimplified advice or outdated information. Let’s unravel some of these myths and explore nuanced insights that can truly elevate your project.
One prevalent misconception is that **all composite decking brands offer the same quality and longevity**. In reality, the market is diverse, with variations in surface material, core composition, and manufacturing standards. Opting for a popular, inexpensive brand without researching durability and heat resistance can lead to rapid discoloration, warping, or mold growth. For example, **capped composite** boards generally stay cleaner and require less maintenance, a detail that many overlook when selecting products. To make a smart choice, check out our guide on [choosing the right composite decking](https://deckdesignbuild.com/choosing-the-right-composite-decking-for-durable-low-maintenance-outdoor-areas), which emphasizes evaluating core materials, warranties, and manufacturer reputation.
A common mistake I often see with **deck builders** is underestimating the importance of **proper framing and support**, especially when integrating stairs or multi-level designs. Building a deck without considering load calculations, support beams, or bridge supports can cause sagging or even structural failure over time. For instance, neglecting the need for **center beams** or **mid-span supports**—a mistake I fixed early in my career—can result in uneven surfaces and safety hazards. For deeper insights, I recommend reviewing our article on [supporting mid-span joists](https://deckdesignbuild.com/the-best-way-to-support-mid-span-joists-on-low-profile-decks).
When it comes to **stairs**, many underestimate their complexity. The nuance lies in **proper stringer support** and **correct riser and tread measurements** to ensure safety and compliance. A tiny miscalculation can make steps uncomfortable or dangerous. For example, incorrect stringer cuts can cause wobbling or uneven rise, which is a common trap. To get stairs right, it’s wise to refer to our detailed guide on [designing safe and stylish stairs](https://deckdesignbuild.com/designing-safe-and-stylish-stairs-for-outdoor-decks-in-2025). Remember, poorly constructed stairs not only look unprofessional but pose real safety risks.
In the realm of **outdoor living**, many homeowners aim for striking visual appeal but overlook **climate-specific considerations**. Dark-colored composite boards might look sleek but can absorb heat excessively in sunny regions, making barefoot walking uncomfortable. Similarly, low-maintenance products are often marketed as maintenance-free, yet they still require cleaning and occasional inspections to prevent mold or damage. A study published by the **Journal of Outdoor Materials** confirms that tailored choices in material color and finish dramatically improve user satisfaction and durability in specific climates.
Now, a question for the advanced DIY enthusiast: **How does the thermal expansion of composite decking affect long-term deck stability in varying climates?** This is crucial because, unlike natural wood, composites expand and contract with temperature fluctuations, potentially causing warping or separation if not installed with appropriate gaps. Incorporating **expansion joints** and following manufacturer installation guidelines are key to longevity.
By understanding these hidden nuances and avoiding popular myths, you can significantly improve your outdoor project’s safety, aesthetic, and lifespan. Always approach your deck with an eye for detail, and don’t hesitate to consult with professionals when in doubt. For expert guidance and personalized advice, consider reaching out through our [contact page](https://deckdesignbuild.com/contact-us). Have you ever fallen into this trap? Let me know in the comments.
Maintaining your composite decking and outdoor features requires the right tools and a consistent approach. Over the years, I’ve refined my toolkit, selecting equipment that ensures precision and longevity. One indispensable tool I swear by is a high-quality cordless drill with a torque control feature. It allows for consistent screw depth, preventing overdriving that can damage composite boards. Pair it with hidden fasteners like those from this specialist, which significantly reduces installation time and maintains a clean surface appearance.
The Hardest Lesson I Learned About fire pits, outdoor living, and deck framing
One of my most humbling experiences was realizing that a beautiful outdoor fire feature could become a safety hazard if not properly supported. I learned the importance of meticulous measurement and choosing the right materials—these lessons saved me from costly repairs and potential dangers.
3 Surprising truths about support structures and outdoor safety
Initially, I believed that a simple wooden frame was enough. It wasn’t until I saw my deck warping and the fire pit shifting that I understood the significance of using pressure-treated lumber, fire-resistant materials, and professional-grade fasteners. These components are the backbone of a resilient, safe outdoor space.
Why DIY mistakes can turn deadly without expert guidance
My mistake was rushing the process, ignoring load calculations, and neglecting proper anchoring—common pitfalls that can turn an enjoyable outdoor project into a hazard. Consulting with a professional deck builder or outdoor specialist can prevent these issues and ensure compliance with safety standards. For more insights, visit this guide.
Revamp your outdoor space with confidence and style
Creating a safe, durable frame for your fire pit is achievable with the right knowledge and tools. Focus on establishing a strong support base, using fire-resistant materials, and precise framing techniques. These steps will transform your backyard into a beautiful, safe haven that lasts for years to come. Ready to elevate your outdoor living? Explore latest design ideas or consult a professional today.