I remember the day I decided to upgrade my outdoor space. I was eager to create a stunning deck that would become our family’s favorite hangout spot. But as I started designing the stairs, I hit a snag. The slope of my yard was uneven, and I wanted a staircase that was both functional and beautiful, with a mid-point landing for safety and style. Turns out, I had no clue where to begin. The more I researched, the more overwhelmed I felt—there seemed to be countless design options and safety codes to consider. Honestly, I felt like giving up before I even started.
Why a Well-Designed Staircase Transforms Your Outdoor Living Experience
Designing your deck stairs might seem like a straightforward task, but the reality is that a poorly planned staircase can turn into a safety hazard or a visual eyesore. I’ve learned that the key isn’t just in making it tall enough or wide enough but in understanding how the staircase flows naturally with your landscape and deck layout. That mid-point landing, for example, can serve as a resting spot, a transition point, or even a decorative element if planned correctly. Proper design ensures your stairs are safe, durable, and visually appealing, boosting your home’s value and your outdoor enjoyment.
Are You Frustrated by the Lack of Clear Guidance?
If you’ve ever felt lost staring at blueprints or puzzled by conflicting advice, you’re not alone. Early in my journey, I made a rookie mistake: I ignored the importance of precise measurements and overlooked local building codes. This led to extra costs and delays, which could have been preventable with better planning. A skilled deck builder or designer knows how to navigate these pitfalls, and I’ll show you how to avoid my mistakes and approach your project with confidence.
Now, let’s explore how to create a staircase that perfectly fits your yard and matches your aesthetic preferences. Ready to turn your deck dreams into reality? Keep reading, and I’ll guide you through each step of designing a stunning, code-compliant staircase with a mid-point landing that will impress your family and neighbors alike.
,
Measure Precisely to Fit Your Yard
Start by taking accurate measurements of your yard’s slope and the intended deck height. Use a long level and tape measure, much like a painter uses a brush to ensure even strokes. In my experience, rushing this step leads to uneven stairs. I once skipped measuring the slope carefully and ended up with a staircase that was too steep, causing safety concerns. Double-check your measurements from multiple points to account for irregularities.
Calculate Riser and Tread Dimensions for Comfort
Next, determine the riser height and tread depth. A common standard is a 7-inch riser with a 11-inch tread. To keep stairs comfortable and code-compliant, add up the riser height times the number of steps to match your total deck height. I recall building a set where I misjudged the riser height, resulting in a staircase that felt like climbing stairs at a stadium. Use a framing square or a riser template to mark consistent dimensions on your stringers.
Cut and Assemble Stringers Accurately
Use the calculations to cut stringers with a circular saw or reciprocating saw, following a framing square or a jig. Think of stringers as the backbone of your stairs; precision here is critical. I once saw a neighbor’s stairs wobble because their stringers were uneven from rough cuts. To prevent this, I marked each cut carefully, double-checked measurements, and tested fit before assembly. Remember, the stringers will support the entire staircase, so any mistake can compromise safety.
Plan the Mid-Point Landing for Safety and Style
Design the landing to be at a comfortable height, typically aligned with door thresholds and accessible from the yard. Frame it with additional stringers or blocking for stability. I once integrated a landing mid-staircase to serve as a resting spot during my project, which also added aesthetic appeal. The landing not only improves safety for steep slopes but also becomes a natural transition, seamlessly connecting your outdoor space.

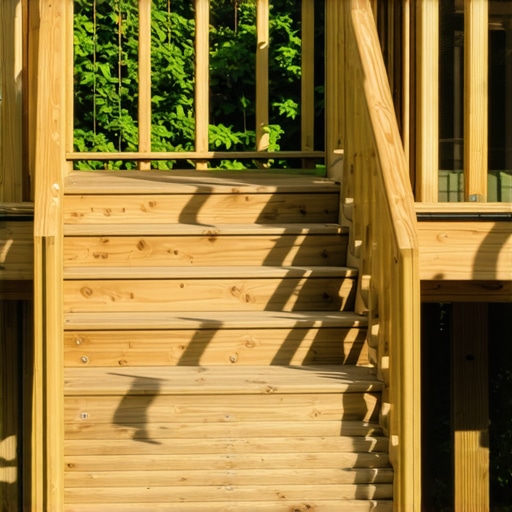
This image illustrates properly measuring for stringer cuts, showcasing how to align your measurements with the slope for safe stairs. Accurate measurement techniques help prevent costly mistakes and ensure your stairs are sturdy and compliant with local codes.
Install Treads Securely with Hidden Fasteners
Attach composite treads using hidden fasteners for a clean look. Pre-drilling holes and using appropriate fasteners like stainless steel screws prevents warping or squeaks. I learned this the hard way after my first DIY attempt—rattling stairs all night. By switching to quality fasteners and following manufacturer guidelines, I achieved a quieter, more durable finish. Proper fastening distributes weight evenly, reducing the risk of loose boards over time.
Navigate Building Codes for Durability and Safety
Consult your local building codes early in the planning process to ensure your design passes inspection and is safe for use. Codes specify maximum riser heights, minimum tread depths, and handrail requirements. I once ignored a regulation about handrail height, which led to revisions after inspection, delaying my project. Familiarize yourself with guidelines available at [designing safe and stylish stairs for outdoor decks in 2025](https://deckdesignbuild.com/designing-safe-and-stylish-stairs-for-outdoor-decks-in-2025). This diligence pays off by saving time and avoiding costly rework.
Finish with Style and Function
Sand and seal the wood or composite surface to prevent splinters and weather damage. Adding lights along the stairs enhances safety at night. My experience includes installing low-voltage LED lights in stair risers, which creates a welcoming ambiance while illuminating each step—combining safety with aesthetics seamlessly. Choose materials and finishes that complement your deck design for a cohesive outdoor living area.
Many DIY enthusiasts and even seasoned homeowners assume that choosing the right composite decking material is all about color selection, maintenance, and cost. However, a nuanced understanding reveals that the *installation process* often holds the key to long-term satisfaction. For instance, overlooking proper support spacing and drainage considerations can lead to premature warping or rot, no matter how high-quality the boards are. This is where even experts can slip up if they’re not vigilant—according to a study by the Power Magazine, improper decking support can reduce lifespan by up to 30%. So, let’s discuss the subtle factors that influence durability and appearance in outdoor living projects.
Contrary to popular belief, composite decking isn’t completely maintenance-free. Many believe that its stain-resistant and weatherproof coatings mean no upkeep is needed. Still, neglecting regular cleaning or failing to inspect for and address minor damage can result in mold build-up or surface degradation over time. In my experience, homeowners often forget that debris accumulation between boards can trap moisture, accelerating deterioration. Using a gentle brush and warm soapy water periodically maintains surface integrity, aligning with professional advice for extending decking life. This nuance underscores the importance of proactive upkeep, even with low-maintenance materials.
How does the terrain influence composite decking longevity?
One advanced aspect often overlooked is how your yard’s inherent slope and ground stability impact your deck’s performance. Installing a deck on uneven or poorly prepared ground can cause flexing or shifting, leading to gaps or structural stress. A study from the Journal of Civil Engineering emphasizes that proper foundation support is critical—what many call ‘support spacing’ or ‘beam alignment’ can make or break your project. For example, reinforcing footings and leveling supports prevent sagging and uneven surface, maintaining aesthetic appeal and safety. These nuances demand careful planning, especially for multi-level decks or stairs, to avoid what I call the ‘hidden trap’ of ground instability.
One common myth I’d like to dispel is the idea that composite decking integrates seamlessly with existing structures without additional framing. In reality, mismatched heights or unsupported joists can cause squeaks, uneven surfaces, or worse, structural failure. Consulting with a professional deck builder ensures your design accounts for these subtle details, resulting in a durable, visually pleasing outdoor space. Remember, the devil is in the details, and ignoring them often leads to costly repairs or replacements down the line.
Have you ever fallen into this trap? Let me know in the comments. For more insights on elevating your outdoor living area, check out creating seamless transitions and how they enhance both form and function in your project.
Creating a durable and beautiful outdoor living area doesn’t end with installing your deck; ongoing maintenance and the right tools are essential to keep it in top shape over the years. From specialized cleaning equipment to measurement technology, choosing the right gear can make your upkeep routine more manageable and effective.
Invest in Quality Power Tools for Precision and Efficiency
I personally swear by a high-quality cordless impact driver. Its versatility streamlines fastening and disassembly tasks, especially when securing hidden fasteners or adjusting deck components. Pair it with a compact orbital sander for periodic surface refinishing; a smooth, splinter-free surface not only looks better but also enhances safety. A good reciprocating saw, fitted with fine-tooth blades, simplifies cutting replacement boards or trimming framing components without causing damage.
Use Specific Cleaning Equipment to Preserve Your Deck
For routine cleaning, I rely on a soft-bristle deck brush and a garden hose with adjustable pressure. Avoid high-pressure washers that can dislodge composite coatings or cause surface gouges; instead, a gentle scrub combined with a mild soap (like trisodium phosphate) removes debris and mildew effectively. For stubborn stains, a manufacturer-recommended composite cleaner ensures longevity without damaging your material. regularly inspecting and gently cleaning your deck prevents mold build-up and maintains resale value.
Leverage Technology for Accurate Maintenance
Laser distance meters have revolutionized my approach to measuring and troubleshooting deck issues. They enable quick, precise readings of uneven slopes, beam span limitations, or support positioning, reducing manual errors. With accurate measurements, you can adjust support posts or joist spacing before problems escalate, extending your deck’s lifespan. As composite trends evolve, integration of smart sensors and moisture detectors is on the horizon, potentially warning homeowners of rot or moisture issues before visible signs occur.
How do I keep my outdoor space functioning well over time?
Consistency is key. Regularly inspect for loose fasteners, signs of warping, or drainage issues. Maintain your deck’s drainage system to prevent standing water, which can lead to mold and mildew. Use appropriate fasteners and sealants—consulting this resource helps in selecting long-lasting hardware. Don’t forget to revisit your local building codes periodically; updates may introduce new requirements that enhance safety and performance. Embrace modern tools like moisture meters and protective coatings to stay ahead of potential problems, making your outdoor oasis a long-term retreat.
Finally, I recommend trying out a high-end laser measuring device during your next project assessment. Its precision can reveal subtle sloping inconsistencies or support misalignments that might otherwise go unnoticed. Incorporating this tech into your routine might not seem essential now, but it pays dividends in durability and safety. Ready to elevate your maintenance game? Dive into advanced tools and see the difference it makes in your outdoor living experience!
The Hidden Pitfalls No One Tells You
One of the biggest lessons I learned was that every yard’s terrain can surprise you. Even seemingly simple measurements can hide complex slopes that, if overlooked, lead to unstable stairs or expensive fixes. It’s easy to assume your ground is level until you start digging in. This realization pushed me to be meticulous—taking multiple measurements and investing in quality tools. If you’re planning similar projects, remember that patience and precision are your best friends in avoiding unseen issues.
Tools That Turn DIY Mistakes into Masterpieces
Over time, I discovered that having the right power tools made a world of difference. I never regret upgrading my impact driver or investing in a laser distance meter. These tools not only save time but also minimize errors, especially when cutting stringers or supporting beams. Embracing technology helps you build confidently and ensures safety—imagine knowing you’ve got every measurement spot-on before making the cut. For DIYers serious about quality, these tools are game-changers and well worth the investment.
Why Learning From Every Step Matters
Looking back, I realize that each decision—big or small—layered up to a final result that I’m proud of. Making mistakes with riser heights or misaligning support beams taught me to pause and double-check. This mindset of continuous learning simplified future projects and boosted my confidence. If you’re embarking on your outdoor staircase project, remember that each misstep refines your skills, leading you to create something both stunning and safe. Every little lesson adds up to a lifetime of outdoor joy.
Where to Dive Deeper Into Expert Advice
If you’re hungry for more insights, I highly recommend exploring resources like creating seamless transitions to enhance your understanding of aesthetic flow, or checking out the latest in staircase safety and style for 2025. These guides provide in-depth advice that can help you avoid common pitfalls and push your project from functional to fabulous. Sharing your journey and seeking out such expert resources accelerates your growth as a confident DIYer or dedicated homeowner.
Step Up and Make Your Outdoors Shine
Remember, every great outdoor space starts with a bold step—literally. The satisfaction of building your stairs and seeing them become a central, functional feature of your yard is unparalleled. It’s not just about aesthetics; it’s about creating a safe, inviting environment where memories are made. So, why wait? Bring your outdoor dreams to life with care, patience, and a willingness to learn. Your perfect staircase—and the unforgettable outdoor living experience that comes with it—is within reach. Are you ready to transform your yard into the oasis you envision? Let me know your biggest challenge in the comments below, and let’s tackle it together.