I vividly remember the sinking feeling when my DIY deck stairs failed inspection on move-in day. All that hard work, the countless weekends spent measuring, cutting, and assembling—down the drain because of a simple mistake I overlooked. It wasn’t a structural failure or shoddy materials. No, it was something much more subtle yet deadly: the fundamental understanding of how loads transfer through the stairs. That lightbulb moment hit me hard: most DIYers, myself included early on, miss a crucial reason why our stairs aren’t just falling apart—they’re failing inspection and risking safety.
Why Your DIY Deck Stairs Might Be a Safety Hazard (Even If They Look Fine)
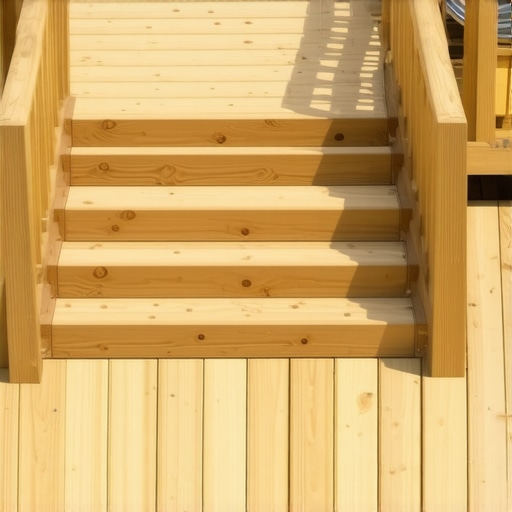
Let’s be honest: building stairs for your outdoor space isn’t just about making something look good. It’s about ensuring safety, durability, and compliance with local building codes. From my experience, many hobbyists focus on the aesthetic and neglect the underlying structural principles. This oversight often leads to stairs that wobble, crack, or worse—fail inspection and pose real safety risks.
But what is the most common mistake that trips up DIY builders? It’s often rooted in misunderstanding load distribution and the importance of proper framing. You see, each step, riser, and stringer must work together harmoniously to support weight—not just your weight when stepping but also additional loads like furniture, snow, or even heavy foot traffic.
Interestingly, according to structural engineering experts, improper load transfer is the leading cause of deck stair failure and safety violations (source: [The Structural Reason Most DIY Deck Stairs Fail Inspection](https://deckdesignbuild.com/the-structural-fix-for-a-deck-that-shakes-when-you-walk)). Early mistakes I made included ignoring span limits for joists and improperly anchoring stringers, which contributed to instability over time.
Are you facing the chaos of uneven, creaky stairs? Or worse, have you had your project scrutinized and found it wanting? If so, you’re not alone, and there’s a solution. In the upcoming sections, I’ll walk you through the actual steps to build stairs that are not just beautiful but meet inspection standards, ensuring safety and peace of mind. Let’s get started on making your outdoor living dreams a safe reality.
Start with Precise Planning and Measurement
Before you pick up any tools, carefully measure your staircase area. Use a tape measure to determine total rise and run, ensuring your stairs will fit comfortably and meet code. Remember, consistent riser height makes a big difference in safety and comfort. I once skipped this step, leading to uneven steps that required rework, wasting time and materials.
Choose the Right Materials for Strength and Longevity
Select high-quality, pressure-treated lumber or composite materials suited for outdoor use. I recommend using capped composite decking for treads because it resists moisture and staining. Head over to this guide to help pick the best materials. Using inferior wood or composites can lead to warping or rot, compromising safety over time.
Build a Solid Frame Foundation
Cut and Assemble Stringers Carefully
Accurately cut stringers to match your riser height and tread depth. Use a framing square and a circular saw to ensure precise angles. I once used a makeshift jig, which resulted in uneven cuts; replacing the stringers was frustrating but necessary to ensure stability. For consistent results, double-check your measurements and test-fit before fastening.
Use Proper Support and Anchor Points
Securely attach stringers to the ledger board and footings with galvanized hardware. Level each stringer with shims to prevent wobbling. I always use leveling shims under each post—it’s a small step that prevents unevenness later. Proper anchoring ensures your stairs can support expected loads without shifting or collapsing.
Ensure Load Transfer and Structural Integrity
Distribute weight evenly across the entire structure. Use cross-bracing where necessary, and double-check that all connections are tight. Remember, each component works together to transfer loads properly. I once overlooked diagonal bracing, which caused wobbling under load; adding bracing afterward stabilized the stairs significantly.
Install Treads and Risers Carefully
Lay out your treads and risers, paying attention to overhangs and gaps. Fasten each securely using corrosion-resistant screws. For composite decking, follow recommended spacing to allow expansion and contraction, which prevents buckling. Proper fastening is crucial; loose screws can make steps feel unsafe and creaky.
Finish with Final Checks and Code Compliance
Measure all riser heights and tread depths again, ensuring consistency within local code limits (commonly 7-1/4 to 7-3/4 inches for risers). Check that handrails are installed at the proper height and secure. Never skip this step; I once had a stair rail fail inspection because I overlooked height requirements.
By meticulously following these steps, you ensure your deck stairs are not only safe but also comply with building codes. Remember, structural integrity depends on precise measurements, quality materials, and solid workmanship. For inspiration on elevating your outdoor space further, visit top stair designs. For more detailed tips and professional assistance, consider consulting a qualified deck builder through this contact page.
Many DIY enthusiasts believe that choosing the most expensive composite decking guarantees durability and low maintenance, but in reality, not all brands perform equally well under the same conditions. It’s a misconception that all composite materials are created equal—understanding the nuances, such as cap layer quality and mineral core technology, can make a significant difference in longevity and appearance.
Why Do Some Decks Fail Despite Using Premium Materials?
Most people overlook the importance of proper installation techniques, which are critical for maximizing the lifespan of composite decking. Even high-end boards can deteriorate prematurely if not installed correctly, especially concerning fastener placement and support spacing. Expert studies show that improper support intervals and fastener choices can lead to warping, squeaking, and visible damage within a few years (source: The Structural Mistakes That Lead to Deck Failure). It’s also a common myth that composite decking never needs maintenance; in fact, neglecting periodic cleaning and inspections can promote mold growth and discoloration, making the deck look aged faster. When planning your outdoor living project, consider professional guidance from experienced deck builders to avoid these tricky pitfalls. Their expertise can help you select the right materials and ensure correct installation, which is crucial for long-term durability. Don’t fall into the trap of assuming that cheaper options or DIY shortcuts won’t cost you more in repairs or replacements later—investing in quality and professional craftsmanship pays off. For inspiration and expert tips on how to elevate your outdoor space, visit top stairs designs or transforming your garden into a retreat. Remember, understanding these hidden nuances and myths can save you time, money, and headaches—so always do your homework before building or updating your deck.
Tools I Recommend for Lasting Outdoor Creations
Maintaining a deck or outdoor living space requires precise tools that deliver professional results. I personally rely on a high-quality cordless impact driver, such as the Milwaukee M18 Fuel, because it provides consistent torque for fastening composite boards securely without stripping screws. Additionally, a digital angle finder ensures your stairs and framing are perfectly aligned, preventing uneven steps that can cause safety issues. For cleaning, I swear by a pressure washer with adjustable PSI—around 1500 to 2000—to remove dirt and mold without damaging surfaces. Using specialized nozzles allows me to target grime more effectively while preserving the deck’s material integrity.
Essential Maintenance Techniques for Long-Term Results
Staying proactive with your deck’s upkeep extends its lifespan significantly. Regular inspections for loose fasteners and damaged boards can prevent small issues from turning into costly repairs. I recommend developing a routine cleaning schedule, at least bi-annually, using a deck-specific cleaner like Defy Wood Cleaner, which breaks down mold and stains without harsh chemicals. Applying a protective sealer designed for composite decks every 2-3 years helps maintain its appearance and prevents moisture intrusion that can cause rot at support points. Remember, addressing minor problems early keeps your outdoor space safe and visually appealing for years to come.
How do I maintain my outdoor stairs and ensure safety over time?
To keep your outdoor stairs safe and compliant with codes, check the riser and tread measurements periodically; minor deviations can become hazards. Tighten or replace loose fasteners and consider installing anti-slip treads on high-traffic steps to enhance safety, especially in damp weather. For long-term durability, I also recommend sealing the edges of composite boards to reduce water ingress that causes warping or mold growth. Engaging with a professional builder periodically for an assessment—like those found through contacting experts—can provide valuable insights. For specific tools that make these ongoing maintenance routines easier, investing in a cordless detail sander helps smooth out any rough spots or splintered edges, especially on stairs. Make these practices part of your routine, and you’ll enjoy a safe, beautiful outdoor space for many seasons.
Lessons That Changed My Approach to Building Outdoor Stairs
One of the most eye-opening lessons I learned was how subtle misunderstandings in load transfer can lead to significant safety issues. I once thought that simply following a checklist would ensure quality, but real-world experience revealed the importance of understanding how each component supports the other, especially under unexpected loads. Another revelation was that even premium materials can fail if installation techniques aren’t meticulous—attention to detail in fastening and support spacing is vital. Lastly, I discovered that ongoing maintenance isn’t just about appearance but about catching potential problems early, which can save costly repairs and keep your stairs safe for years. These insights have profoundly influenced my approach, making me more cautious, informed, and confident in my outdoor projects.
Key Tools and Resources That Elevate My Work
My toolbox wouldn’t be complete without a high-quality cordless impact driver like the Milwaukee M18 Fuel, which ensures secure fastening without damaging materials. For precise measurements and angles, a digital angle finder has been invaluable, helping me maintain accuracy on complex cuts. To keep my decks and stairs looking pristine, I rely on a pressure washer set to around 2000 PSI with adjustable nozzles, allowing me to clean without causing surface damage. Additionally, I trust resources like this guide on composite decking trends to stay updated on the latest materials and installation techniques that stand the test of time. These tools and references form the core of my ongoing commitment to quality outdoor living spaces.
Fuel Your Confidence to Create Stunning Outdoor Stairs
Building safe, durable, and beautiful outdoor stairs is an achievable goal that starts with the right knowledge and mindset. Don’t let fear or doubt hold you back—embrace the learning process, and trust that your efforts will pay off in a space you can enjoy and be proud of. Whether you’re planning a small staircase or a grand entry, every skill you acquire adds to your confidence and capability. Remember, every seasoned builder started exactly where you are now. Take that first step, and watch how your outdoor living space transforms into a showcase of your effort and craftsmanship. Your outdoor stairs can become a testament to what you can create with a bit of knowledge and a lot of passion. Ready to tackle your next project? It all begins with taking that initial step and believing in your ability to make it happen. Have you faced challenges with building or maintaining your outdoor stairs? Share your stories below—I’d love to hear and help if I can.