I vividly remember spending an entire Sunday afternoon wrestling with a stubborn, massive boulder that seemed to mock my every attempt to integrate it into my backyard deck. No matter how carefully I tried to fit the deck boards around its jagged edges, gaps appeared, and the result looked more like a patchwork quilt than a seamless outdoor space. It was a frustrating realization: I hadn’t thought through how to precisely scribe my deck boards around such heavy landscape features, and it showed.
If you’ve ever faced a similar challenge—whether it’s a hefty boulder, an uneven tree root, or a quirky slope—the struggle to achieve a sleek, professional finish can be daunting. But here’s the good news: With a few tried-and-true techniques, you can confidently scribe deck boards around even the heaviest obstacles, transforming your outdoor project into a work of art.
In this post, I’ll walk you through the essential process of scribing deck boards around irregular landscape features. You’ll learn how to measure accurately, handle stubborn obstacles, and achieve that seamless look that makes your deck stand out. Don’t let these tricky elements intimidate you; instead, see them as opportunities to elevate your craftsmanship and create a truly custom outdoor space.
The Importance of Precise Scribing for a Flawless Finish
Before diving into the step-by-step methods, it’s worth understanding why meticulous scribing matters so much. When deck boards follow the natural contours of your yard or landscape features, it not only looks much more appealing but also prevents issues like gaps, moisture buildup, and premature wear. Accurate scribing ensures the boards sit flush against obstacles, creating a smooth, professional appearance that enhances both safety and aesthetic appeal.
One common mistake I made early on was rushing this process, thinking I could eyeball the fit. That approach often led to uneven edges and the need for costly corrections later. Instead, taking the time to mark, measure, and cut precisely pays off in the end. If you’re interested in how choosing the right materials can make this process smoother, check out [this guide on composite decking materials](https://deckdesignbuild.com/choosing-the-right-composite-decking-for-durable-low-maintenance-outdoor-areas), which highlights options that are easier to work with and more forgiving when fitting around obstacles.
Have you ever faced a difficult landscape feature that seemed impossible to work around? If so, you’re not alone. Many DIYers and pros alike find this part of deck building challenging, but with patience and the right tools, you can master it.
Now, let’s look at how to measure and prepare your deck boards to tackle even the most stubborn obstacles effectively.
Marking and Measuring Precisely
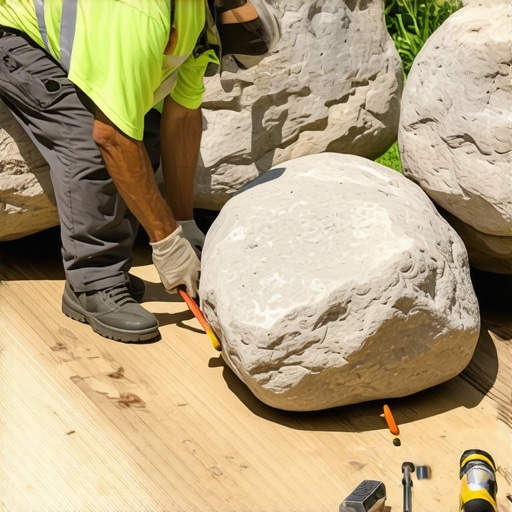
Start by placing your deck board over the obstacle, like your stubborn boulder, and hold it firmly in place. Use a pencil to trace along the edge of the obstacle, ensuring the line follows every contour. When I built my last deck, I used a flexible curve measure to match the boulder’s jagged shape—the result was a perfect template that made cuts much cleaner and minimized waste. Ensure your measurements are tight and accurate, as this will be the foundation of a seamless fit.
Transferring the Pattern to Your Material
Next, transfer your traced outline onto your deck board, which is typically a composite material. If the board is long, consider making a template from scrap material or cardboard first. Clamp the board securely to prevent shifting, then trace your pattern with a pencil. Using a stable surface keeps your lines precise. Remember, precision here saves you time during cutting and results in a more professional appearance. During my last project, I once skipped this step, resulting in a miscut that required rework and delayed installation.
Choosing the Right Cutting Tools
Use a fine-toothed saw or a jigsaw with a carbide blade for curved cuts. A jigsaw offers excellent control when following irregular lines, especially for complex shapes like tree roots or boulders. I prefer a variable-speed jigsaw, which lets me adjust to delicate curves without splintering the composite board. Securing the board with clamps keeps it steady. During my experience, I found that rough cuts with a circular saw often leave splinters or rough edges, making finishing more difficult.
Mastering Curved Cuts for a Seamless Look
When cutting curves, go slow and follow your lines carefully. For tight bends, interpolate the curve with multiple shallow cuts rather than trying to cut in one pass. An analogy I like is carving a sculpture: patience yields a smooth shape. After cutting, always sand the edges with a fine-grit sandpaper to prevent splinters and ensure flush contact with the obstacle, like your boulder or uneven ground. In one instance, I skipped sanding, and the sharp edge caused the deck board to sit unevenly, which I then had to fix later.
Fitting and Fine-Tuning
Place the cut board over the obstacle to assess fit. Use a rasp or fine file to make incremental adjustments to the shape for a snug fit. It’s better to remove small amounts gradually—this prevents overcutting. I once had to re-cut several times before achieving a flush, but patience paid off with a seamless appearance. When fitting, ensure your board sits flush against the obstacle and the adjoining boards for a professional finish.
Securing the Board Properly
Once satisfied with the shape, fasten the board with corrosion-resistant screws or hidden fasteners designed for composite decking. Pre-drilling reduces the risk of splitting and helps maintain accuracy. During my last project, I learned that rushing this step led to loose fit or even cracking the boards, undermining the whole effort. Using spacer tools ensures consistent gaps and alignment, especially important around irregular shapes.
Many homeowners assume that choosing a popular decking material or design ensures the best results, but in my experience, there’s often more beneath the surface. For example, a common myth is that all composite decking is created equal—yet, not all products perform well in high-traffic or harsh weather conditions. Skimping on quality or overlooking specific properties can lead to costly repairs and replacements sooner than expected.
One hidden nuance most overlook is the importance of proper joist spacing and support when installing stairs. Even a slight miscalculation can result in sagging or squeaking over time, especially when dealing with heavy outdoor furniture or frequent foot traffic. An advanced tip is paying attention to the structural integrity beyond just aesthetics. Ensuring your framework is designed with load-bearing capacity in mind prevents issues down the line.
A trap many fall into is choosing stain or paint for composite surfaces. Contrary to popular belief, many standard paints breach warranty and don’t bond well, leading to peeling and discoloration. According to building experts, selecting specialized coatings designed for composite materials extends deck life and maintains appearance. So, do your homework before applying any finishes—what works for wood might ruin your composite.
Have you ever fallen into this trap? Let me know in the comments.
How does joist spacing impact the longevity of decking and stairs?
Ensuring correct joist spacing isn’t just about code compliance; it is vital for durability and safety. For composite decking and stairs, manufacturers often specify optimal spacing (commonly 16 inches on center), but in real-world applications, wider spacing can lead to unwanted flexing or cracking. According to recent industry studies, proper support reduces stress on the boards and prevents early failure, especially in outdoor environments exposed to moisture or temperature swings. Regular inspections and adhering to manufacturer guidelines are key to maintaining a safe, long-lasting deck.Maintaining your outdoor deck and stairs is essential to keep them safe, functional, and visually appealing over the long haul. One of the most effective ways to ensure longevity is investing in the right tools and adopting proven maintenance practices. I personally recommend a few specialized tools and methods that make upkeep more manageable and effective.
First, a **zircon electronic moisture meter** has become a staple in my toolkit. This device helps me monitor moisture levels in joists and framing components, which is critical in preventing rot and decay, especially in areas prone to high humidity or frequent rainfall. Regular moisture readings can reveal hidden issues before they become costly repairs, aligning with advice from experts on [maximizing outdoor space longevity](https://deckdesignbuild.com/maximizing-outdoor-space-inspiring-deck-and-stair-ideas-for-every-budget).
Next, a **maintenance sander with a fine-grit abrasive disc** is invaluable for smoothing out any surface splinters or rough patches that develop over time. I use it annually to keep stair edges and deck surfaces safe, particularly when dealing with composite boards, which can become rough or develop micro-splinters from wear. Keeping surfaces smooth not only enhances aesthetics but also prevents injuries.
For cleaning, I rely on a **high-pressure, low-volume power washer** fitted with a specialized deck cleaning tip. This approach effectively removes dirt, algae, and mold without damaging the composite surface. A gentle, controlled pressure is key—overly aggressive cleaning can cause surface gouges or discoloration, especially on capped composites. For detailed cleaning instructions tailored to durability, check out [this guide on composite decking trends](https://deckdesignbuild.com/composite-decking-trends-2025-the-ultimate-guide-for-outdoor-enthusiasts).
To protect your investment, applying a **high-quality, composite-specific sealant** every few years is wise. I prefer a product recommended by the manufacturer, which I apply with a foam brush to ensure even coverage, particularly on the stair risers where water tends to pool and cause deterioration. Regular maintenance not only preserves the appearance but also reinforces the structural integrity of your deck and stairs.
Looking ahead, the trend in outdoor maintenance tools is leaning towards automation and smart monitoring. Advanced moisture sensors and robotic cleaning systems are entering the market, promising even fewer burdens for homeowners. By integrating these technologies, you’re likely to extend your deck’s lifespan while making upkeep more efficient.
**So, how do I maintain my outdoor stairs and decking over time?** Consistent inspection and cleaning, timely replacement of worn or damaged components, and using the right tools are your best strategies. For instance, mastering a simple yet effective tip—using a moisture meter to catch early signs of decay—can save hundreds in repairs and prevent safety hazards.
To start, I suggest trying out a moisture monitoring device on your deck framing. It’s a proactive step that pays dividends in the long run and aligns with building professionals’ recommendations. If you’d like to learn more about structural support or specific maintenance routines, exploring resources like [creating seamless transitions in stairs](https://deckdesignbuild.com/creating-seamless-transitions-stairs-as-key-elements-in-outdoor-living) can provide additional insights to upgrade your outdoor living space.
The Hidden Lessons That Transformed My Deck Building Journey
One of my most surprising revelations was realizing that each obstacle, like stubborn boulders or uneven slopes, offered an opportunity rather than a setback. I learned that patience and meticulous planning—especially when scribing around irregular features—are key to achieving a truly professional finish. These challenges forced me to develop sharper measurement skills and to understand my materials more intimately, ultimately elevating the quality of my work beyond initial expectations.
I’ve also seen firsthand how underestimating the importance of structural support can lead to long-term issues. Using the right fasteners and support spacing isn’t just about compliance; it’s about creating decks that stand the test of time. This awareness changed my approach to every project, emphasizing quality over speed, and highlighting the value of continuous learning in outdoor construction.
Tools and knowledge that elevate deck craftsmanship
My essential toolkit now includes a **flexible curve measure**, which simplifies tracing complex contours naturally found around landscape features. I trust **composite-specific sealants** for longevity, knowing they protect my work against the elements. A **high-precision moisture meter** has become indispensable, allowing me to catch hidden issues before they escalate, and a **variable-speed jigsaw** ensures clean, accurate cuts for curved and irregular shapes. These tools, combined with my research from trusted resources like [choosing the right composite decking](https://deckdesignbuild.com/choosing-the-right-composite-decking-for-durable-low-maintenance-outdoor-areas), have transformed my approach from trial-and-error to confident craftsmanship.
Your next steps in outdoor living excellence
Building on these lessons and resources, I encourage you to embrace each challenge as an opportunity to improve. Whether you’re scribing around a boulder or installing stairs with perfect riser heights, remember that meticulous work and quality materials forge lasting outdoor spaces. Don’t be afraid to experiment with new tools or techniques—each project offers insight that gets you closer to your ideal outdoor retreat. By applying a thoughtful, detailed approach, you’ll create outdoor living spaces that are as functional as they are beautiful.